

Here is my guide on how to install Puppet on a Linux virtual machine using "Puppet Enterprise — 2019.8 (LTS)".
In this walkthrough I will be using Puppet Enterprise version of Puppet, as it is the long term support (LTS) and latest version Puppet Enterprise. It also gives us a chance to out the full functionality of Puppet for up to 10 nodes with no worries about license keys. So this works for me as I learn how Puppet works.
How to Install Puppet Enterprise on a Linux virtual machine
Step 1 - Create a Virtual Machine with your favourite cloud provider
Create a Virtual Machine with your favourite cloud provider, this may be Amazon Web Services (AWS), Google Cloud platform (GCP), Microsoft Azure, etc.
Step 2 - Download Puppet Enterprise to your Linux virtual machine
Download Puppet Enterprise file that is appropriate to your operating system and architecture. It is currently shared as a tarball file (tarball file is a tar archive - a group of files collected together as one).
Optional, but you can choose to change to the /tmp folder or similar of where you would like to temporary save your Puppet Enterprise installation file.
$ cd /tmp
When you are ready, select the distribution you need. In my example below, I will be using Centos 8 or Ubuntu Server 18.04, we will use the following command:
Centos 8
EL (RHEL, CentOS, Scientific Linux, Oracle Linux) ver. 8 (x86_64)
$ curl -JLO 'https://pm.puppet.com/cgi-bin/download.cgi?dist=el&rel=8&arch=x86_64&ver=latest'
Or you can use the following (which includes variables to allow you to download the latest versions):
$ PE_VERSION=$(curl -s http://versions.puppet.com.s3-website-us-west-2.amazonaws.com/ | tail -n1)
$ PE_SOURCE=puppet-enterprise-${PE_VERSION}-el-8-x86_64
$ DOWNLOAD_URL=https://s3.amazonaws.com/pe-builds/released/${PE_VERSION}/${PE_SOURCE}.tar.gzwget --progress=bar ${DOWNLOAD_URL}

Ubuntu 18.04
Ubuntu ver. 18.04 (amd64)
$ curl -JLO 'https://pm.puppet.com/cgi-bin/download.cgi?dist=ubuntu&rel=18.04&arch=amd64&ver=latest'

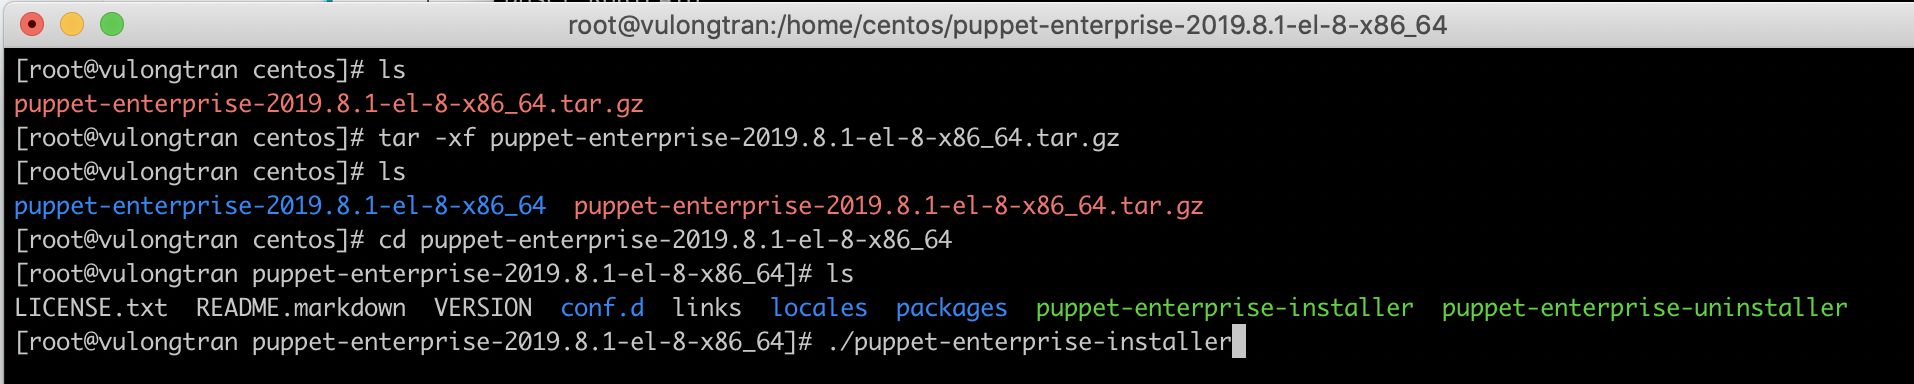
Step 3 - Unpack the Puppet Enterprise file
Unpack the installation tarball. Let's check that it exists and the name of the tarball file and then let's unpack it.
$ lspuppet-enterprise-2019.8.1-el-8-x86_64.tar.gz
$ tar -xf puppet-enterprise-2019.8.1-el-8-x86_64.tar.gz
Let's check that tarball file unpacked okay. You can see a folder created.
$ ls
puppet-enterprise-2019.8.1-el-8-x86_64 puppet-enterprise-2019.8.1-el-8-x86_64.tar.gz

Step 4 - Check that the Puppet Enterprise files are there
From new folder directory that was created when the tarball file was unpacked, let change to that folder and check that the Puppet Enterprise files are there. Then install the Puppet Enterprise installer file.
$ cd puppet-enterprise-2019.8.1-el-8-x86_64$ lsLICENSE.txt README.markdown VERSION conf.d links locales packages puppet-enterprise-installer puppet-enterprise-uninstaller
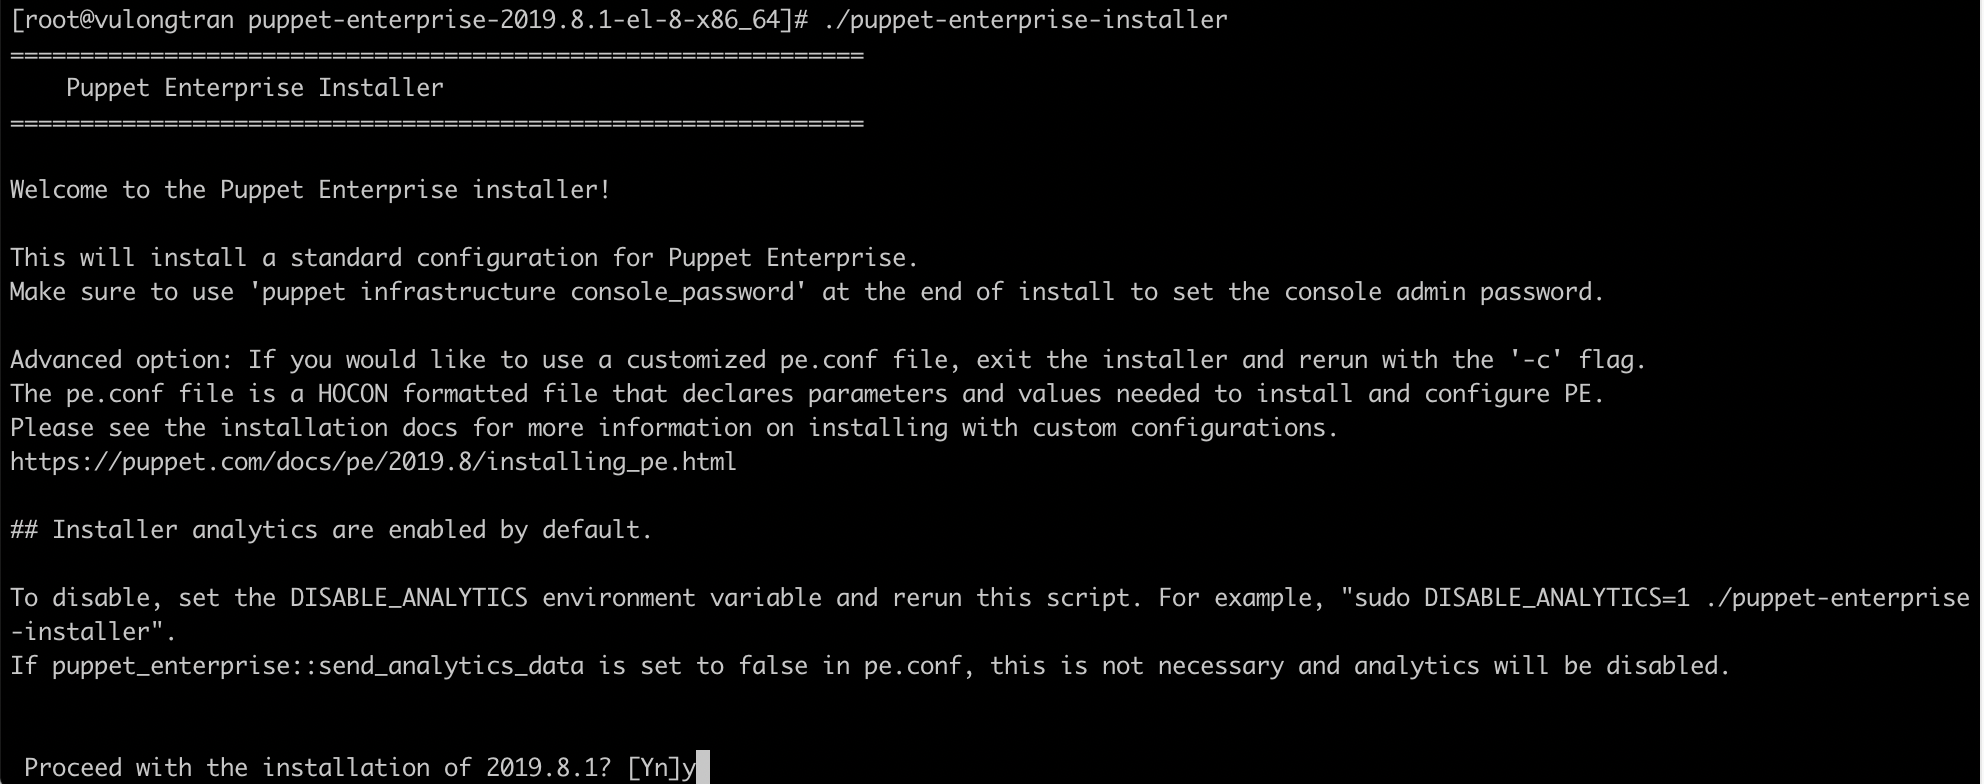
Step 5 - Run the Puppet Enterprise installer
When you're ready, run the Puppet Enterprise installer.
$ ./puppet-enterprise-installer

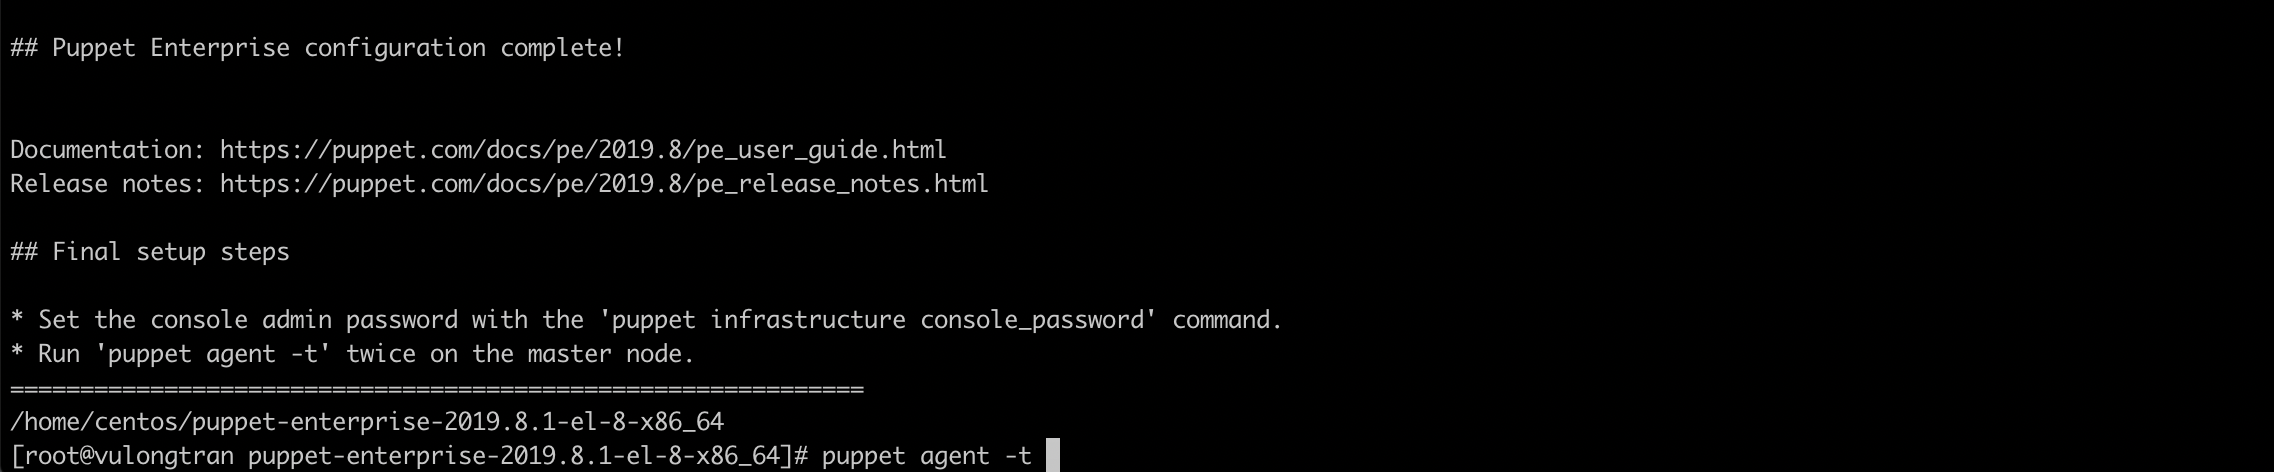
Step 6 - Set a password for Puppet Enterprise console
Puppet Enterprise is now installed. Once Puppet Enterprise is installed, you will be given the opportunity to specify a console administrator password for Puppet Enterprise:
$ puppet infrastructure console_password --password=setasecretpasswordhere
OR
$ puppet infrastructure console_password
Then you will be prompted to select a password.
Step 7 - Run Puppet Twice
Run Puppet twice, this will allow Puppet to run Puppet scripts in the backend to get everything running.
$ puppet agent -t
$ puppet agent -t

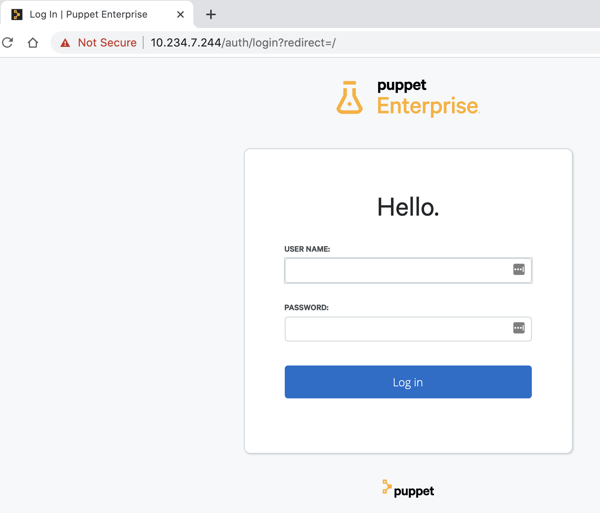
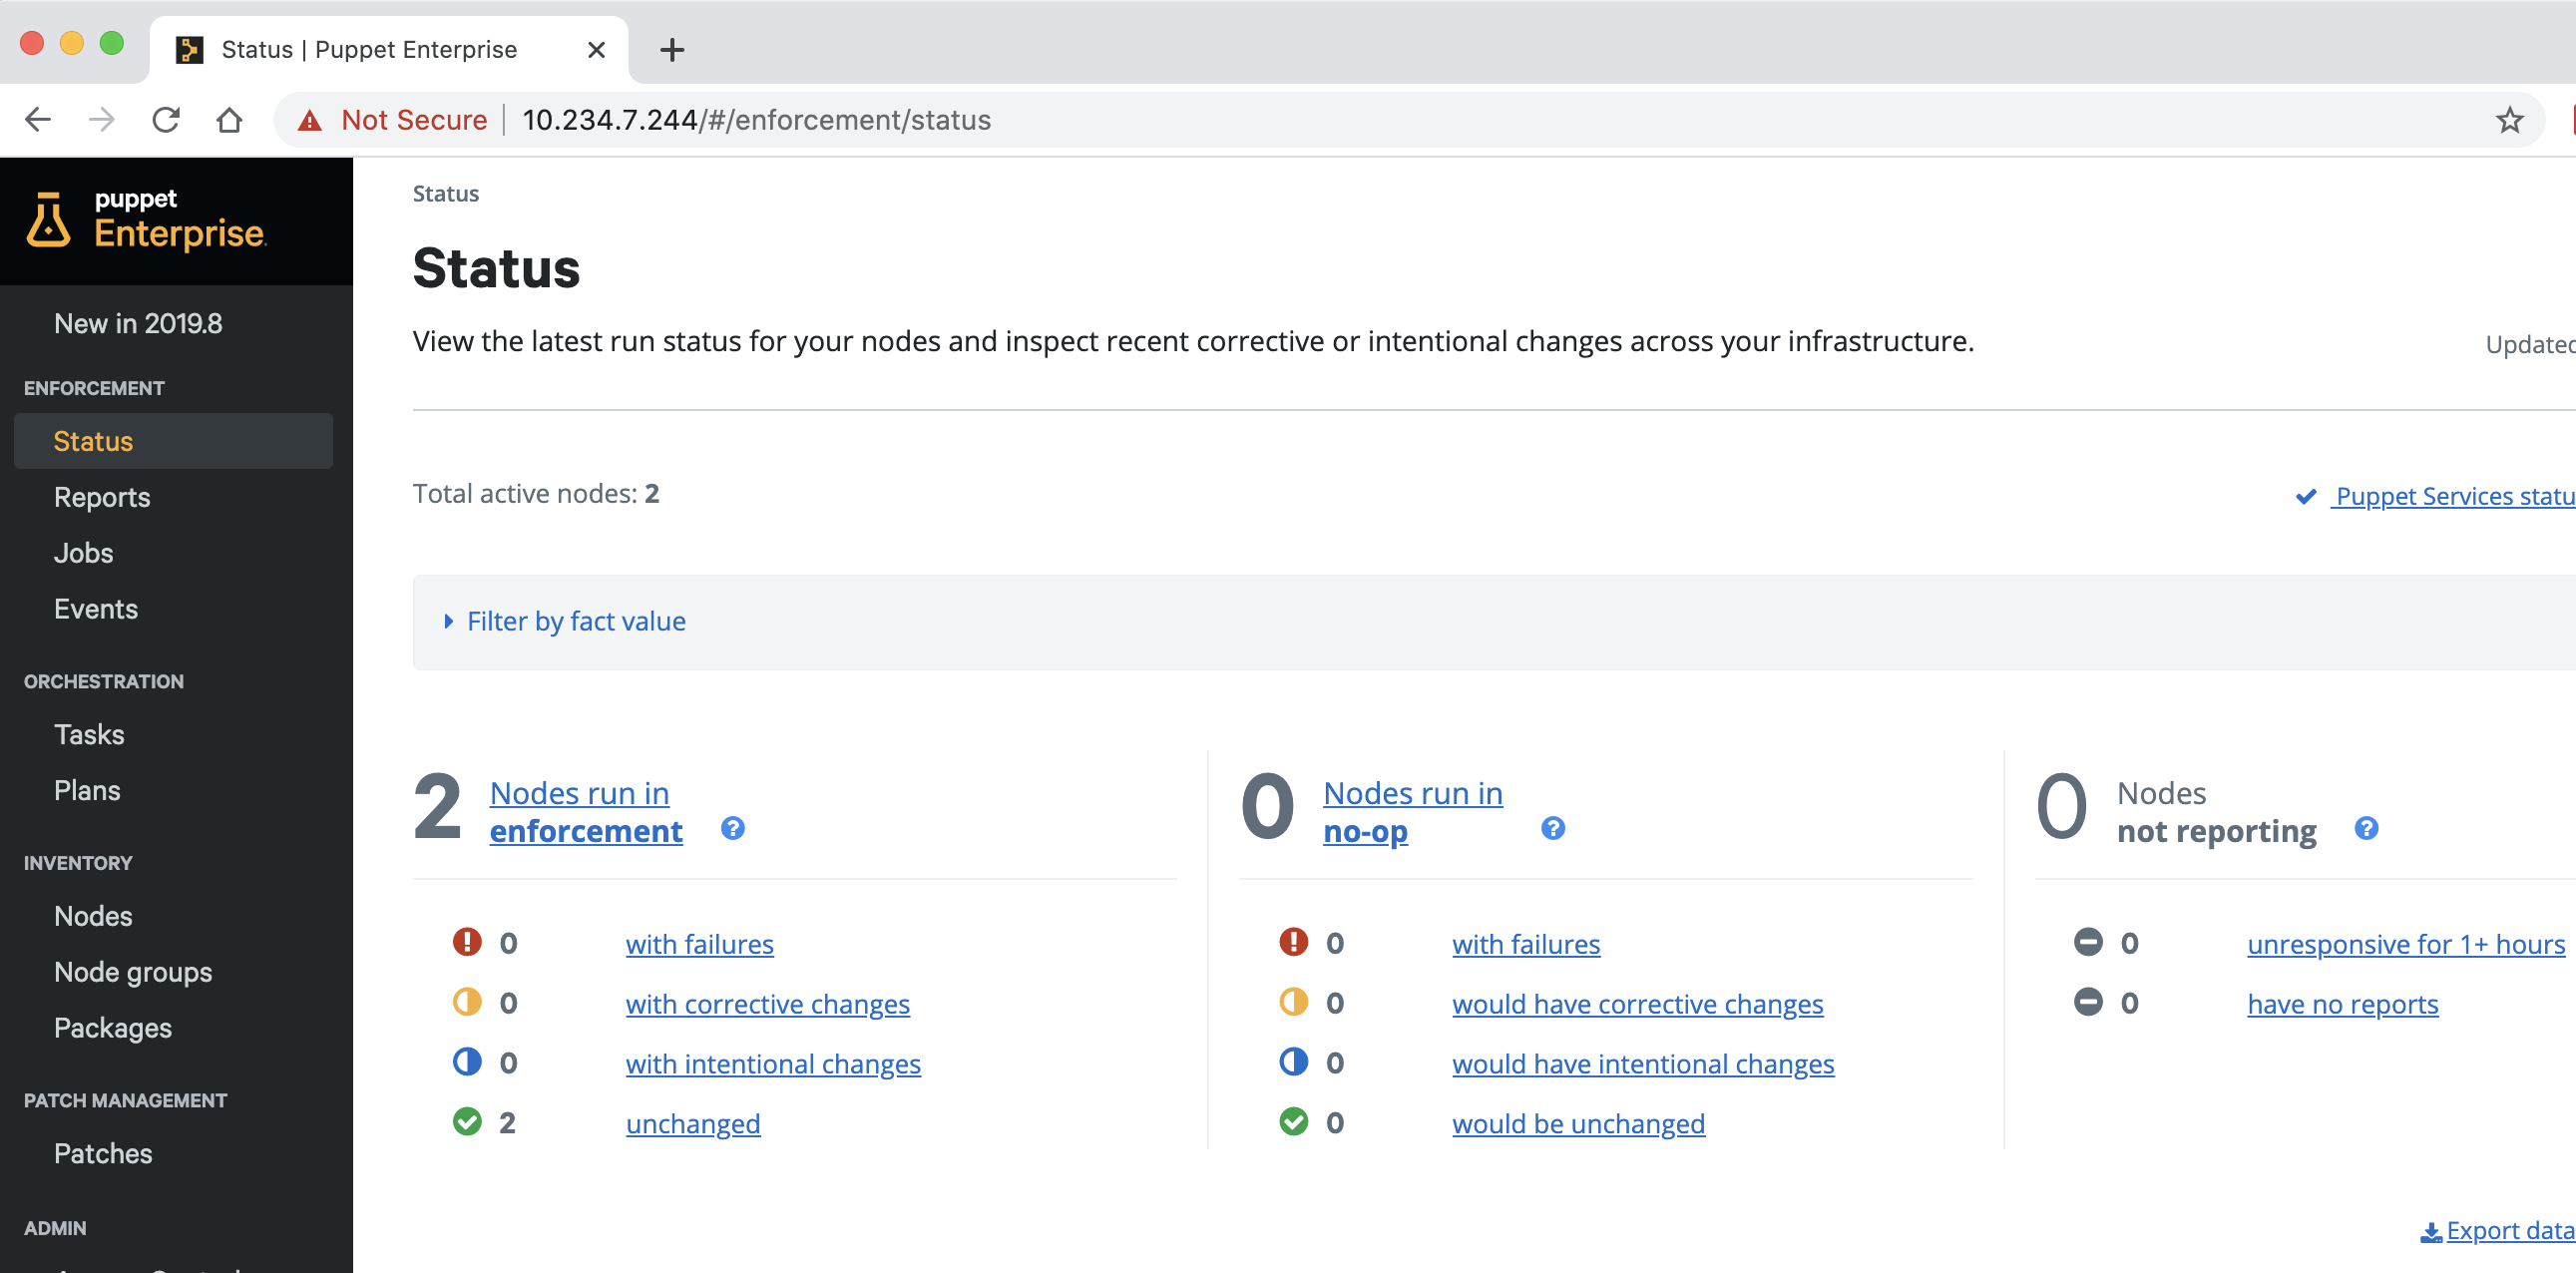
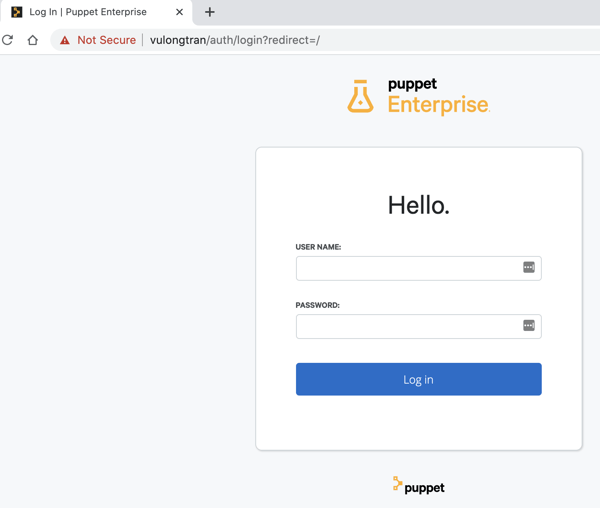
Step 7 - Log into Puppet Enterprise console in your web browser
Once things are up and running. You can log into your web browser to view the Puppet Enterprise console.
Use the Public IPv4 IP address and type that into your browser. I recommend putting https:// in front of it. That is:
https://ip-address
User name: admin
Password: (password you set up earlier in step 6 - set password for Puppet Enterprise console)
Step 8 - Puppet Enterprise is ready to go now!
You are ready to go now!
You can now move to the next step which is adding Puppet agents to manage with your new Puppet Master.
(Optional) Step 9 - Update your domain name to reflect for your Puppet Enterprise console
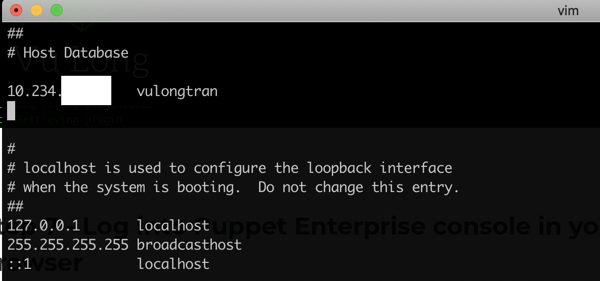
We would ideally want to change the settings so the Puppet Enterprise reflects your domain name in the URL, instead of the IP address of your server.
We do this editing the /etc/hosts file on the server so it notes its FQDN (fully qualified domain name), that is something like the following:
PRIVATEIP yourfutureintendeddomain.com
So let's ssh into your current computer (not the servers), we want to edit the /etc/hosts file.
$ sudo vi /etc/hosts

Once you have opened up the /etc/hosts file. Since we have used a vim editor (vi refers to vim editor), we can:
- Press "i", which allows us to insert and edit the file
- Type in the private IP address and hostname
- Press "ESC", and type ":wq" and press "ENTER" (as the way to write save a file in Vim and quit the editor is :wq)
PRIVATEIP yourfutureintendeddomain.com master
Then you will see this page when you type in the name you set earlier in your web browser.
Rather than having to type in the IP address of your server. As your web browser will refer to this /etc/hosts/ file to direct you to your environment.

The instructions here is to show you how to do this for easy testing purposes on your machine.
Something to note is that we will want to do the same for our server too, where we will also edit the /etc/hosts files there too. This is on our servers, we will be using them when we set up certificate authority (CA) certificates. More on this on a later post when I dive into creating agents for this Puppet Enterprise set up to manage.
FAQ
If you receive puppet command not understood
Restart the shell in order to use client tool commands. You can do this by exiting root if you were logged in as root, and then log back as root.
$ exit
$ sudo su
Update your Linux after installation
Optional but you can update your Linux after installation.
The commands below depend on the operating system and distribution you selected, but here are some examples.
On Centos8, run:
$ yum -y update
On Ubuntu, run:
$ sudo apt-get update
[ERROR]: puppet-enterprise-installer
If you get an error that refers to [ERROR]: puppet-enterprise-installer must be run as root, then add sudo in front.
That is, sudo ./puppet-enterprise-installer
$ sudo ./puppet-enterprise-installer
In the event you get any port related errors, you may not have opened the ports that are required for Puppet Enterprise to function.
| Port | Use |
|---|---|
| 8140 |
|
| 443 |
This port provides host access to the console The console accepts HTTPS traffic from end users on this port. Classifier group: PE Console |
| 4433 |
This port is used as a classifier / console services API endpoint. The master communicates with the console over this port. Classifier group: PE Console |
| 8081 |
PuppetDB accepts traffic/requests on this port. The master and console send traffic to PuppetDB on this port. PuppetDB status checks are sent over this port. Classifier group: PE PuppetDB |
| 8142 |
Orchestrator and the Run Puppet button use this port on the master to accept inbound traffic/responses from agents via the Puppet Execution Protocol agent. Classifier group: PE Orchestrator |
| 8170 |
Code Manager uses this port to deploy environments, run webhooks, and make API calls. |
| 5432 |
This port is used to replicate PostgreSQL data between the master and replica. |
You can use these commands if you need to unlock any of these ports via Linux. Though if you are using AWS (Amazon Web Services) or GCP (Google Cloud Platform), you may be able to do it in their portal rather than command line.
sudo ufw allow 8140/tcp
sudo ufw status numbered
For Puppet Dashboard, you’ll need to enable three ports:
sudo ufw allow 443/tcp
sudo ufw allow 3000/tcp
sudo ufw status numbered
If you get language locale LC_CTYPE warnings:
If you are using a machine that may have set multiple languages in it, e.g. I have English (United States) and English (Singapore) on my machine, you may get some LC_CTYPE warnings. You can run these commands to try fix this.
$ locales
$ dpkg-reconfigure locales
OR
$ export LANG=en_US.UTF-8
$ export LANGUAGE=en_US.UTF-8
$ export LC_ALL=en_US.UTF-8
If that does not work, you can try this tip from the system.
WARNING! Your environment specifies an invalid locale.
The unknown environment variables are:
LC_CTYPE=UTF-8 LC_ALL=
This can affect your user experience significantly, including the
ability to manage packages. You may install the locales by running:

sudo apt-get install language-pack-UTF-8
or
sudo locale-gen UTF-8

To see all available language packs, run:
apt-cache search "^language-pack-[a-z][a-z]$"
To disable this message for all users, run:
sudo touch /var/lib/cloud/instance/locale-check.skip
If you get puppet:8140/puppet-ca/v1 failed error:
If you get the following puppet:8140/puppet-ca/v1 failed error, it is as you are running the command not in sudo, so the system is looking to for puppet agent related files and cannot see it as it in related files gated requiring sudo superuser access.
[centos@master /]$ puppet agent -tError: Request to https://puppet:8140/puppet-ca/v1 failed after 0.004 seconds: Failed to open TCP connection to puppet:8140 (getaddrinfo: Name or service not known)Wrapped exception:Failed to open TCP connection to puppet:8140 (getaddrinfo: Name or service not known)Error: No more routes to caError: Could not run: No more routes to ca
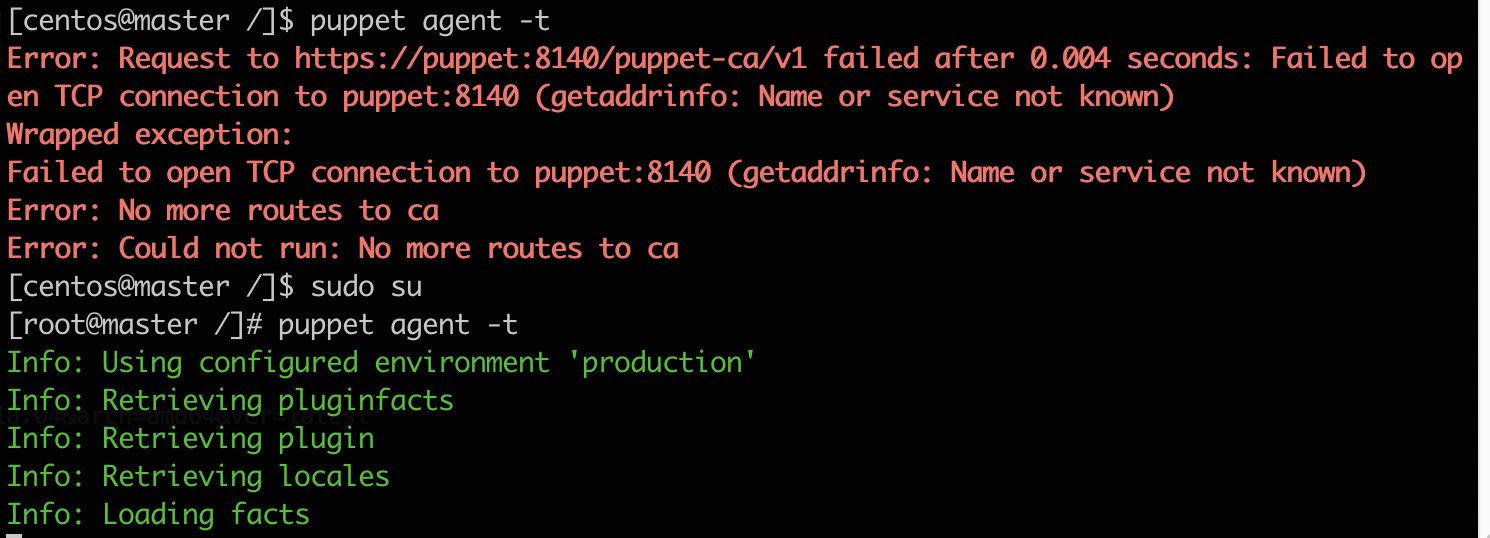
So type sudo su and then run the command.
$ sudo su
$ puppet agent -t
$ puppet agent -t
Error retrieving certificates error
If you get an error:
"error retrieving certificates. Unable to connect to retrieve certificate signing requests"
OR error:
"Could not request certificate: Failed to open TCP connection to puppet: 8140"
If you see this, it is best to check if the server to the hostname of your master in /etc/puppetlabs/puppet/puppet.conf is listed (in my case it should be "master.vulongtran.com". Additionally, once that is confirmed, that it can be resolved via DNS entry if this is online or hosts file entry if you are testing this locally.
If you get a failure to allocate memory error:

Error: Could not prefetch package provider 'yum': Cannot allocate memory - /bin/rpm -qa --nosignature --nodigest --qf '%{NAME} %|EPOCH?{%{EPOCH}}:{0}| %{VERSION} %{RELEASE} %{ARCH}\n' | sort 2>&1
Error: Failed to apply catalog: Cannot allocate memory - /bin/rpm -qa --nosignature --nodigest --qf '%{NAME} %|EPOCH?{%{EPOCH}}:{0}| %{VERSION} %{RELEASE} %{ARCH}\n' | sort 2>&1
If you get this error, it may be that you have not allocated enough memory for the default settings of Puppet Server. So for our testing, we can just readjust what we want to give Puppet Server by editing the configuration file.
To change the Puppet Server memory allocation, you can edit the init config file.
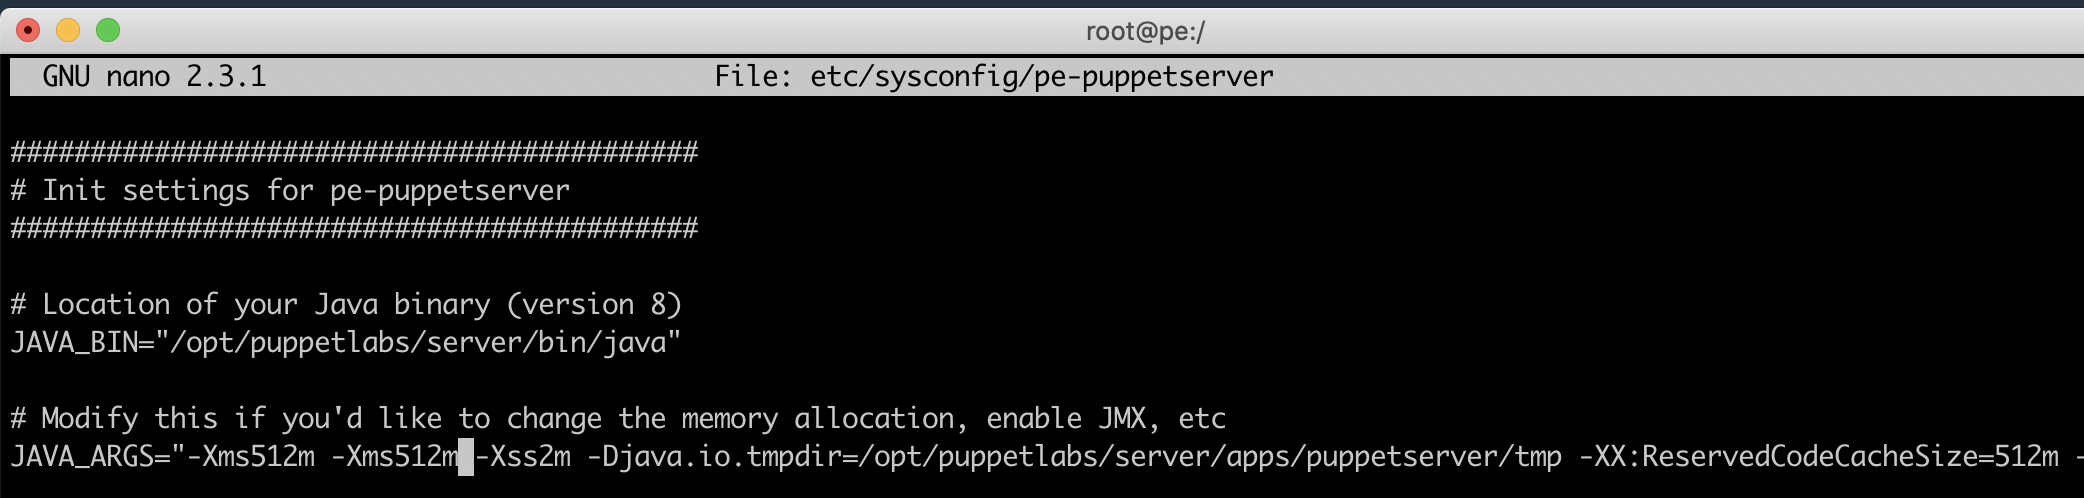
For CentOS, open /etc/sysconfig/pe-puppetserver
$ sudo vi /etc/sysconfig/pe-puppetserver
For Ubuntu, open /etc/default/pe-puppetserver
$ sudo vi etc/sysconfig/pe-puppetserver
In the configuration settings, update the line so that we use 512 megs instead of 2 GB memory. JAVA_ARGS="-Xms2g -Xmx2g"
to
JAVA_ARGS="-Xms512m -Xmx512m"
That is, from 2 GB (xms2048m).
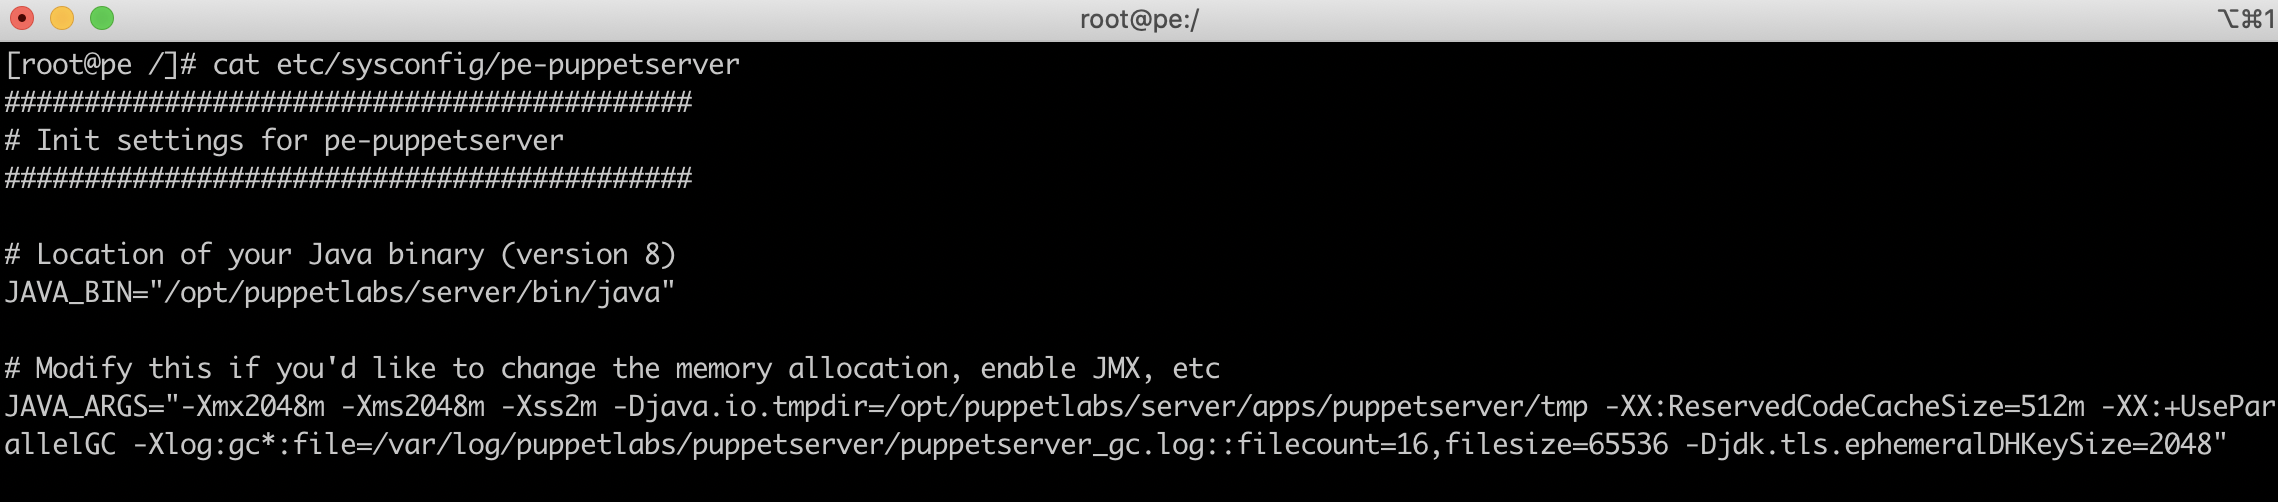
To 512 MB (xms512m).
Restart the puppetserver service after making any changes to this file.$ sudo systemctl stop pe-puppetserver
$ sudo systemctl start pe-puppetserver
(Optional - You can run the "enable pe-puppetserver" command if you are ready to have the puppetserver running live in the background after a restart of the machine. You can stop this anytime).
$ sudo systemctl enable pe-puppetserver
Restarting your server and/or your Puppet Enterprise Console
When restarting your server, you just have to wait for a couple of minutes for it to reload. If you see any errors during startup, you can manually restart your Puppet service by running the following series of commands:
$ sudo systemctl stop pe-puppetdb$ sudo systemctl stop pe-puppetserver$ sudo systemctl stop pe-console-services$ sudo systemctl start pe-puppetdb$ sudo systemctl start pe-puppetserver$ sudo systemctl start pe-console-services
Puppet.com - Getting started with Puppet Enterprise - Installing Puppet Enterprise (PE)- Puppet.com - Firewall rules and ports that you need for Puppet Enterprise
- How to add agent nodes to your Puppet Enterprise set up


