

This is a step by step guide on how to set up SSO for Microsoft Office 365 on Okta.
- Prerequisities
- Add Microsoft Office 365 app to your Okta instance
- Test and confirm that it is working
- (Optional) Set up Okta WS-Federation for Office 365
- (Optional) Set up Okta to Office 365 provisioning
Prerequisites
Before you can start setting up Single Sign On (SSO) for Microsoft Office 365 and Okta, we need to check the following:
- Access to Microsoft Office 365 - Confirm that you have administrator access to Microsoft Office 365. If you are testing, you can sign up for a Microsoft Developers account https://developer.microsoft.com/en-us/microsoft-365/dev-program
- Access to Okta Admin Console - Confirm that you have administrator access to Okta's Admin Console. If you do not have an Okta account, you can create a free Okta Trial account or Okta Developer account.
1. Add Microsoft Office 365 app to your Okta instance
Log in to your Okta account as an administrator (with administrator access).
Under Applications> Applications, search for the Microsoft Office 365 app in the Okta Integration Network (App Integration Catalog).
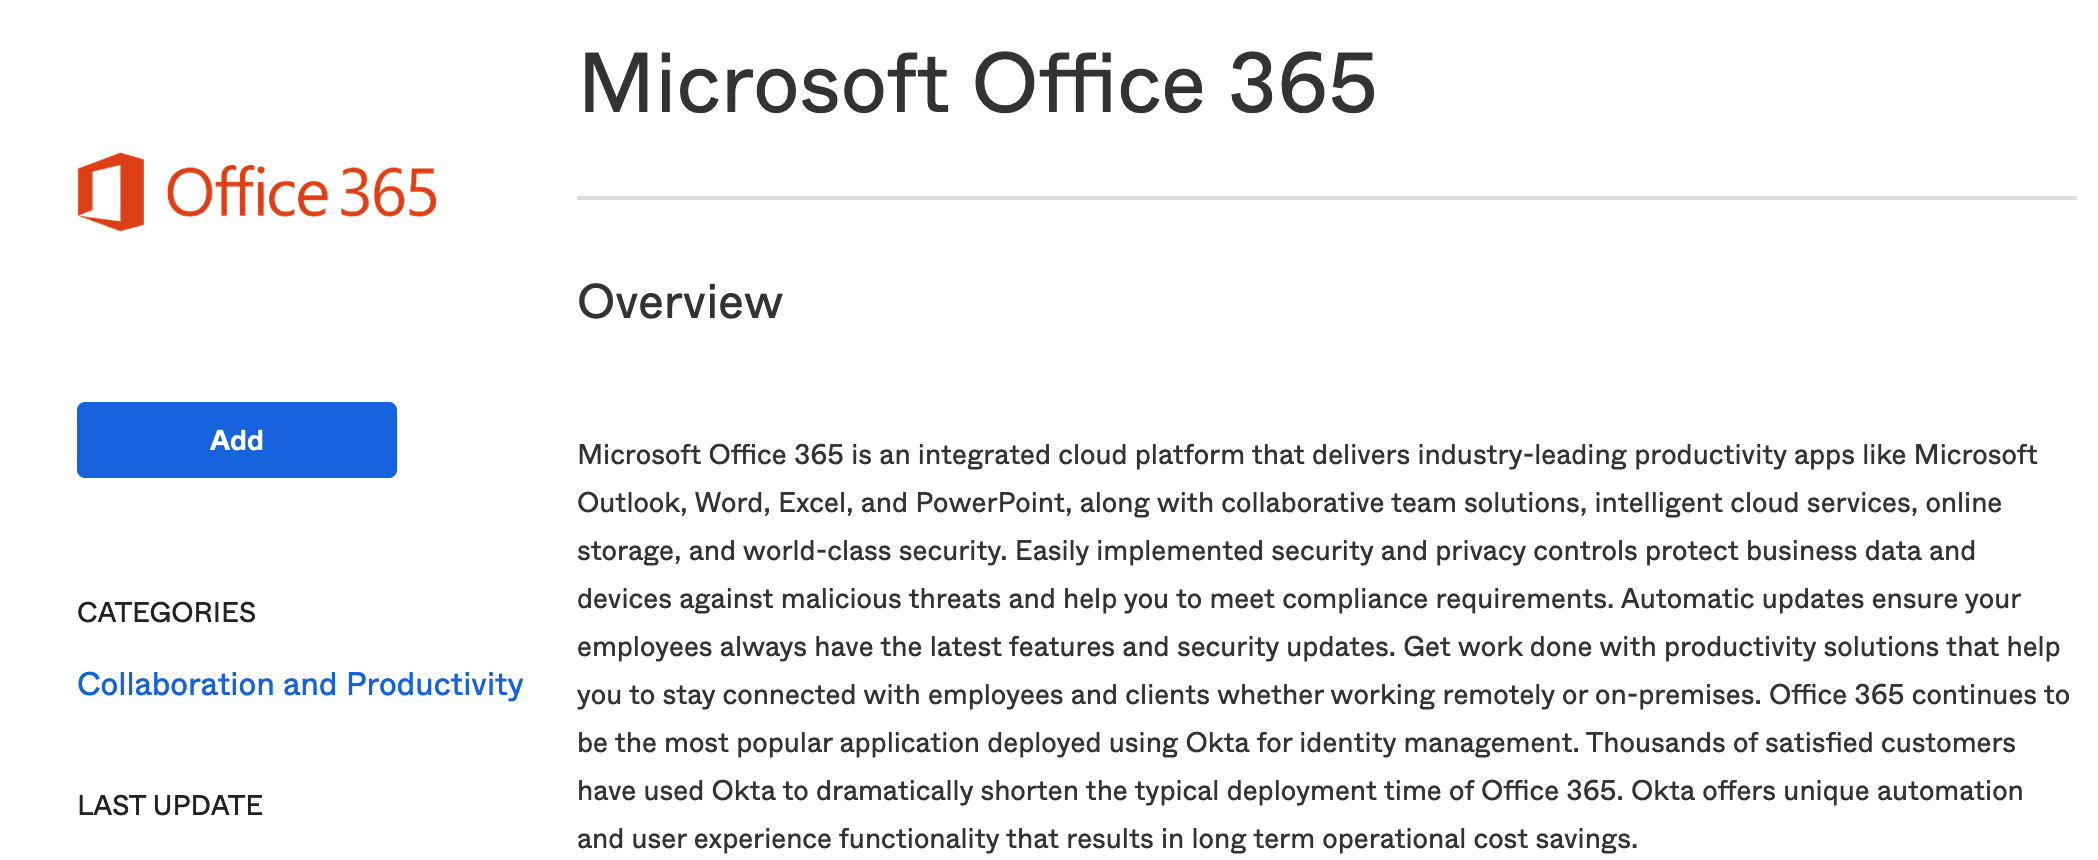
"Add" Microsoft Office 365 app.
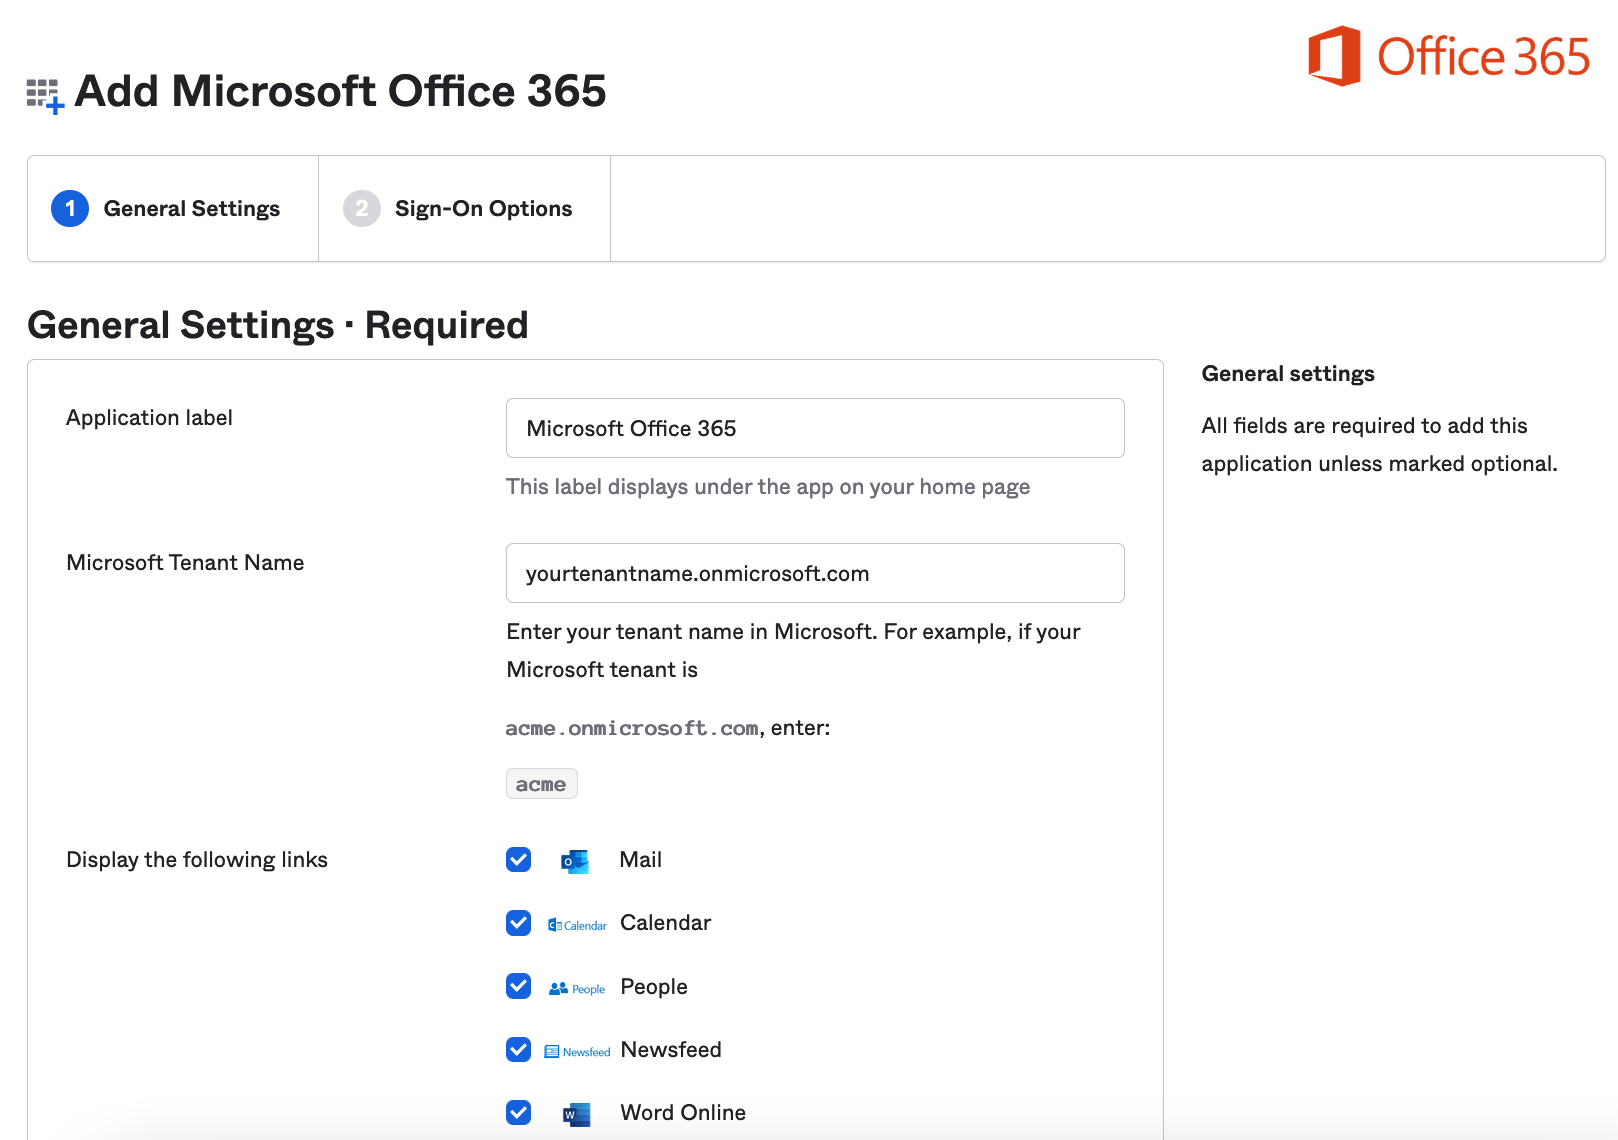
Add your Microsoft Office 365 tenant domain and leave the rest to the default settings in the first page. Then click Next.
Select "Secure Web Authentication".
Select the appropriate option for username and password setup that you want to test with.
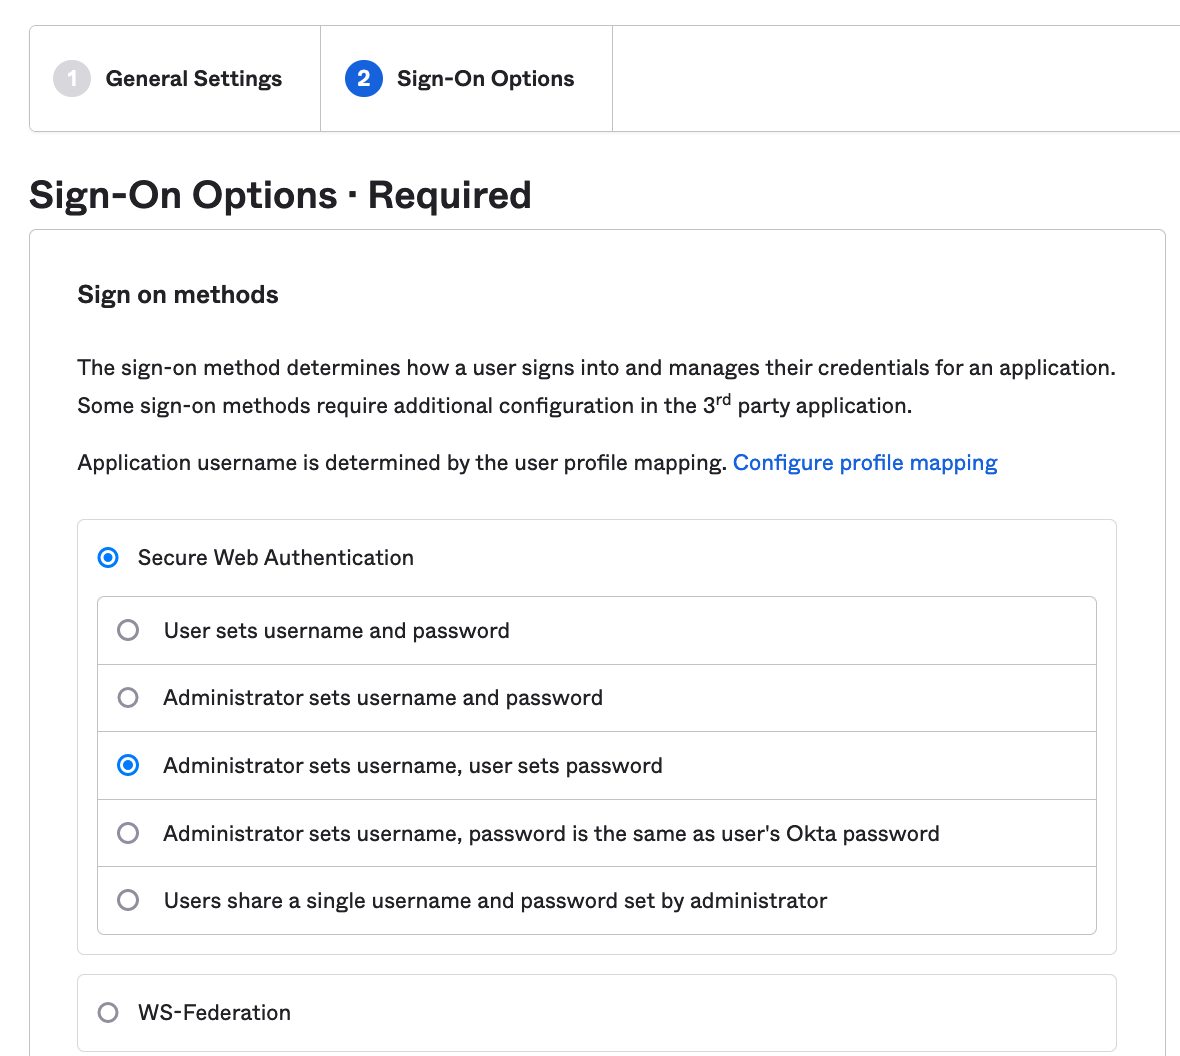
This is important to select "Secure Web Authentication" now. As we can change this later in the future. It is important is as we need to make sure users can log in while we migrate the users over.
For now, leave the rest of the default settings and click Done.
2. Test that SSO is working on Office 365
We can now test this in our Okta end user dashboard. To do this, in Okta, let's assign a user to the application.
Go to our "Microsoft Office 365" application via Applications> Applications.
Go to "Assignments".

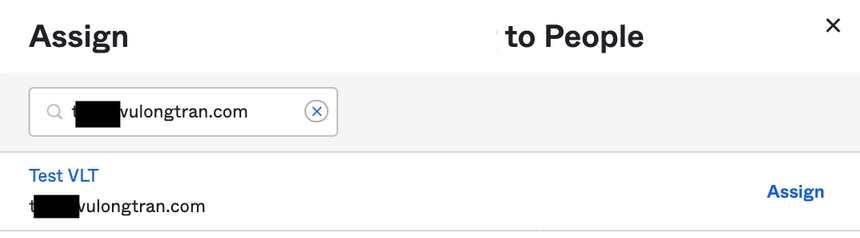
Select "Assign" and "Assign to People".
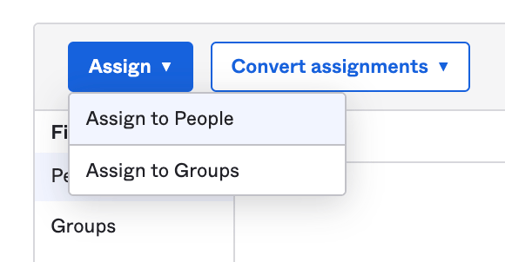
Select our test user, click "Assign".
Assign appropriate Office 365 licenses to your test users.
Click "Done".
Now let's log into our Okta instance as a test user. You may need to refresh your browser if you had the browser window already open.
Then click on one of your "Microsoft Office 365" application icons (chiclet) to log into the application.
3. Add a domain to Microsoft Office 365
If you have not already, we want to add our own domain (custom domain) to Microsoft Office 365. We want to change this to our own custom domain as we will not be able to federate on a Microsoft domain (e.g. developerdomain.onmicrosoft.com). That is, *.onmicrosoft.com domains cannot be federated.
So we need a custom domain that we can use for WS-Federation (WS-Fed).
To do this, we need to add our own custom domain following steps in Microsoft.
Go to the admin center at https://admin.microsoft.com.
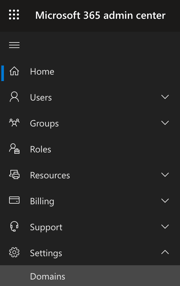
Go to the Settings > Domains page.
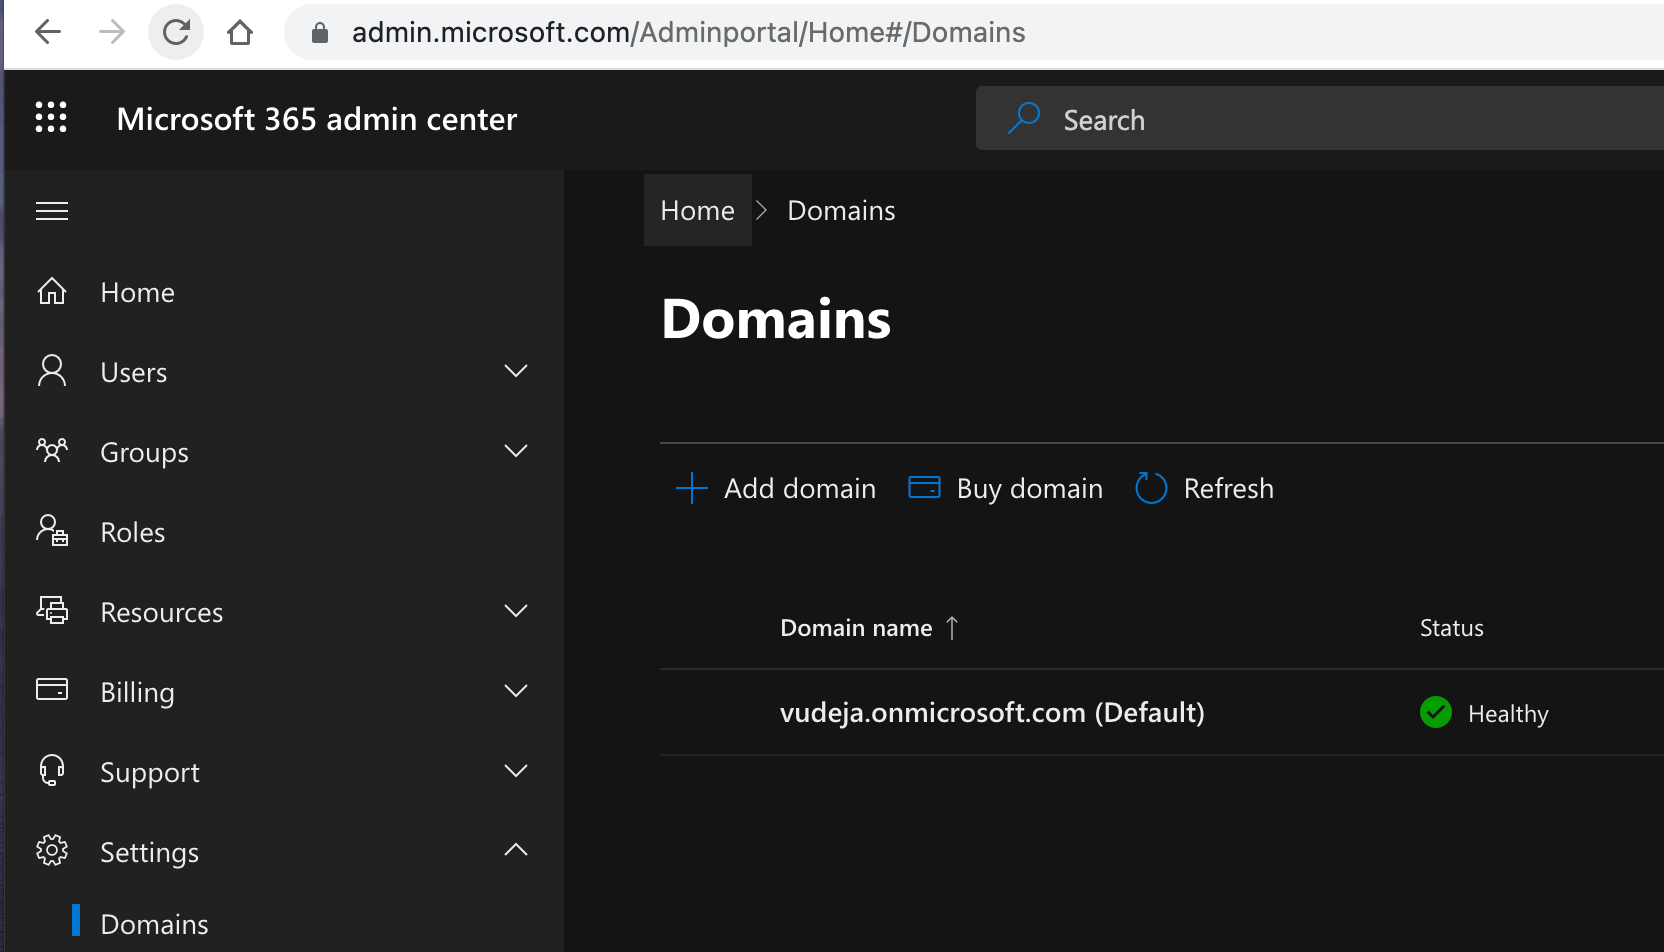
Select Add domain.
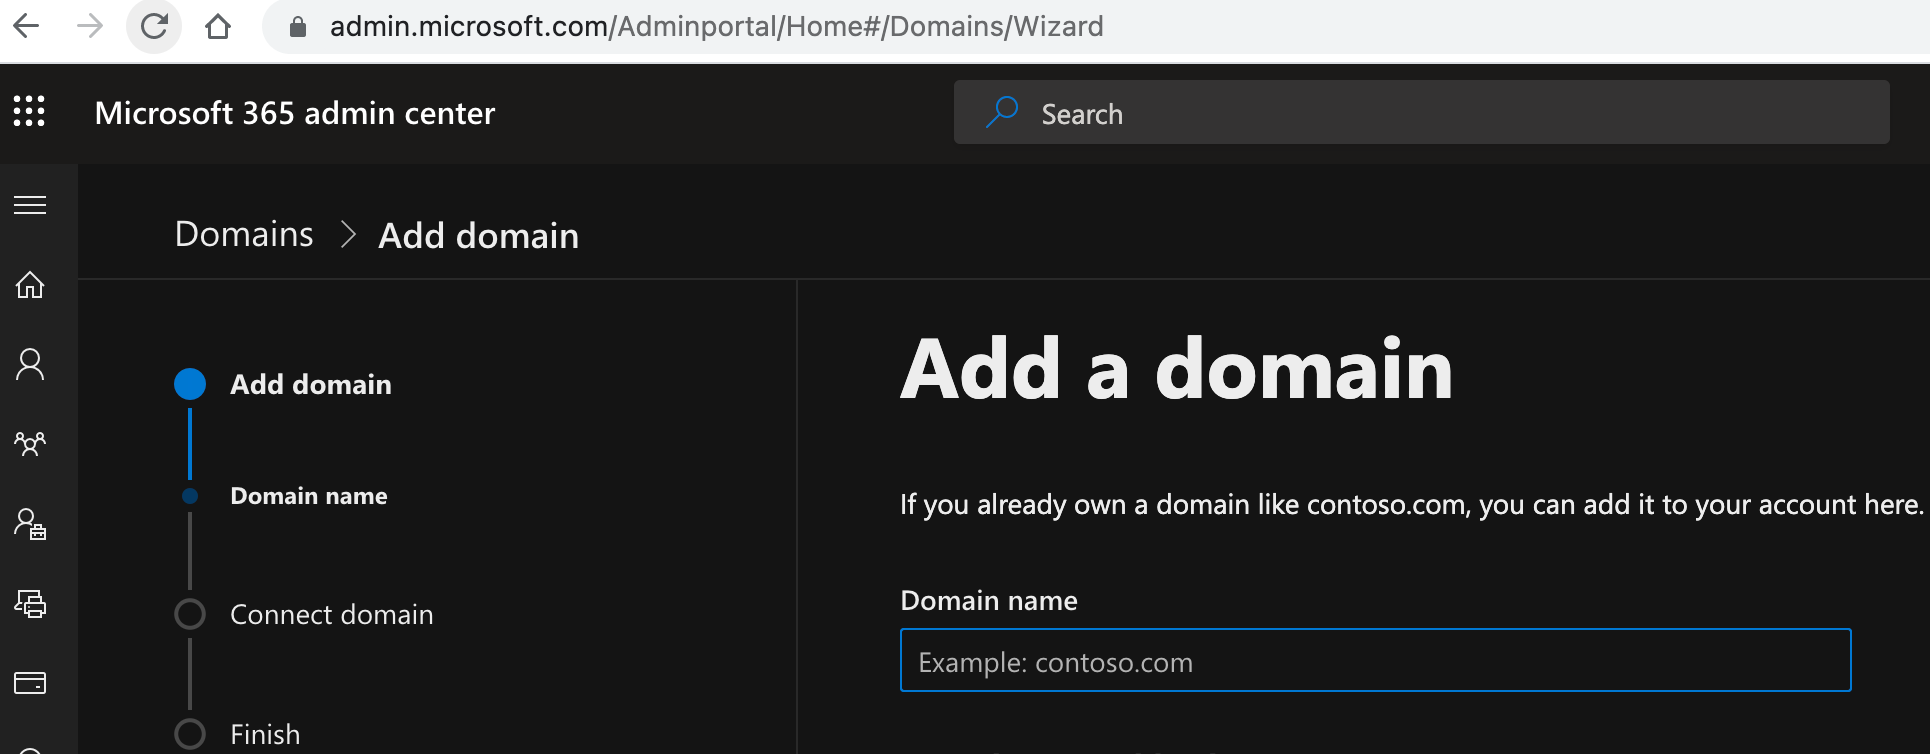
Enter the name of the domain you want to add, then select Next.
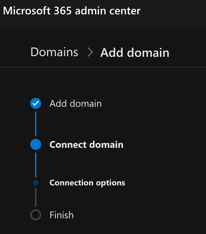
Then choose how you want to verify that you own the domain.
e.g. You can use a TXT record to verify your domain.
Make the DNS changes required for Microsoft to use your domain.
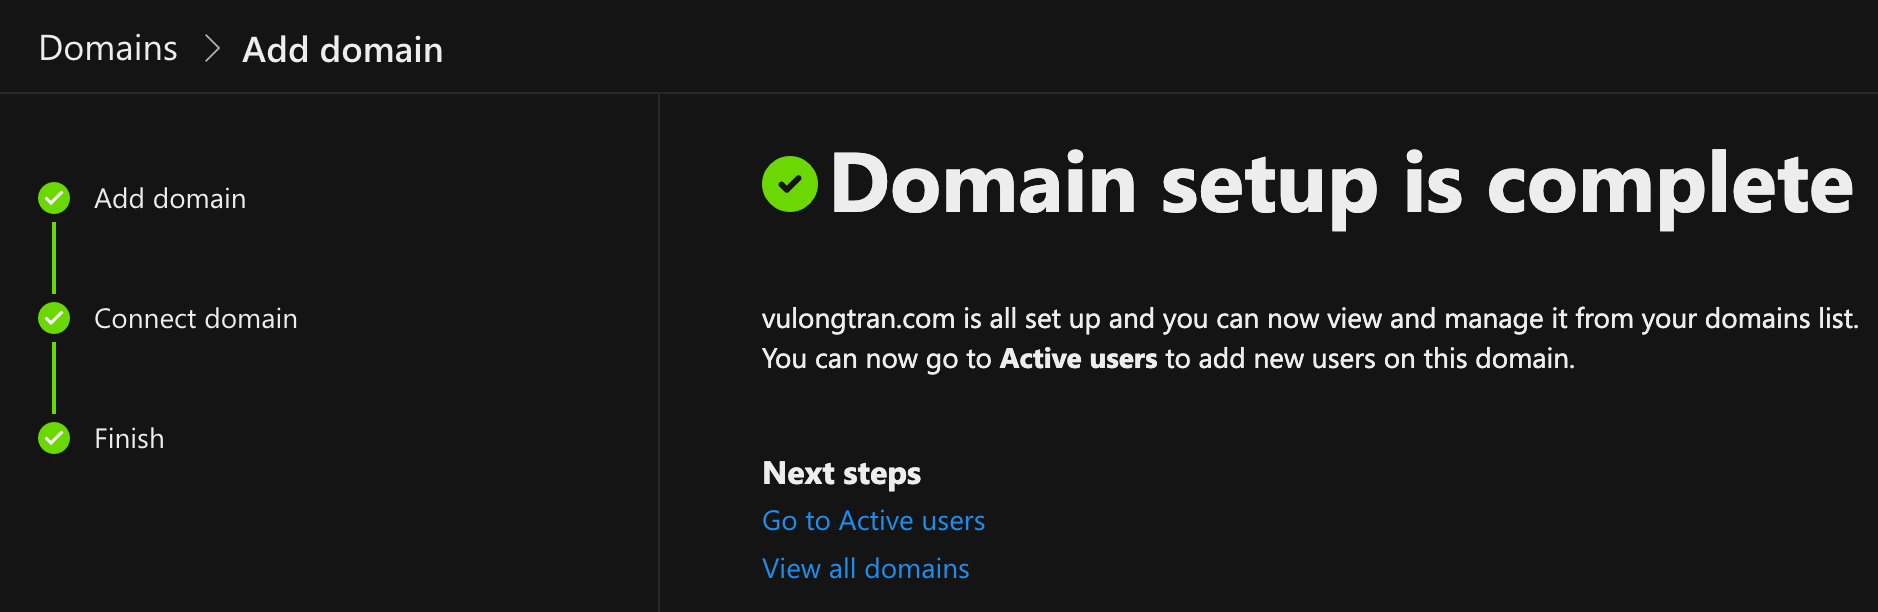
Select Finish - you're done!
https://docs.microsoft.com/en-us/microsoft-365/admin/setup/add-domain?view=o365-worldwide
4. Import users into Okta
You can import users with a CSV file or using the provisioning function to enable importing (steps on how to set up provisioning below that below).
If your users have the same email address as your custom domain, then you can use the default "email" or similar setting in Okta.
For example, myemail@vulongtran.com = myemail@vulongtran.com
If your users have email addresses which different from the custom domain then we may need to do some username mapping.
For example, myemail@differentdomainname.com is not myemail@vulongtran.com.
We can use the transform functions within Okta to help us with this username transformation and mapping.
In Okta, open Applications> Applications.
Open Microsoft Office 365 > "Sign on" tab > Edit
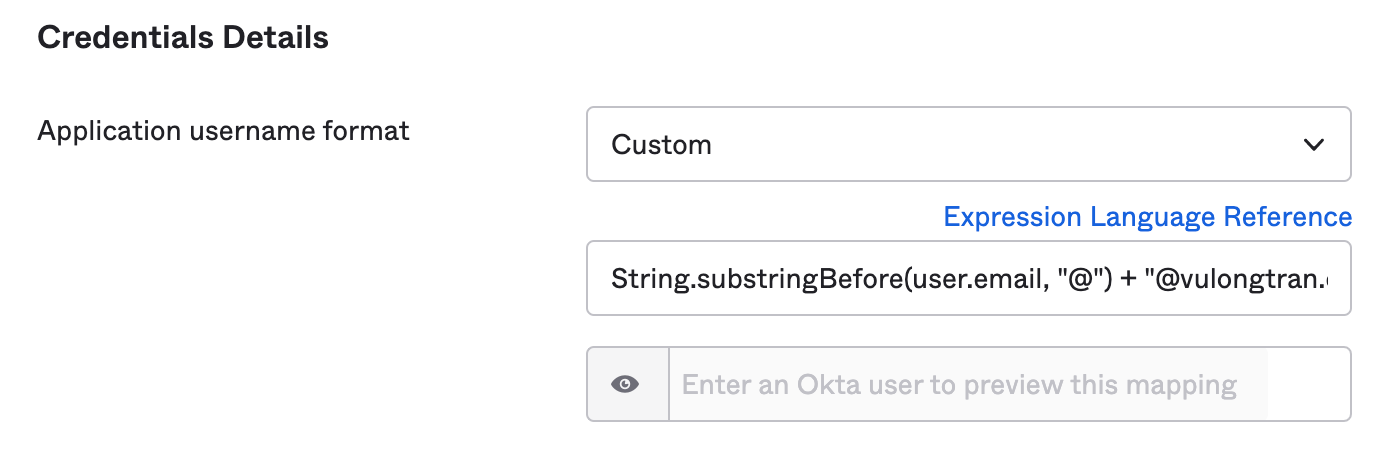
Under Credentials Details > Application username format, select "Custom" from the drop down menu.
You can use a string as follows, depending on your preferences.
String.substringBefore(user.email, "@") + "@vulongtran.com"
String.substringBefore(user.email, "@") + "@yourdomainname.com"
You may need to use the source.Mail variable and not user.email. So you can use this string instead.
String.substringBefore(source.Mail, "@") + "@vulongtran.com"
It will let you test what the output looks like, by entering an Okta user to preview this mapping with. Please feel free to use that to check so you are comfortable with the expected outputs.
More guidance here from Okta if your users’ email addresses do not reside in the domain you are federating. As you can use the "Profile Editor" to facilitate the mapping.
(Optional) 5. Switch on WS-Federation for Microsoft Office 365
Prepare for WS-Federation for Microsoft Office 365.
In Okta Admin Console, go to Applications> Applications.
Open your "Microsoft Office 365" app.
Click on the "Sign On" tab.
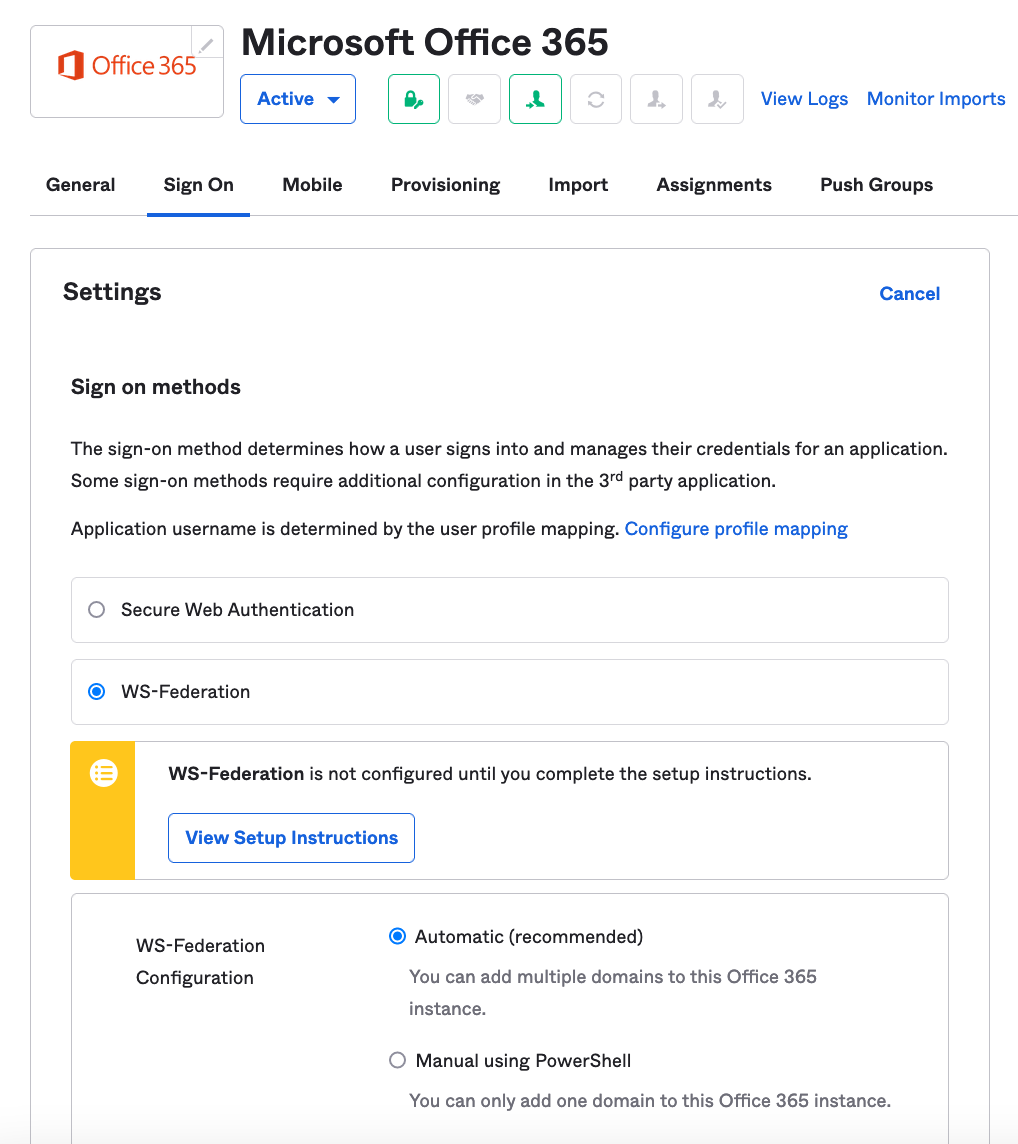
Click on "WS-Federation"
Click on "View Setup Instructions" and read through the tips and guidance there. I have a brief summary of my tips and guidance below as well.
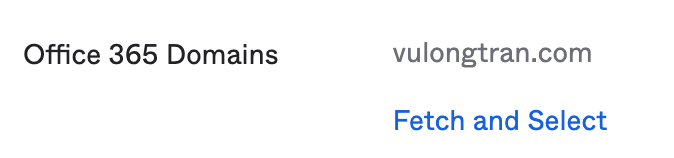
you will need to go to the "Sign" tab of the "Microsoft Office 365" app and look for "Office 365 Domains" and click on "Fetch and Select". Then select your custom domain.
5. Test that SSO is working on Office 365
Similar to Step 2 earlier, we can test that SSO is working on Office 365 with the WS-Federation method.
You will notice that the log in process looks very similar.
However, this time, behind the scenes, there is no username and password needs to be set up as what is required for the Secure Web Authentication (SWA) method. So WS-Federation is always the goal to work towards as you phase your migrate your users into Office 365 and make it as seamless as possible for the users experience.
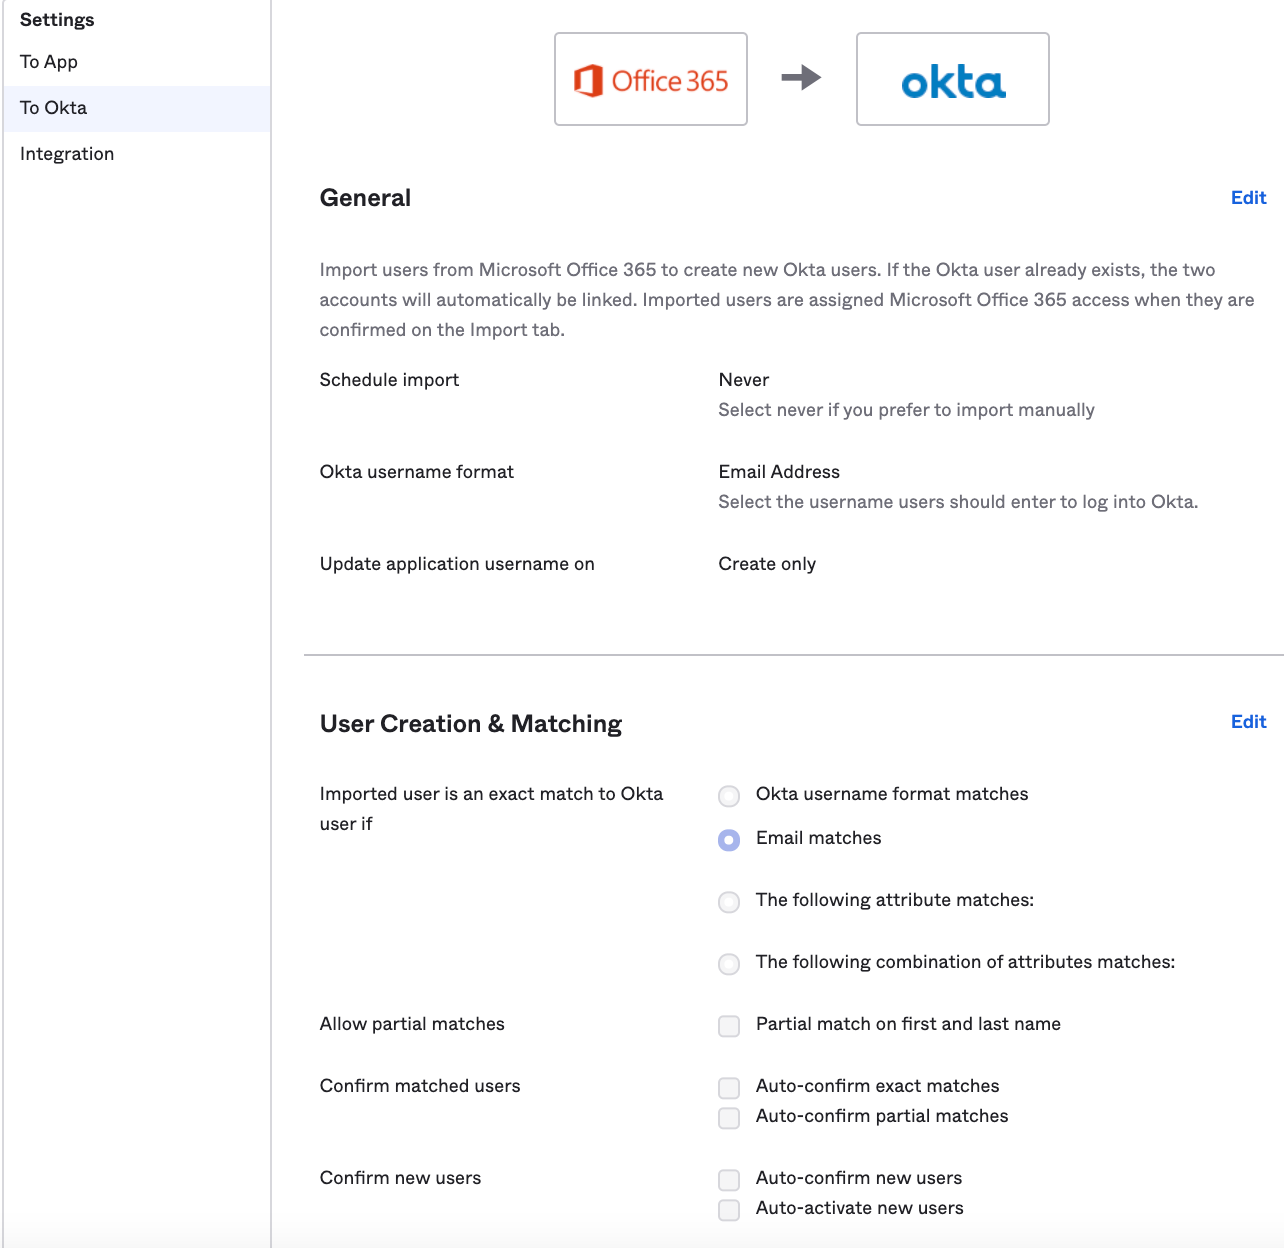
(Optional) Set up Okta to Office 365 provisioning
What is provisioning?
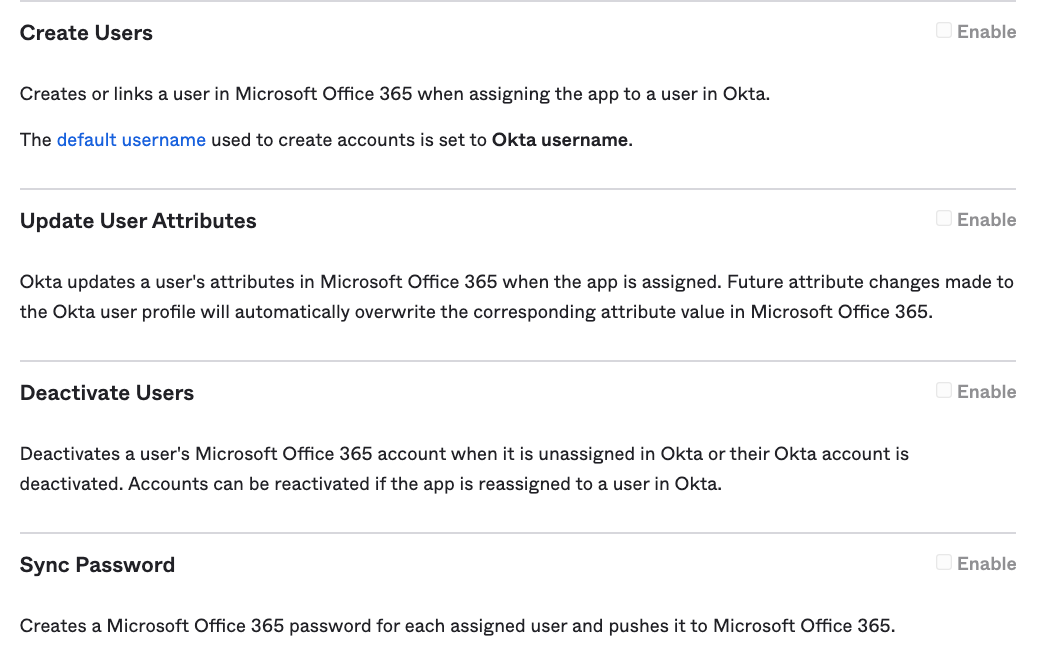
Provisioning allows Okta to help you manage the users with access to Microsoft Office 365.
Specifically, provisioning will allow you to Create, Update and Deprovision users in Office 365 using Okta as your control centre. Essentially CRUD, Create, Read, Update, and Deprovision users in/from Office 365.
A. How to set up Okta Office 365 Provisioning
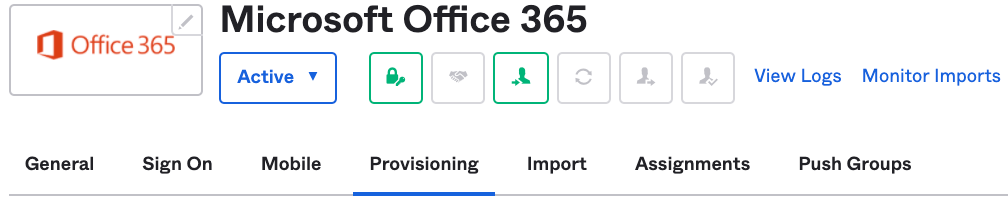
Go to "Microsoft Office 365".
Click on "Provisioning" tab.
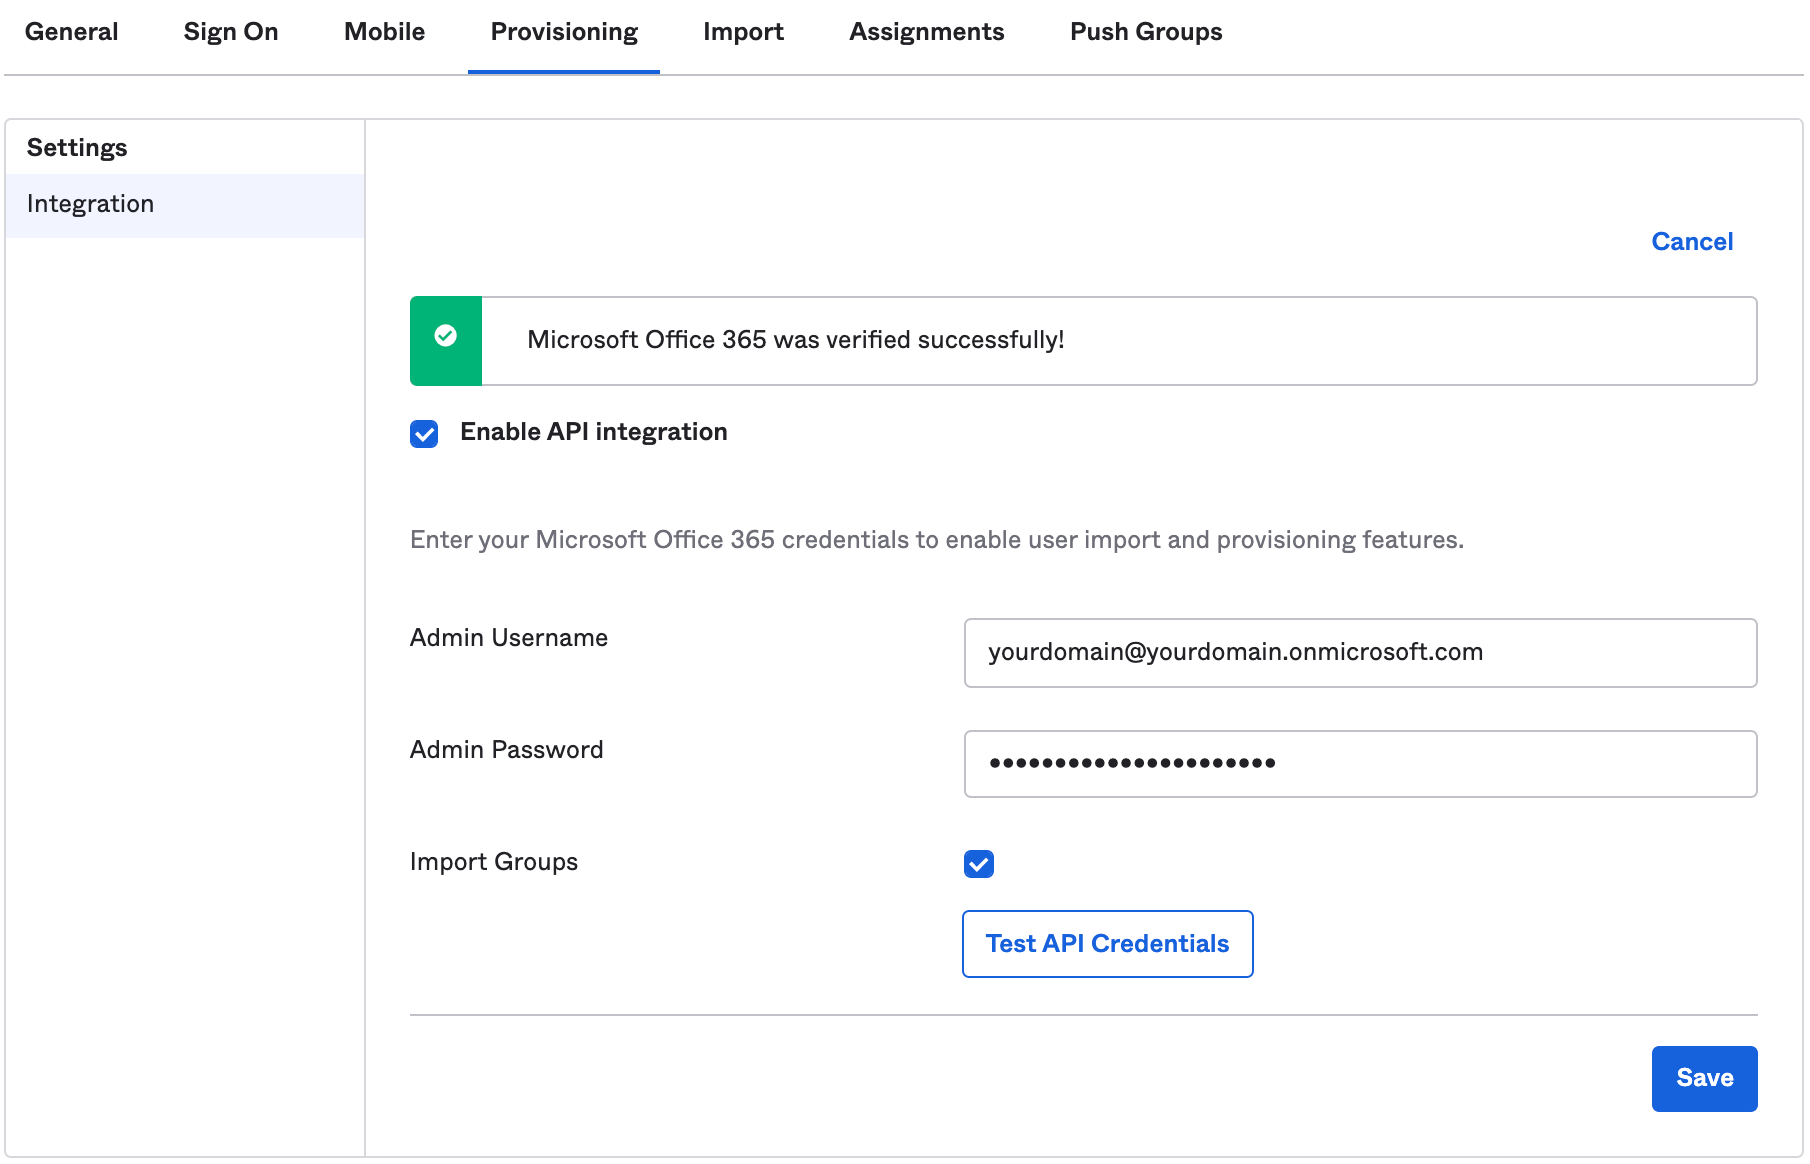
Click on "Configure API integration".
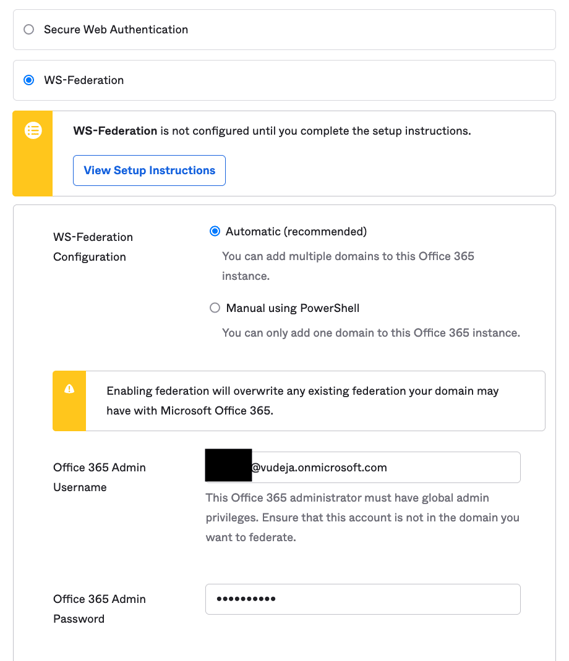
Fill in your login details for Microsoft Office 365 using your Microsoft Administrator account. As you need to provide consent to Microsoft to allow Okta to access directory data in your Microsoft tenant.
Ensure you are using administrator credentials for an account that is on your default Office 365 domain. This domain is by using your default Microsoft yourtenant.onmicrosoft.com.
For example:
- Admin Username: yourdomain@yourdomain.onmicrosoft.com
- Admin Password: <youradminpassword>
Notice that we are using my yourdomain@yourdomain.onmicrosoft.com username here. We are using this, as this is our administrator credentials for an account that is on our default Office 365 domain of yourdomain.onmicrosoft.com. We want to keep this one separate and not the domain that you are planning to federate (WS-Federate).
As turning on WS-Fed will require you to authenticate yourself in Microsoft 365 Admin Center through Okta, where you will be treated as a user, not as an admin. So to ensure you always have access to Office 365 domain using your default Microsoft yourtenant.onmicrosoft.com, we will use a custom domain for the WS-Fed set up.
When ready, click "Test API Credentials".
Once successful, you'll see "Microsoft Office 365 was verified successfully!"
Click "Save" when you're ready. Then it will automatically refreshed.
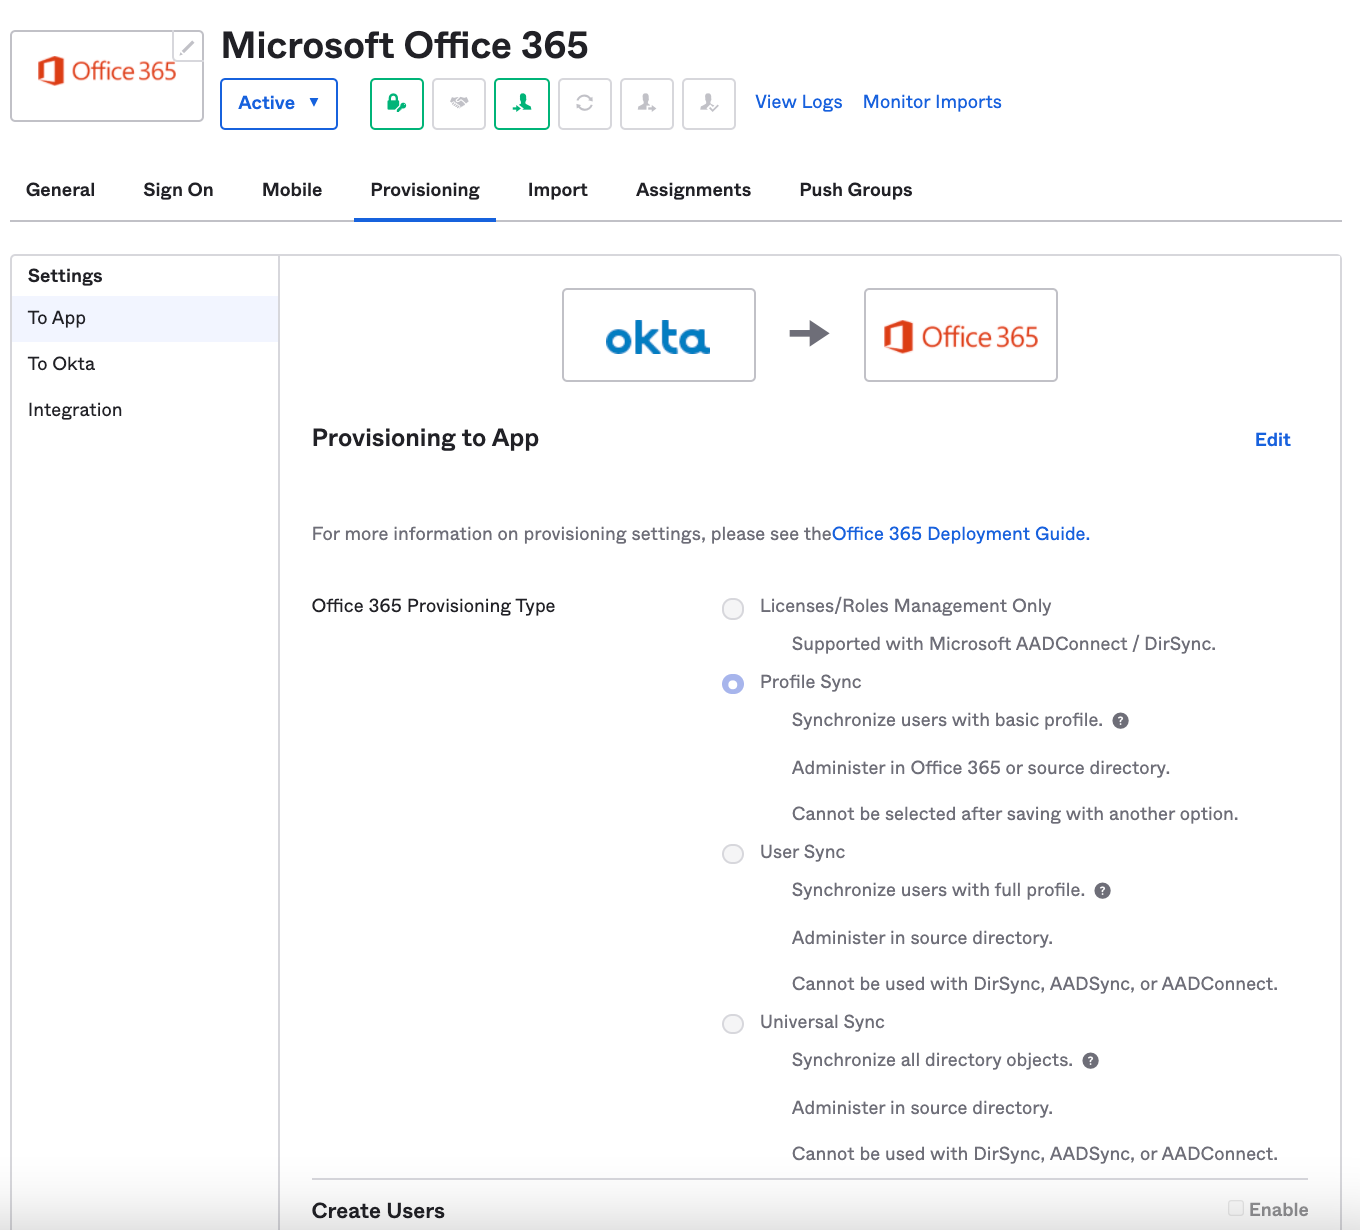
Once enabled successfully, you will be able to see the following. You can select your desired option below.
Minimum is "Profile Sync" and you can choose one of the others depending on your preferences. If you are unsure, I would recommend selecting "Profile Sync" as once you select the other three options, you will not be able to select "Profile Sync".
Here are further details on each of the options:
- Profile Sync (recommended to start with)
- Synchronises users with basic profile (which includes 5 attributes: Username, First Name, Last Name, and Display Name).
- Administer in Office 365 or source directory.
- This option cannot be selected after saving with another option.
- User Sync
- Synchronises users with full profile (which includes 20+ attributes from Okta Universal Directory).
- Administer in source directory (Okta Universal Directory).
- Cannot be used with DirSync, AADSync, or AADConnect (Azure AD Connect).
- Universal Sync
- Synchronises users all directory objects (which includes 140+ attributes from AD to Okta to Office 365: e.g. Users, Security Groups, Distribution Lists, Contacts, Resource Mailboxes).
- Administer in source directory (Okta Universal Directory).
- Cannot be used with DirSync, AADSync, or AADConnect (Azure AD Connect).
- Licenses/ Roles Management Only
- Supported with Microsoft AADConnect (Azure AD Connect)/ DirSync
Other notes:
- User Sync and Universal Sync cannot be used with Directory Synchronization, Azure Active Directory Sync, or Azure Active Directory Connect (AAD Connect).
- Once you select User Sync or Universal Sync, you cannot modify your selection back to Profile Sync.
- If you have selected User Sync or Universal Sync provisioning type, all users irrespective of where their profile is sourced from, appear marked as "Synced with Active Directory" in your Office 365 tenant. However, the user is still sourced from the source directory.
- Exchange Hybrid is currently not supported.
- More details including a table of what each option means in terms of provisioning on "Provisioning options for Office 365" here.
You will be able to use these options from "Okta to [Office 365] App".
You will be able to use these options from "[Office 365] App to Okta".
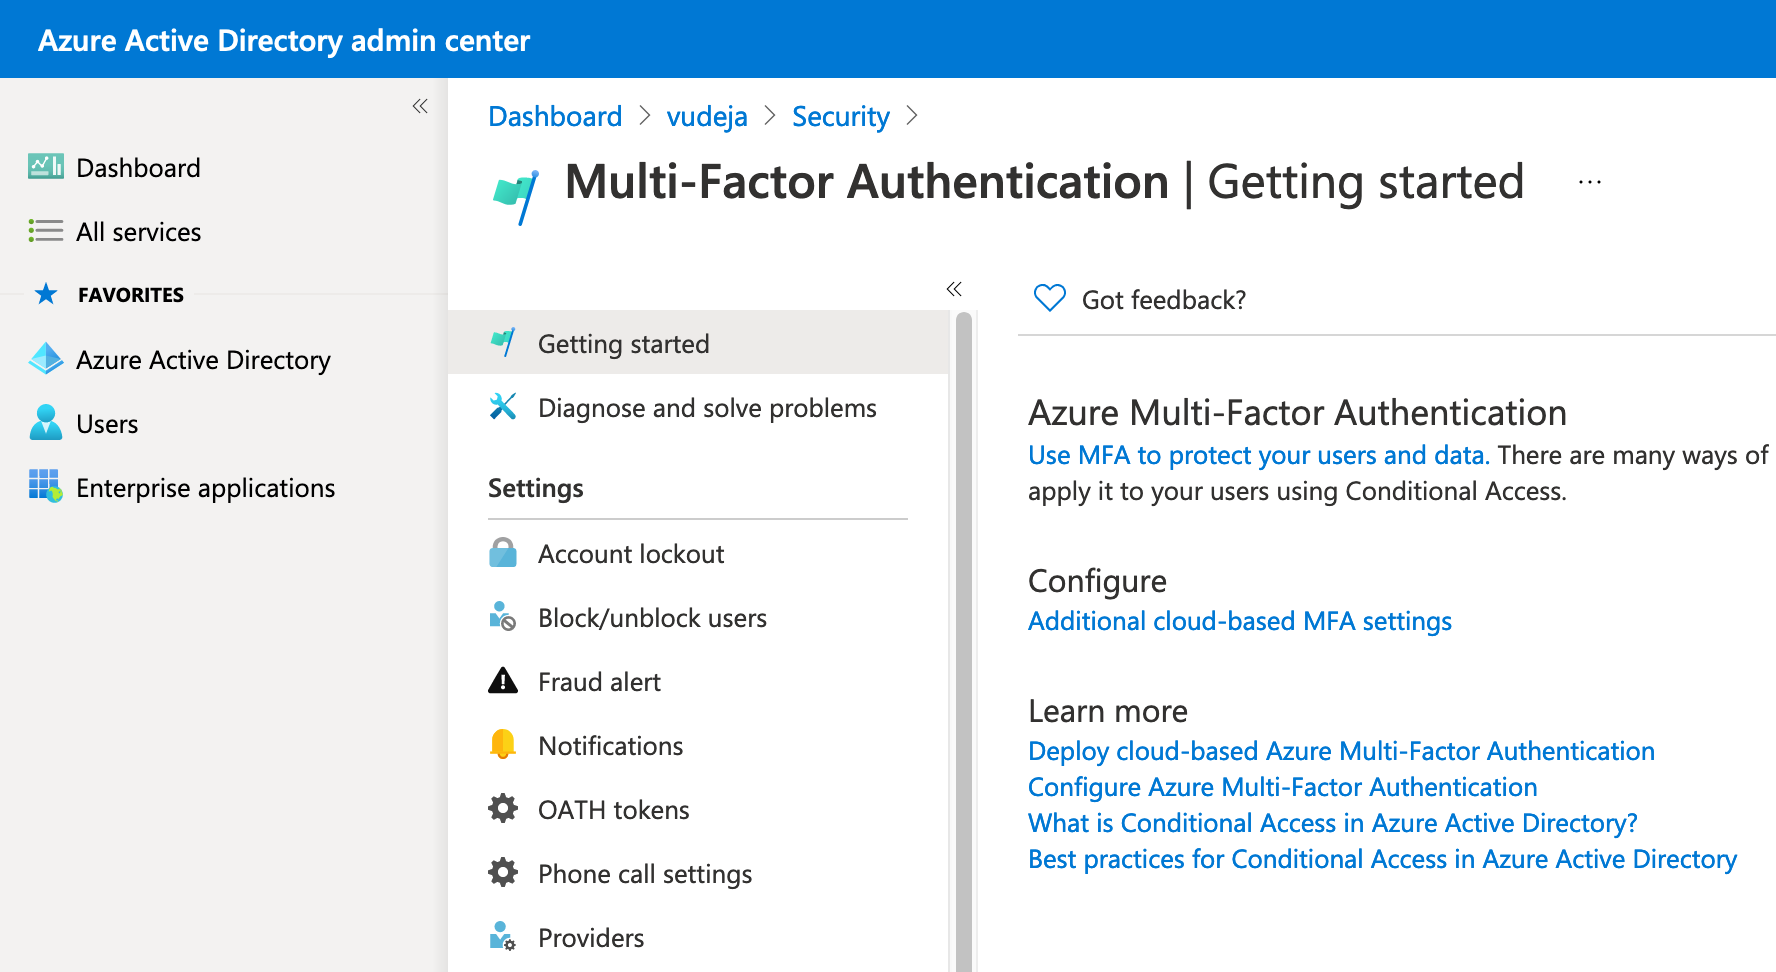
B. Configuring your Office 365 account for provisioning
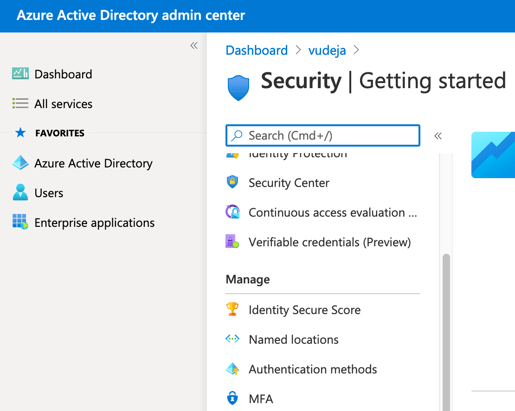
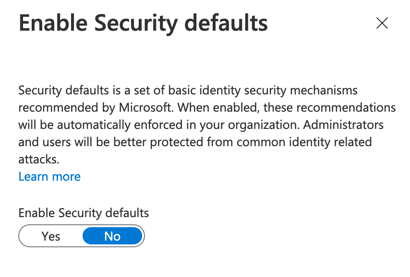
Here are some useful links in case you need more details around this.
- Azure Documentation - Security Defaults
- Azure Active Directory Security Defaults (direct link to Security Defaults settings)
- Multifactor Authentication (direct link to MFA settings)
- Or you can try this direct link "Additional cloud-based MFA settings" if you get stuck (replace tenantid with your tenant ID): https://account.activedirectory.windowsazure.com/usermanagement/mfasettings.aspx?tenantId=tenantid&culture=en-us&requestInitiatedContext=users
C. Testing your Office 365 for provisioning
We can test if this is working correctly by deactivating a person in Okta.
To do this, we:
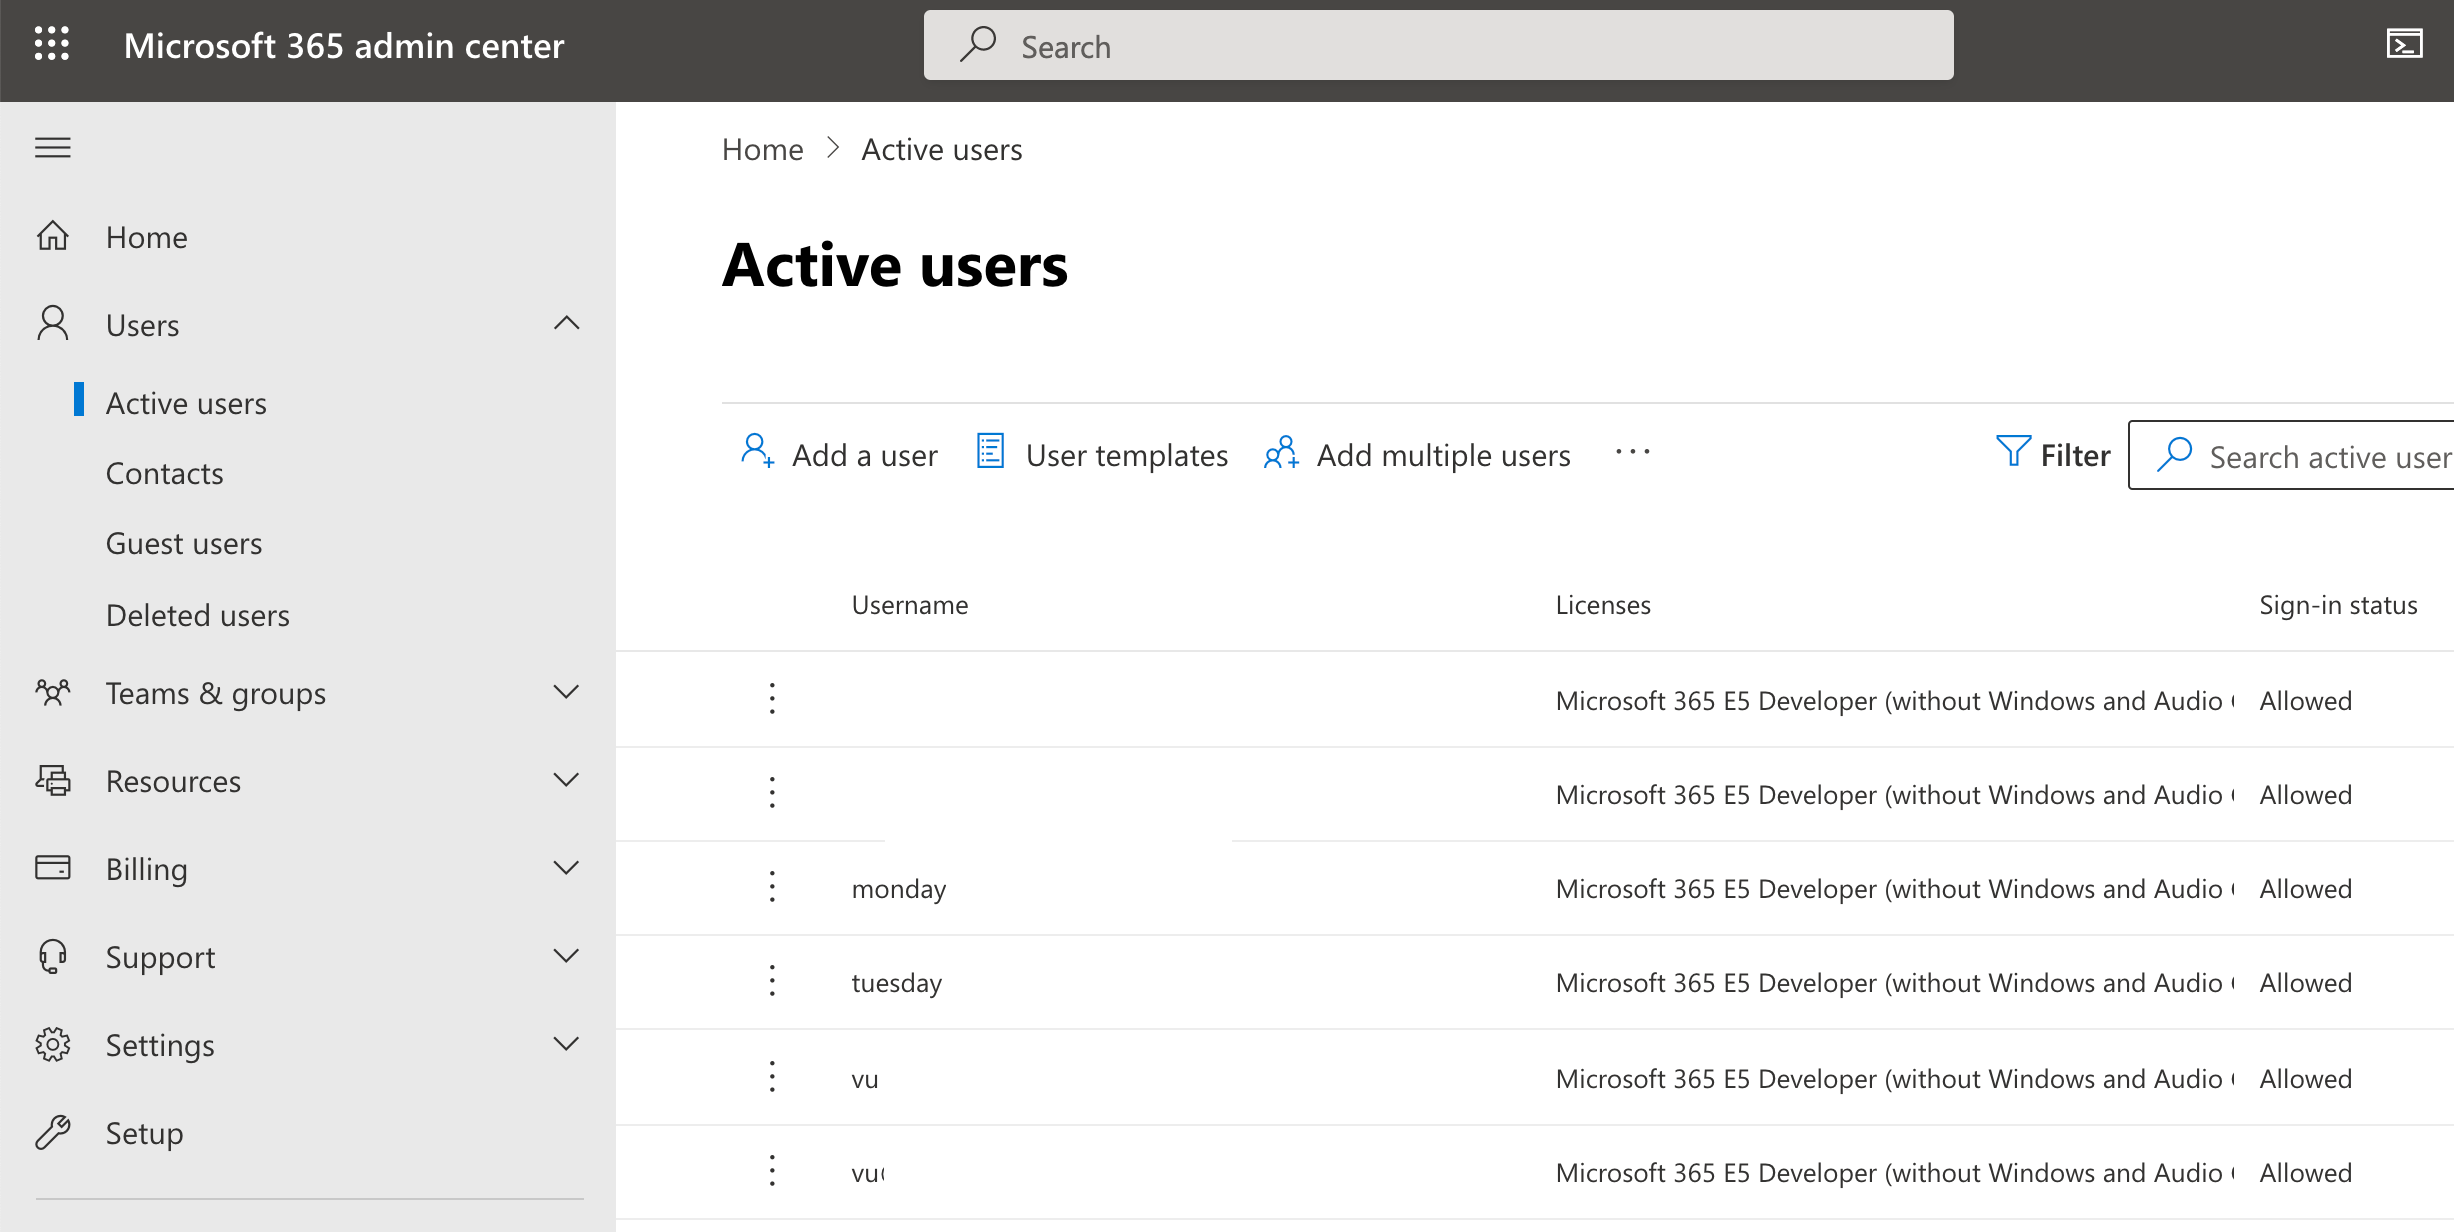
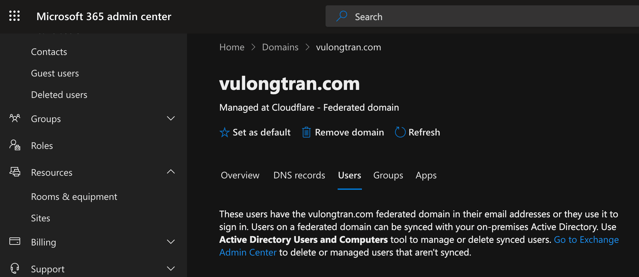
1. In Microsoft 365 admin center (Microsoft Office Admin Console), we go to our Users> Active users.
Notice that the "Sign-in status" = "Allowed" for our users.
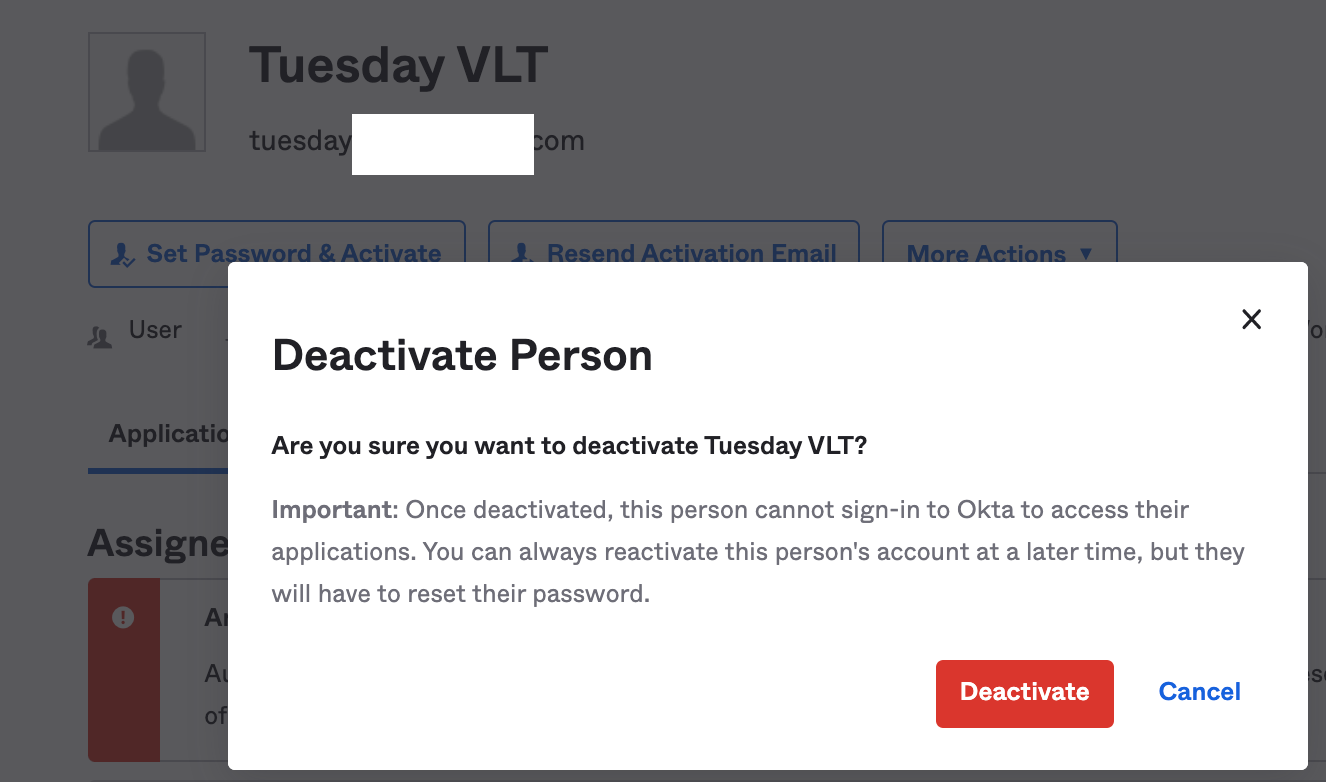
2. In Okta Admin Console, go to Directory > People.
Find a test user to deactivate, I am using tuesday@ as my example.
We would click on "More Actions> Deactivate Person" in the option there.
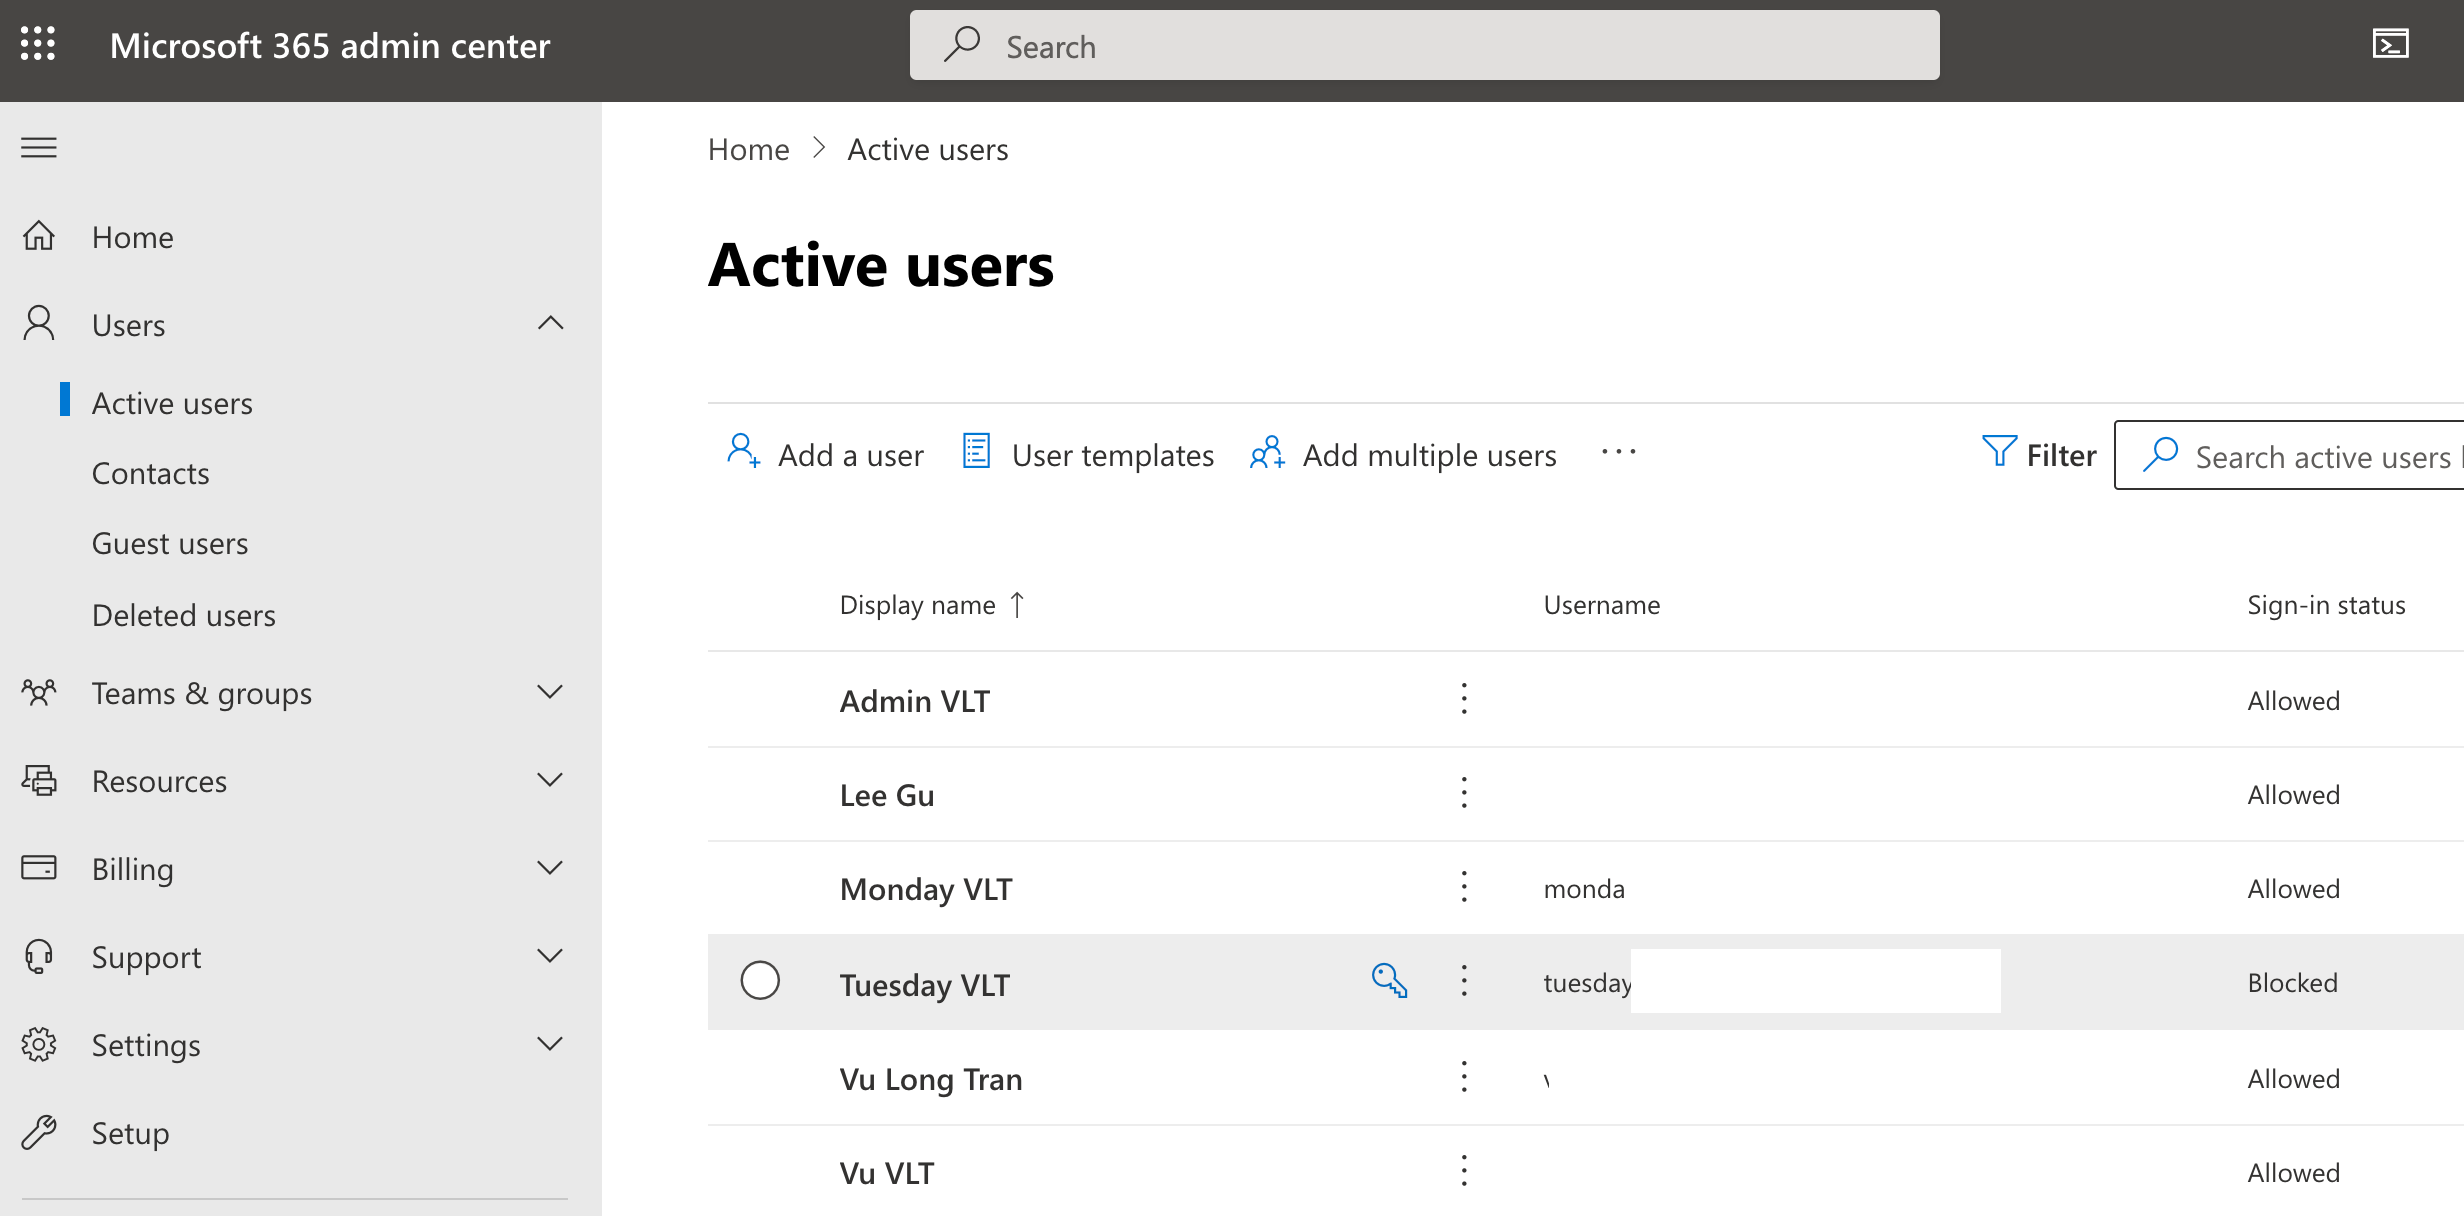
3. Go back to Microsoft 365 admin center (Microsoft Office Admin Console), and go to our Users> Active users.
Refresh the page.
You will notice that my test user (Tuesday) is now status as blocked, which is what we want to see.
Notice that the "Sign-in status" = "Blocked" for our users.
Tips and notes:
Do not use onmicrosoft.com for WS-Federation (WS-Fed)
You can't remove the ".onmicrosoft.com" domain from your account. You also cannot federate on a *.onmicrosoft.com domain. When you remove a domain, user accounts will revert back to the ".onmicrosoft.com" address as the Primary SMTP/UserprincipalName.
How to configure Office 365 WS-Federation
- Okta and Office 365 can work without AD - You can use Okta with Office 365 without an Active Directory implementation.
- Delegated authentication then import users - If you plan to delegate the authentication for your Office 365 users back to an on-premise Active Directory, then please import those users into Okta.
- Switching to SWA turns off WS-Federation - After you have set up WS-Federation, if you choose to switch the sign on method to Secure Web Authentication, then the previously set Office 365 federation will be automatically removed.
- Two methods for configuring WS-Federation
- Manual WS-Federation set up - If you choose to configure WS-Federation manually, you will need to use the Microsoft PowerShell tool.
- Automatic WS-Federation set up - f you choose to configure WS-Federation automatically, continue filling in your admin credentials into the "Sign-On Options" tab of the "Microsoft Office 365" app.
Troubleshooting:
Custom domain could not be added error
If you have received this, reset your admin password by following these instructions. You will need to know the name of your previous Microsoft account that has been using that domain. https://passwordreset.microsoftonline.com.

We have confirmed that you own dejavuguides.com, but we can't add it to your account because the domain is already added to a different Microsoft 365 organization: dejavuguides.onmicrosoft.com.Sign in to the admin center as an admin for that organization, and remove the domain dejavuguides.com. Try resetting the admin password if you can't sign in. You should be able to add the domain dejavuguides.com here after taking that step.If you can't access dejavuguides.onmicrosoft.com, please contact our support team for help.
Error if you try federate using the *.onmicrosoft.com address
You will receive an error if you try federate using the *.onmicrosoft.com address.
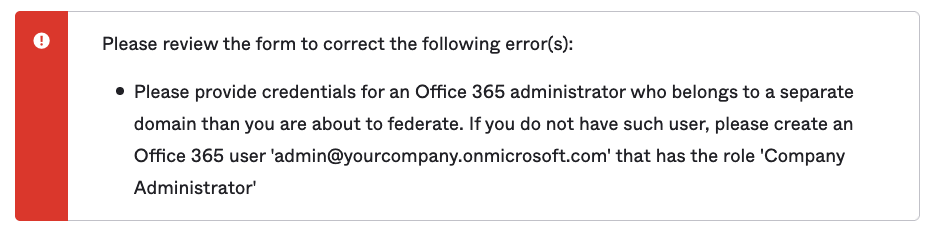
Please review the form to correct the following error(s):
Please provide credentials for an Office 365 administrator who belongs to a separate domain than you are about to federate. If you do not have such user, please create an Office 365 user 'admin@yourcompany.onmicrosoft.com' that has the role 'Company Administrator'To fix this, you will need to go to the "Sign On" tab of the "Microsoft Office 365" app and look for "Office 365 Domains" and click on "Fetch and Select". Then select your custom domain.
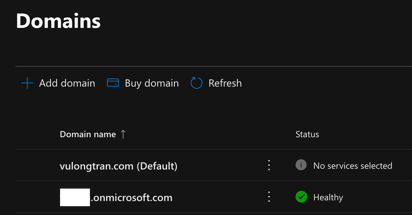
Error if you try federate using the default domain in Office 365
You will receive an error if you try federate using the default domain in Office 365.

Please review the form to correct the following error(s):
Federating to the 'Default' domain is not allowed. Please change your Office 365 domain for this app. domain=vulongtran.com
To fix this, you will need to go to Microsoft Admin console> Settings> Domains and update your default to be your *.onmicrosoft.com address or another domain other than the one you are planning to use in Okta.
Office 365 Login Failure
This usually comes up when immutable ID does not show up in the user assignment.
"Office 365 Login Failure. Your account has not been configured for this application"
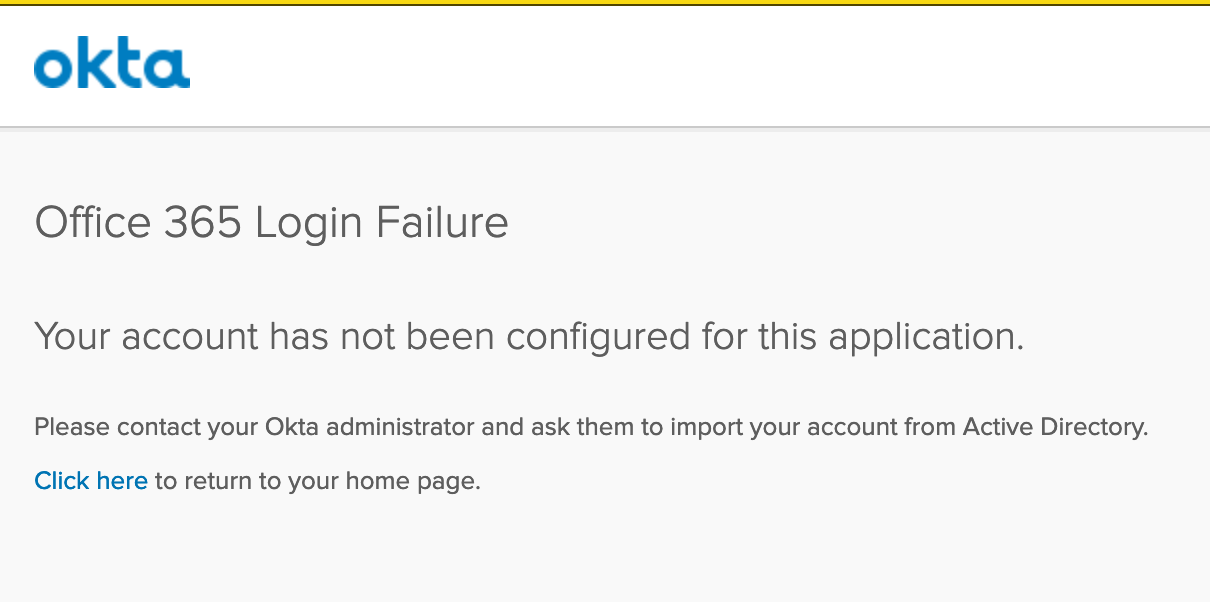
If you are not using Active Directory (as we won't be using the immutable ID from AD), you can fix this by doing the following:
In Okta> Applications> Applications
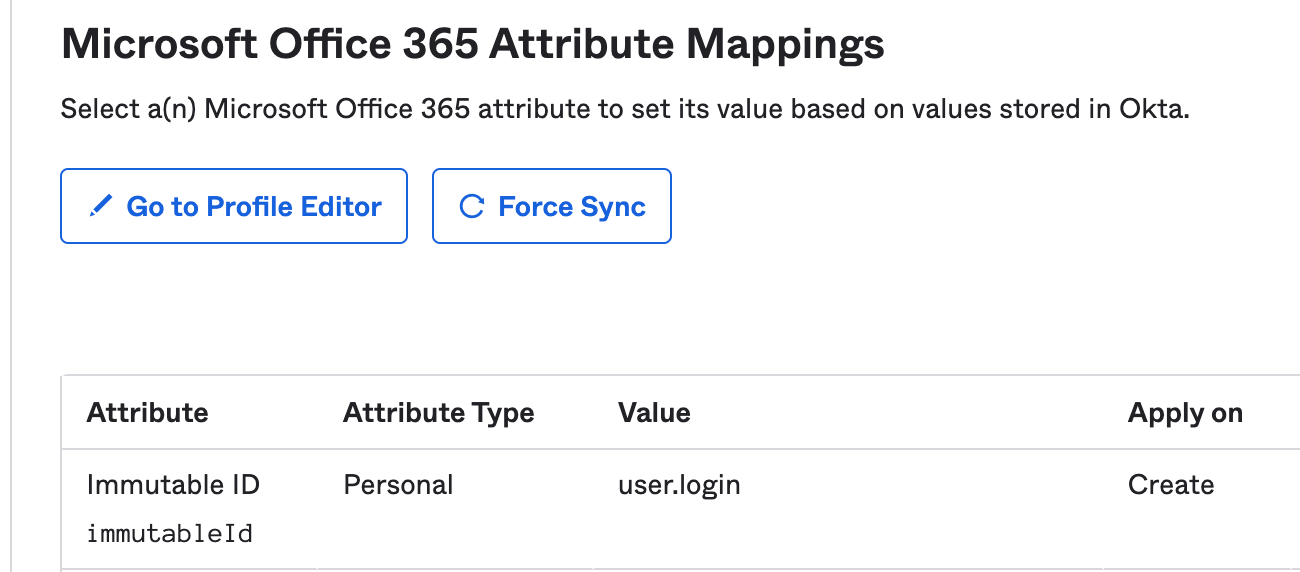
Provisioning> To App> scroll down to "Microsoft Office 365 Attribute Mappings"
Set the "Microsoft Office 365 Attribute Mappings" to have the following:
- Attribute: Immutable ID
- Value: user.login
As when you click on Assignments and then the pencil icon next to the user.

You may or may not see the "immutable ID". Microsoft Office 365 needs that immutable ID, else it will give the error message "Office 365 Login Failure. Your account has not been configured for this application".
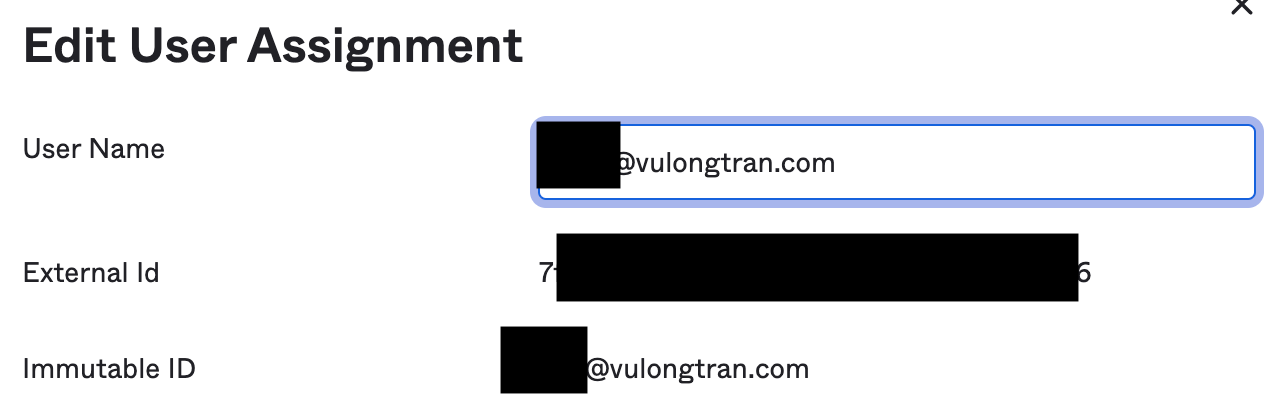
- Immutable ID (unique identifier) needs to be synchronized between Okta and Office 365.
- Check that immutable ID is synchronized by going to Microsoft Office 365> Assignments and clicking on the pencil button next to each user, and see if the user has an immutable ID showing up.
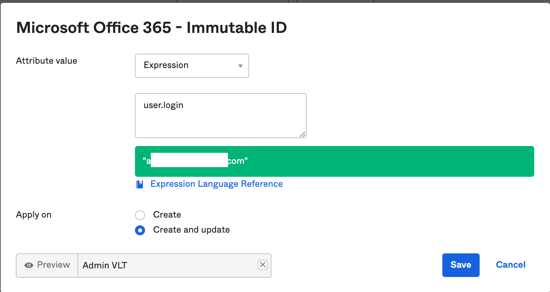
- Check the mapping between Okta and Office 365 to confirm that the immutable ID is mapped, and in this "Profile Editor" check that Okta is able to create users.
- The sourceAnchor attribute is defined as an attribute immutable during the lifetime of an object. It uniquely identifies an object as being the same object on-premises and in Azure AD. The attribute is also called immutableId and the two names are used interchangeable.
The word immutable, that is "cannot be changed", is important to this document. Since this attribute’s value cannot be changed after it has been set, it is important to pick a design that supports your scenario. More details from Microsoft on this concept here - Azure AD Connect: Design concepts - immutableIDs/ sourceAnchor.- Commonly used attributes include employeeID.
- Commonly used attributes include employeeID.
- If you are using Active Directory with Okta, so Okta will preset a search for the AD directory as a way of aligning immutable IDs and mapping it. That is, users will be provisioned into Office 365 with the Immutable ID value captured from the specified AD instance, using these mapping details.
- hasDirectoryUser()?findDirectoryUser().externalId:null
- If you have more than one AD, you can read more details from Microsoft on managing provisioning issues for Office 365 after adding a second AD instance.
You can also try this "Expression" setting if the test if you need to have the "Apply on: Create and Update" option as well.

(Optional) Check Federation status of domain on Microsoft
You can also check the federation status of your domain on Microsoft. Here's an example:
https://admin.microsoft.com/Adminportal/Home#/Domains/Details/vulongtran.com
Cannot create new user in Microsoft 365 with custom domain
You create a new user in the Microsoft 365 Admin Center in Office 365. However, when you try to assign a federated domain to the new user, the federated domain isn't listed in the user's list of domains.
This behavior is by design in Office 365. You can't create federated users through the portal. All federated users must be created on-premises and must be synced by using the Microsoft Azure Active Directory Sync Tool.
For more details:
- Okta Microsoft Office 365 app integration
- Office 365 - Configure SSO
- Office 365 - Provisioning users
- Office 365 - Provisioning Type options
- Office 365 - Set up and add custom domain
- Microsoft Azure Active Directory Sync Tool.
- Microsoft Online Services Sign-In Assistant and the Azure Active Directory Module for Windows PowerShell
Useful Troubleshooting links:
- Duplicate or invalid attributes prevent directory synchronization in Office 365
- Office 365 profile push error 400 Uniqueness violation and Duplicate Users


