

So instead, you can use run a login command on your laptop ("puppet-access login").
That is, rather than needing to SSH (e.g. "ssh centos@<10.puppetmasteripaddress> -i ssh-key.pem") into your Puppet Master server.
I will show you how I set this up with an example using my Macbook laptop workstation.
How to set up Puppet Access to log into your Puppet Master server
Step 1 - Install PE tools (Puppet Enterprise tools)
Puppet Enterprise tools, also known as PE tools, is installed by default on your Puppet Master server. We also want to install PE tools on our desired workstation, which in my example, will be my Mac laptop.
So I can download the file to our laptop to install.
I have a couple of options to download this to install.
1. Download the Mac installer dmg file via my web browser from Puppet's website here - Install Puppet Enterprise Client tools.
Or
2. Run command line - I can run this command line to download the file to my laptop.
$ curl -JLO 'https://pm.puppet.com/pe-client-tools/2019.8.1/19.8.2/repos/apple/10.15/PC1/x86_64/pe-client-tools-19.8.2-1.osx10.15.dmg'
Just choose what makes sense for you, download the dmg file to your machine, open the dmg file and install it.
Step 2 - Configure Puppet Access
Once installed we want to start configuring our Puppet Access, essentially so it is authorised to access our Puppet Master server.
We do this by creating and configuring a global configuration file and call it puppet-access.conf.
Global configuration file is located at: etc/puppetlabs/client-tools/puppet-access.conf
We want to configure the following settings inside this global configuration file. Here is an configuration file example which is formatted in JSON. {"service-url": "https://<CONSOLE HOSTNAME>:4433/rbac-api","token-file": "~/.puppetlabs/token","certificate-file": "/etc/puppetlabs/puppet/ssl/certs/ca.pem"}
So let's create and configure a global configuration file and call it puppet-access.conf.
2.1 Set up Puppet access config file details for on your workstation
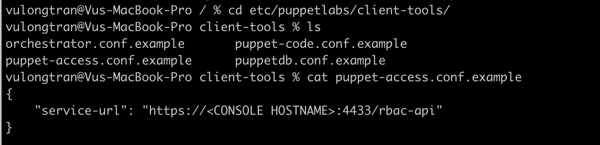
In command line we can change directory (cd) into your folder and you should see a sample installed on your Mac.
$ cd /
$ cd etc/puppetlabs/client-tools/puppet-access.conf
$ ls
$ cat puppet-access.conf && echo
So let's make a copy of the example puppet-access.conf.example file and use that for as our puppet-access.conf file. We first need to create the puppet-access.conf as it does not exist, copy the file contents across and then confirm that it is copied.
$ cd /
$ cd etc/puppetlabs/client-tools
$ sudo touch puppet-access.conf

$ cp puppet-access.conf.example puppet-access.conf

$ ls

Optional.
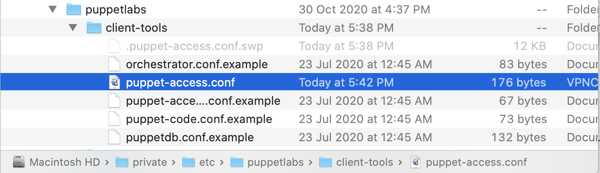
If you want to also check and see this puppet-access.config file on your Mac workstation if you follow the folder directory path. Though you might need to turn on show hidden folder and file settings so you can see it.
These this command will allow you to show hidden folder and files.
$ defaults write com.apple.Finder AppleShowAllFiles true
When you are done, you can hide hidden folder and files again with the following command.
$ defaults write com.apple.Finder AppleShowAllFiles false
2.2 Copy the Puppet access config file details from your Puppet Master for your workstation
On the Puppet Master server - If you also checked this on your Puppet Master server, you would see this pre-populated as Puppet Enterprise pre-populates this for you. We want to copy these details over to our workstation.
$ cd etc/puppetlabs/client-tools/puppet-access.conf$ ls$ cat puppet-access.conf && echo
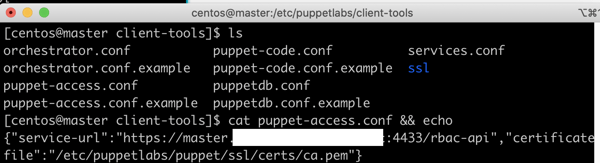
{"service-url": "https://<CONSOLE HOSTNAME>:4433/rbac-api","token-file": "~/.puppetlabs/token","certificate-file": "/etc/puppetlabs/puppet/ssl/certs/ca.pem"}
Copy these details into your workstation.
So on your workstation, let's head to the puppet-access.conf file we created earlier and make sure we have filled in the service-url, token file and certificate file. $ cd /
$ cd etc/puppetlabs/client-tools/puppet-access.conf
$ ls
$ sudo vi puppet-access.conf
Then add these details to our puppet-access.conf file and save it.
{"service-url": "https://<CONSOLE HOSTNAME>:4433/rbac-api","token-file": "~/.puppetlabs/token","certificate-file": "/etc/puppetlabs/puppet/ssl/certs/ca.pem"}
TIP - take note of the commas at the end of the lines. As you may get JSON formatting error if a comma is missing or in the wrong place.
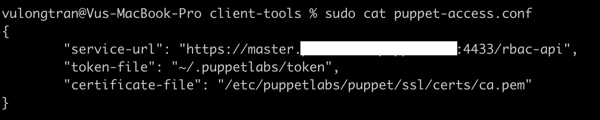
Once done we can check that this is done okay by using this command to show the contents of what is puppet-access.conf.
$ sudo cat etc/puppetlabs/client-tools/puppet-access.conf
Step 3 - Copy the CA certificate file from Puppet Master to your workstation
Copy the CA certificate file ca.pem file from Puppet Master to your workstation. We want to copy this so we have the authentication details on your workstation.
On the master, navigate to /etc/puppetlabs/puppet/ssl/certs/ and copy ca.pem to the directory you created on the workstation.
You can check what is currently on your ca.pem file by running this command:
$ etc/puppetlabs/puppet/ssl/certs/ca.pem
Then you can manually copy and paste this certificate details from your Puppet Master's ca.pem to your Workstation's ca.pem file.
On your workstation, you can make sure file permissions are correct. That is, executable by the system and read only for your ca.pem file by running this command:
$ chmod 444 /etc/puppetlabs/puppet/ssl/certs/ca.pem
Step 4 - Log in and test that logging in with Puppet Access works
Now it is time to test that we have configured our configuration file and CA certificate file correctly.
We can do this by running this command:
$ puppet access login
If you logged in successfully, you should see something like the following:

If this does not work you can try the following command which is aiming to test that the details you have set are correct. So what we can do now is add these flags to test to your puppet-access login request, that is flags such as service-url, token-file, certificate-file.
$ puppet access login --service-url https://<HOSTNAME OF PUPPET ENTERPRISE MASTER SERVER>:4433/rbac-api
If it works, you will get something like this. 
So if that is working, it likely means that the service-url that you set in your config file from the earlier step may have a typo. So go back to your puppet-access.conf file that you set up earlier and check (located in etc/puppetlabs/client-tools/puppet-access.conf).
If you want to use the other flags (such as certificate-file or token-file) you can add that to check as well.
$ puppet access login --service-url https://<HOSTNAME OF PUPPET ENTERPRISE MASTER SERVER>:4433/rbac-api --config-file /etc/puppetlabs/puppet/ssl/certs/ca.pem --token-file ~/.puppetlabs/token
Step 5 - Check and confirm that authentication token was generated
Let's confirm and check our Puppet Access authentication token is the same as the one stored in ~/.puppetlabs/token.
$ puppet-access show
$ sudo cat ~/.puppetlabs/token

$ puppet-access show
Step 6 - Optional - Set a Puppet-access lifetime
Now that you confirmed that Puppet Access log in is working, you can also set a timeline on how long the token lasts for.
- By default, the access-based token will last one hour. But if you want to generate a different lifetime for your token, you can set one. This will allow you to keep one token for multiple sessions.
- You simplify specify a numeric value followed by "y" (years), "d" (days), "h" (hours), "m" (minutes), or "s" (seconds).
For example, "12h" generates a token valid for 12 hours. So the token to expire after 12 hours.
$ puppet-access login --lifetime 12h
For example, "1y" generates a token valid for one (1) year . So the token to expire after a year.
$ puppet access login --lifetime 1y
FAQ
If you ever need more details on puppet-access command flags, here is a list for you.
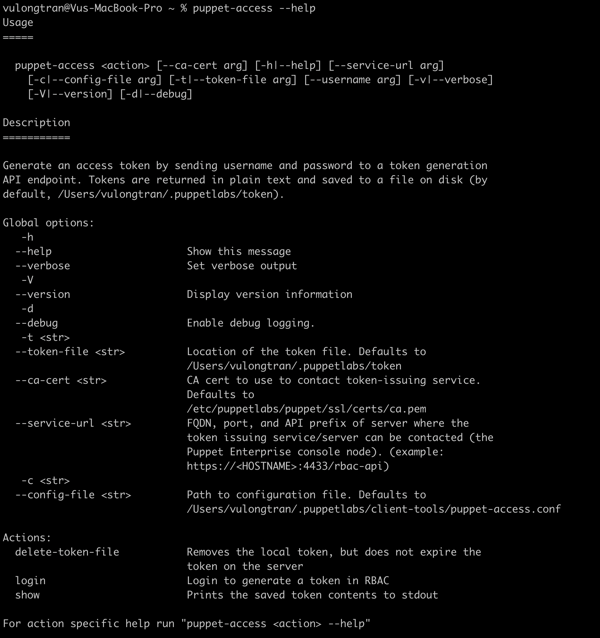
$ puppet-access --help
Usage=====puppet-access <action> [--ca-cert arg] [-h|--help] [--service-url arg][-c|--config-file arg] [-t|--token-file arg] [--username arg] [-v|--verbose][-V|--version] [-d|--debug]Description===========Generate an access token by sending username and password to a token generationAPI endpoint. Tokens are returned in plain text and saved to a file on disk (bydefault, /Users/vulongtran/.puppetlabs/token).Global options:-h--help Show this message--verbose Set verbose output-V--version Display version information-d--debug Enable debug logging.-t <str>--token-file <str> Location of the token file. Defaults to/Users/vulongtran/.puppetlabs/token--ca-cert <str> CA cert to use to contact token-issuing service.Defaults to/etc/puppetlabs/puppet/ssl/certs/ca.pem--service-url <str> FQDN, port, and API prefix of server where thetoken issuing service/server can be contacted (thePuppet Enterprise console node). (example:https://<HOSTNAME>:4433/rbac-api)-c <str>--config-file <str> Path to configuration file. Defaults to/Users/vulongtran/.puppetlabs/client-tools/puppet-access.confActions:delete-token-file Removes the local token, but does not expire thetoken on the serverlogin Login to generate a token in RBACshow Prints the saved token contents to stdoutFor action specific help run "puppet-access <action> --help"
Errors:
If you get any of these errors, this is what you can do.
No authentication token exists at path /Users/username/.puppetlabs/token.
The following message, you need to log in first with "$ puppet access login".
No authentication token exists at path /Users/vulongtran/.puppetlabs/token. Please log in with `puppet access login`
That is, type the following command:
$ puppet access login
Unable to reach the RBAC server

Unable to reach the RBAC server at https://master.vulongtran.com:4433/rbac-api/v1/auth/token due to the following error: SSL peer certificate or SSH remote key was not OK.
You may need to check that the right service-url of your Puppet Master noted correctly in the command:
$ puppet-access login --service-url https://master.vulongtran.com:4433/rbac-api


