This guide details the steps to help you to change your plan on Cloudflare using the Cloudflare API. You can always change your plan within the user interface of the Cloudflare portal, however, you may be looking to change your plans in bulk and that is where using the Cloudflare API makes more sense.
For the purposes of Cloudflare settings, a "zone" or "domain zone" is Cloudflare's naming convention for a "website" URL address.
Prerequisites
- Domain zone is already added to Cloudflare - You can simple add the domain as a Free domain zone (how to add here)
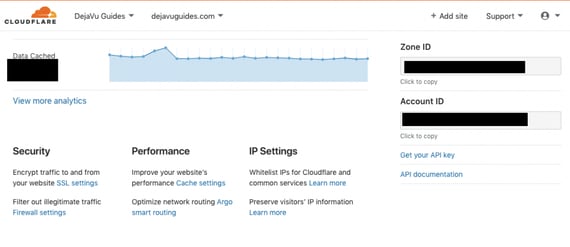
- Domain zone ID: Zone ID retrieved from your Cloudflare portal. In my example, the zone ID for dejavuguides.com. Note - this is different from the ID you see in the website URL when you're logged into Cloudflare.
- Cloudflare plan in mind - So you know what you want to upgrade your plan to. You will typically need to have a credit card in place within your Cloudflare portal if you plan on selecting Professional or Business plan. Or if you have purchased an Enterprise license from the Cloudflare sales team, then an Enterprise license enabled by the team in the backend.
- Details to allow you to use the Cloudflare API - This is essentially your log in details and ensures only authorised users can make changes to your Cloudflare settings for your domain zones.
- Auth-Email: Your Cloudflare log in email address
- Auth-Key: Your Cloudflare Global API Key (which you'll find in your Cloudflare settings when you're logged in)
Overview of the process to change your domain plan
To upgrade a domain to Cloudflare Enterprise using the API, you will need to go through a two step process.
- Identify your CloudflarePlanIDs - Identify the Available CloudflarePlanID that is unique for your domain zone (Using the "List Available Plans" API)
- Edit the domain zone plan - Edit domain zone to the plan type you have chosen (Using the "Edit Zone" API)
How to upgrade your Cloudflare domain plan using the API
1. Identify your Cloudflare Plan IDs using the Cloudflare API
This is required, as Cloudflare has specific Cloudflare plan IDs set up in the backend, so you will need to identify what your unique Cloudflare plan IDs are for your domain zone.
There is a unique ID for Free, Professional, Business and Enterprise plans for each of your domain zones.
Then you run the List Available Plans API within a Terminal (MacOS) or CommandPrompt (Windows).
curl -X GET "https://api.cloudflare.com/client/v4/zones/YOURZONEID/available_plans"
-H "X-Auth-Email: YOUREMAILADDRESS" <br> -H "X-Auth-Key: YOURAPIKEY(Global-Auth-Key)"
-H "Content-Type: application/json"
You will then receive an output for this "List Available Plans" API.
OUTPUT:
{"result":[<br>{"id":"UNIQUE-FREE-PLAN-ID","name":"Free Plan","price":0,"currency":"USD","frequency":"monthly",
"is_subscribed":false,"can_subscribe":true,"legacy_id":"free","legacy_discount":false,"externally_managed":false},
{"id":"UNIQUE-BUSINESS-PLAN-ID","name":"Business Plan","price":200,"currency":"USD","frequency":"monthly",
"is_subscribed":false,"can_subscribe":true,"legacy_id":"business","legacy_discount":false,"externally_managed":false},
{"id":"UNIQUE-PROFESSIONAL-PLAN-ID","name":"Professional Plan","price":20,"currency":"USD","frequency":"monthly",
"is_subscribed":false,"can_subscribe":true,"legacy_id":"pro","legacy_discount":false,"externally_managed":false},
{"id":"UNIQUE-ENTERPRISE-PLAN-ID","name":"Enterprise","price":0,"currency":"USD","frequency":"monthly",
"is_subscribed":false,"can_subscribe":false,"legacy_id":"enterprise","legacy_discount":false,"externally_managed":true}],"success":true,"errors":[],
"messages":[],"result_info":{"page":1,"per_page":25,"total_pages":1,"count":4,"total_count":4}}
Take note of the Unique Cloudflare Plan IDs here, and copy and paste the one you want to change your plan to.
Now we need to change the plan to that using the next API.
2. Edit the domain zone plan using the Cloudflare API
Change the domain zone plan using the Cloudflare "Edit Zone" API
curl -X PATCH "https://api.cloudflare.com/client/v4/zones/ZONEID"
-H "X-Auth-Email: YOUREMAILADDRESS"
-H "X-Auth-Key: YOURAPIKEY-Global-Auth-Key"
-H "Content-Type: application/json"
--data '{"plan":{"id":"INSERT-CLOUDFLARE-PLAN-ID-HERE"}}'
You will then receive an output for this Cloudflare "Edit Zone" API. It should look something like this but with your domain details.
{ "success": true, <br>"errors": [], <br>"messages": [],
"result": {
"id": "ZONE-ID", "name": "dejavuguides.com", "development_mode": 7200,
"original_name_servers": [ "ns1.dejavuguides.com", "ns2.dejavuguides.com" ], "original_registrar": "GoDaddy", "original_dnshost": "NameCheap",
"created_on": "2014-01-01T05:20:00.12345Z", "modified_on": "2014-01-01T05:20:00.12345Z", "activated_on": "2014-01-02T00:01:00.12345Z",
"owner": { "id": "OWNER-ID", "email": "user@example.com",
"type": "user" }, "account": { "id": "ACCOUNT-ID", "name": "Demo Account" },
"permissions": [ "#zone:read", "#zone:edit" ],
"plan": { "id": "CLOUDFLARE-PLAN-ID", "name": "Pro Plan", "price": 20, "currency": "USD",
"frequency": "monthly", "legacy_id": "pro",
"is_subscribed": true, "can_subscribe": true },
"plan_pending": { "id": "CLOUDFLARE-PLAN-ID", "name":
"Pro Plan", "price": 20, "currency": "USD", <br>"frequency": "monthly", "legacy_id": "pro", <br>"is_subscribed": true, "can_subscribe": true },
"status": "active", "paused": false, "type": "full",
"name_servers": [ "tony.ns.cloudflare.com", "woz.ns.cloudflare.com" ] } }
Then log into your Cloudflare dashboard and check if it has been changed to this new plan you have selected successfully.
Screenshots to help you:


