So you might be wondering why I wanted to move from Blogger to WordPress?
 |
| Blogger.com |
Well without going into a lot of detail right now, I have been on the fence for a while on whether to move to WordPress or not. I finally took the plunge after helping a friend with his website that happened to be hosted on WordPress. Through that experience I saw how easy and powerful Wordpress can be, especially with the plugins and themes available on the platform. It's not for everyone, as it depends how much customisation you'd like to do on your blogging website.
What's in this How to Move from Blogger to WordPress guide?
- SEO/ Website traffic (making sure current website traffic is not lost)
- Current posts, images and comments
- Costs
- Future Scalability and Flexibility
What do you need to know and have when migrating from Blogger to Wordpress?
- Website hosting - WordPress.org does not host your website as it's only a content management system (CMS) platform, so you need to find your own website hosting to load it onto. Think of it like Microsoft Windows or Mac iOS, you need to load it onto a piece of hardware. In this case, it's a website hosting server provided by website server hosts (more details below).
- A custom domain name (if you don't have one already) - this is optional, but needed if you want yourname.com. I personally have use Hover.com as it's a no frills offering with domain privacy included for free. But I have also used CrazyDomains and GoDaddy, but there are pros and cons with any provider. I am leaning towards Hover.com for it's simple user interface and no frills. While I have some referral links in the above links, please choose what makes sense to you.
- Blogger is BlogSpot - When I am referring moving Blogger to WordPress, I am referring to moving your BlogSpot blog from Google's Blogger.com to a WordPress content management system (CMS) platform.
- WordPress.com is different from WordPress.org - I know, confusing right?
- WordPress.com is a fully hosted solution of WordPress, while
- WordPress.org is a self-hosted version of WordPress.
- The reason why we want to use WordPress.org is want Google analytics because won't allow you to use plugins without having to pay a lot more for it, along with other features (Read the WordPress.com vs WordPress.org differences).
Step 1 - How To Move Your Blog from Blogger to WordPress
- Sign up for Website hosting - I decided to use SiteGround but there's a variety of different website hosts out there. It up to you on what you think make sense for you.
- I spend a day researching and reading reviews on website hosts and plugins, I decided to use SiteGround for it's strong customer service and security. This is my first time using a website host, so I wanted to make sure I had the support I needed along the way. Their Live Chat support is fantastic, and I will write a more extensive review on SiteGround in time. A2Hosting was my second choice of a provider to go with. Mainly as their benefits and costs were roughly the same lines as SiteGround.
- When Black Friday comes up and you can generally get a good deal now on your hosting. Hosting deals is for these four day period (Black Friday, Saturday, Sunday, CyberMonday). I have seen the following sales before.
- SiteGround's Black Friday specials is up to 70% off their hosting plans.
- No coupon required.
- A2Hosting coupons are:
- "FAST60" = 60% Off Web Hosting Packages
- "VPS50" = 50% Off Dynamic VPS
- "50QUICK" = 50% Off Managed VPS
- SiteGround's Black Friday specials is up to 70% off their hosting plans.
- Create a temporary website - You want to have a temporarily area on where you can set up and make changes. As you want to be able to set up your plugins and align your website themes and look and feel. You set this up on your website host. I had a database instance set up for me by the SiteGround team (you can also create a database instance for testing your WordPress website yourself too if you are keen and tech-savvy*).
- The goal is to have something like this that you can work with: https://555.666.777.888/~newurl
- *If you're trying this. After you have setup FTP, got to phpMyAdmin database and find the WordPress Options table and replace siteurl and home with the new temp URL you want to use.
 |
| phpMyAdmin is under the Databases section in your cPanel (web hosting control panel) |
- Wordpress - You now have a database instance to work with. Click the One-Click install to install WordPress onto your website.
- Set your website links to match your Blogger links - Now you have access to WordPress on your The step here is to make sure your website links match your Blogger.com links. This is called your "permalink structures". You want them to match as this is important to maintain consistency with where your old traffic is going.
You want the https://yourwebsite.blogspot.com/2015/11/post-name-separated-with-spaces.html to have the right matching ends. To do set up these Permalinks in Wordpress:
- Go to Settings and Permalinks
- Choose custom structure
- Then type this in the field /%year%/%monthnum%/%postname%.html/
- Click Save.
This just is telling it to make links like this:
- https://www.yourwebsite.com/%year%/%monthnum%/%postname%.html/
- https://yourwebsite.blogspot.com/2015/11/post-name-separated-with-spaces.html
Step 2- Blog imports - Import your blog posts
Now you want to start importing your blog posts over from Blogger.com to your WordPress website. Then you want to set up some redirects so that traffic comes to your new location for your blogs, website pages, etc. This is where the cool WordPress plugins come in handy.
1. Install Plugins
Click on the “Plugins” menu item on the left-hand side of your WordPress dashboard. Once you see the screen below, click on the, “Add New” (Plugin) button at the top.
2. Search for "Blogger to Wordpress importer"
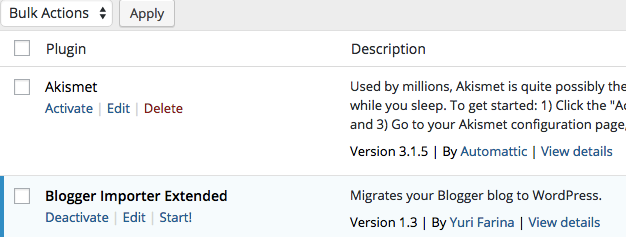
3. Click and Install "Blogger Importer Extended 1.3" plugin
This will install this on your WordPress website. Click "Activate Plugin" when you see the installing plugin screen.
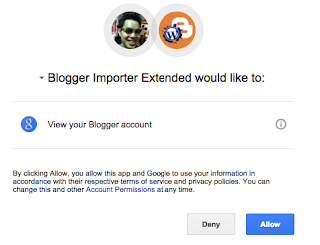
6. Click "Allow"
7. Assign a user to your content
8. Then you get a complete message

Troubleshooting the Blogger Importer Extended 1.3" plugin
(Optional reading - skip this section if it doesn't apply to you)
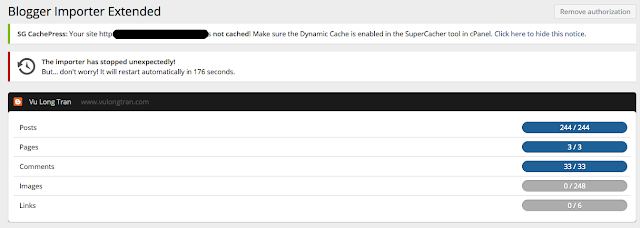
Note - Don't worry just like earlier, if you see the plugin stopped for a few times. As it can sometimes get stuck while crawling your old website for posts, images, etc., so it restarts the process and keeps retrieving information from there.
If you accidentally close your screen while this process is running, you can actually log back in and it will continue where it left off. For me it hung on this step, and I didn't see my images didn't migrate over at first (as per screenshot above). So I deleted the Plugin and also the imports Posts and Pages. I tried to reinstall but it still remembered the old progress and what I'd updated already. I ended up restoring some posts and then it came back up again. Just try those troubleshooting steps if you did get stuck.
Step 3 - Redirections
This allows you to keep you Google Search Rank so this step should not be underestimated. If you’ve worked hard to have your Blogger posts ranked highly in top search results, you don’t want all that work to go to waste when you move to WordPress. The easiest way for non-techies to accomplish this is to use one of two plugins created just for this situation. Both offer detailed instructions which you should follow closely as changes need to made on your old Blogger site as well as on your new WordPress one.
Blogger 301 Redirect Plugin for WordPress
This is the Blogger 301 Redirect plugin is the one I used. One of the other bloggers out there said it was recommended by the folks who created the Blogger Importer Extended plugin that you just used to import your content. I found it worked okay, but not perfect. So it may be worth checking out some other plugins out there. 1. Install Plugins Click on the “Plugins” menu item on the left-hand side of your WordPress dashboard. Once you see the screen below, click on the, “Add New” (Plugin) button at the top. 2. Search for "Blogger 301 Redirect" 3. Click and Install "Blogger 301 Redirect" plugin 4. Activate the Blogger 301 Redirect Plugin
This will now redirect visitors from your old site on Blogger.com to Wordpress. This will help you to keep your blog traffic and manage your PageRank after your migration from Blogger to WordPress. Blogger to WordPress If the previous plugin doesn’t work for you, you can use the Blogger to WordPress plugin as a backup to migrate your redirections.
- Blogger to WordPress Redirection Plugin
- Quick Redirects (301 Redirects)


