

This is a guide to help you understand how to install and set up RADIUS on a Linux machine hosted on a cloud provider.
Before jumping into that, please let me define what RADIUS is and why it is useful to use it.
RADIUS as defined by TechTarget is:
Remote Authentication Dial-In User Service (RADIUS) is a client/server protocol and software that enables remote access servers to communicate with a central server to authenticate dial-in users and authorize their access to the requested system or service. - TechTarget
RADIUS as defined by Wikipedia is:
Remote Authentication Dial-In User Service (RADIUS) is a networking protocol that provides centralized authentication, authorization, and accounting (AAA) management for users who connect and use a network service. -Wikipedia
RADIUS is useful as it allows you to manage authentication for a network appliances where RADIUS can allow you to authenticate remote users against an existing userbase and/or enable multifactor authentication on these network appliances.
RADIUS is a client/server protocol, so it will operate with two components, where the RADIUS Client will send a request to a RADIUS Server, and then the RADIUS Server will process the request and send back a response.
So for RADIUS to operate, we will need to have 1) a RADIUS Client and 2) a RADIUS Server.
- RADIUS Server - RADIUS Server receives user connection requests, authenticate users, and then return configuration information that is necessary for the client to deliver services to the user.
- RADIUS Client - RADIUS Client is often used as a proxy client to other RADIUS servers and/or other authenticator servers or services, which is why you often hear about it when you are talking about MFA (multifactor authentication) and VPNs.
Note when we are referring to:
- Common RADIUS Clients - Common RADIUS Clients we are referring to are network appliances such as a Network Access Servers (NAS), VPNs, wireless access points, routers, or switches. Examples include Linksys WRT54G and dial-up equipment commonly available from large network manufacturers. We are not referring clients such as desktop computer, laptops, tablets, mobile phones, etc. as we do not want these to talk directly to our RADIUS server.
- Common RADIUS Server - Common RADIUS Server products include FreeRADIUS, Cisco ISE (Identity Services Engine), Microsoft NPS (Network Policy Server), or Okta RADIUS agent.
For our testing we will use FreeRADIUS as our RADIUS Server, and localhost as our RADIUS Client.
So let's get started.
How to install FreeRADIUS on a Linux virtual machine
We will do the following things to set up a test environment to demonstrate how RADIUS operates. Using FreeRADIUS as our RADIUS Server, and localhost as our RADIUS Client.
Steps
- Step 1 - Create a Virtual Machine (server) with your favourite cloud provider
- Step 2 - Install RADIUS Server onto our Linux server
- Step 3 - Adding a RADIUS Client to connect with our FreeRADIUS RADIUS Server (beyond localhost)
- Step 4 - Configure Firewall for inbound RADIUS traffic on our FreeRADIUS RADIUS Server hosted on Google Cloud Platform
Notes
Step 1 - Create a Virtual Machine (server) with your favourite cloud provider
Create a Virtual Machine with your favourite cloud provider, this may be Amazon Web Services (AWS), Google Cloud platform (GCP), Microsoft Azure, etc.
We will use this Virtual Machine (server) in the later steps.
You can install Linux (Ubuntu Debian or Centos) onto this virtual machine server, depending on your preferences and comfortability. It is possible to install FreeRADIUS onto a Windows server as well, but we will focus on a Linux server today.
Step 2 - Install RADIUS Server on our Linux server
We need to install a RADIUS Server on our Linux or Windows server.
In my example, I will be using:
- Centos 7 as my Linux operating system,
- Google Cloud Platform as my Linux server cloud provider,
- FreeRADIUS as our RADIUS Server, and
- localhost as our RADIUS Client.
2.1 Install FreeRADIUS on our Linux machine running CentOS 7 on Google Cloud Platform
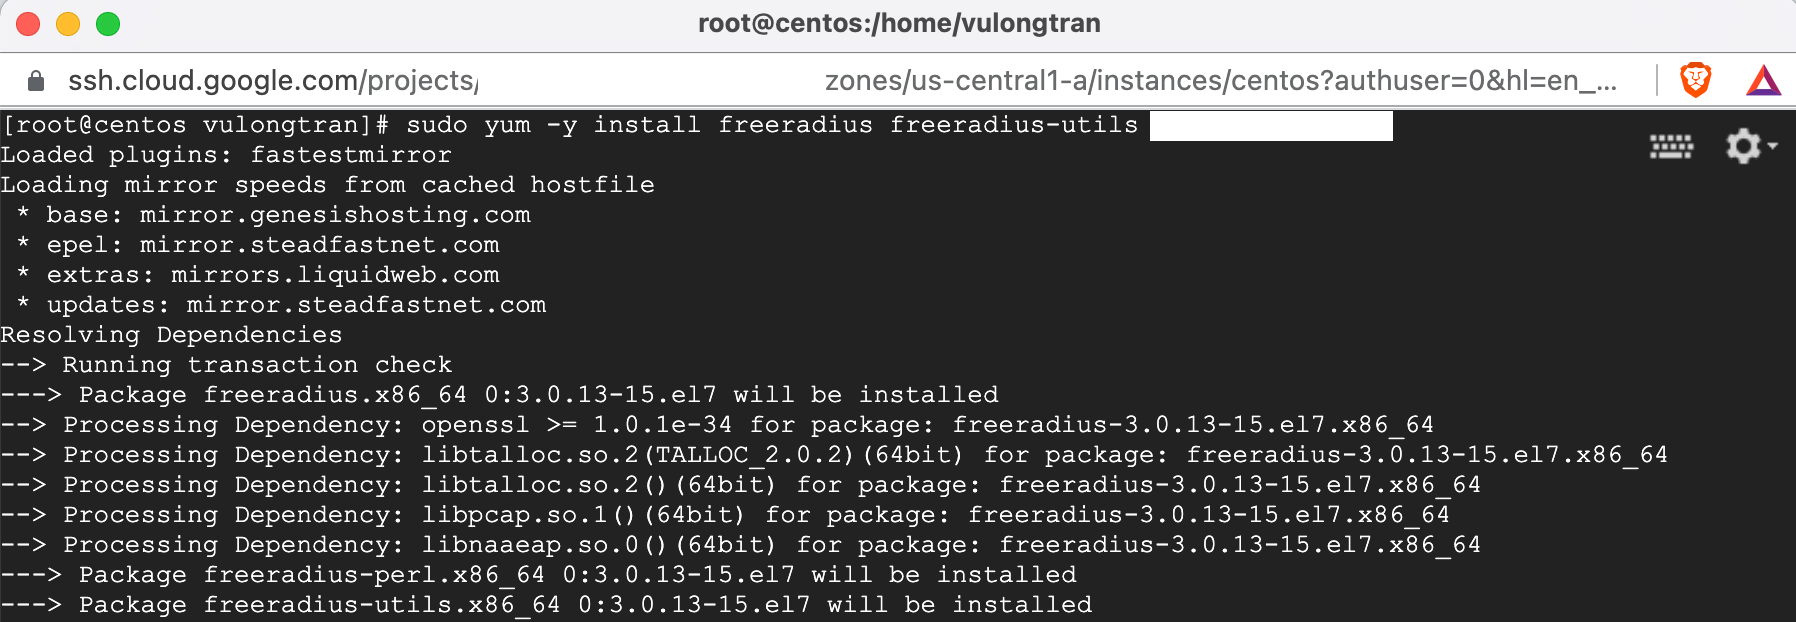
We want to log into our Linux virtual machine (using SSH) and make sure that our CentOS 7 is updated with the latest patches, then we want to install FreeRADIUS and FreeRADIUS modules. We can run the following commands to do this:
sudo yum -y update
sudo yum -y install freeradius freeradius-utils
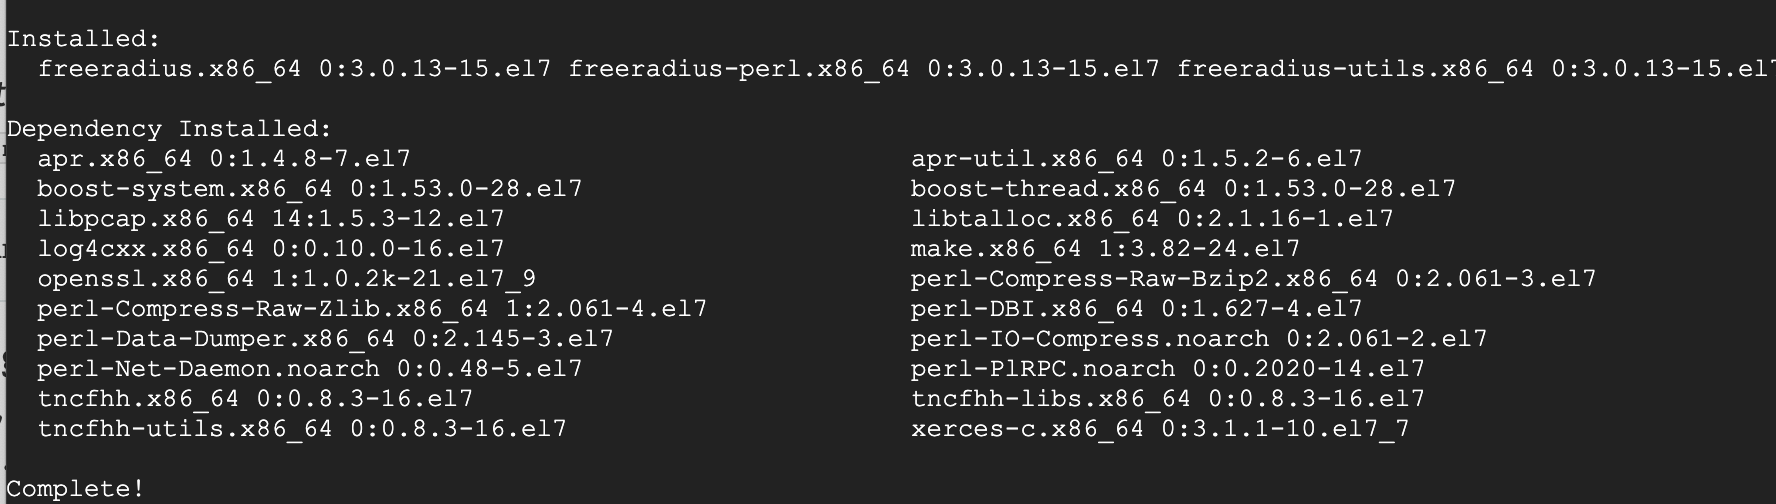
Once it has finished installing, you will see this "Complete!" message.
Now that's installed, let's run to "start" FreeRADIUS service and "enable" will also start it up on server boot up:
systemctl start radiusd.servicesystemctl enable radiusd.servicesystemctl status radiusd.service

If you are looking to do other things like mysql, ldap or similar. Run this command see what other FreeRADIUS modules you may need to use.
sudo yum search all freeradius

2.2 Configure CentOS firewall for our FreeRADIUS Server
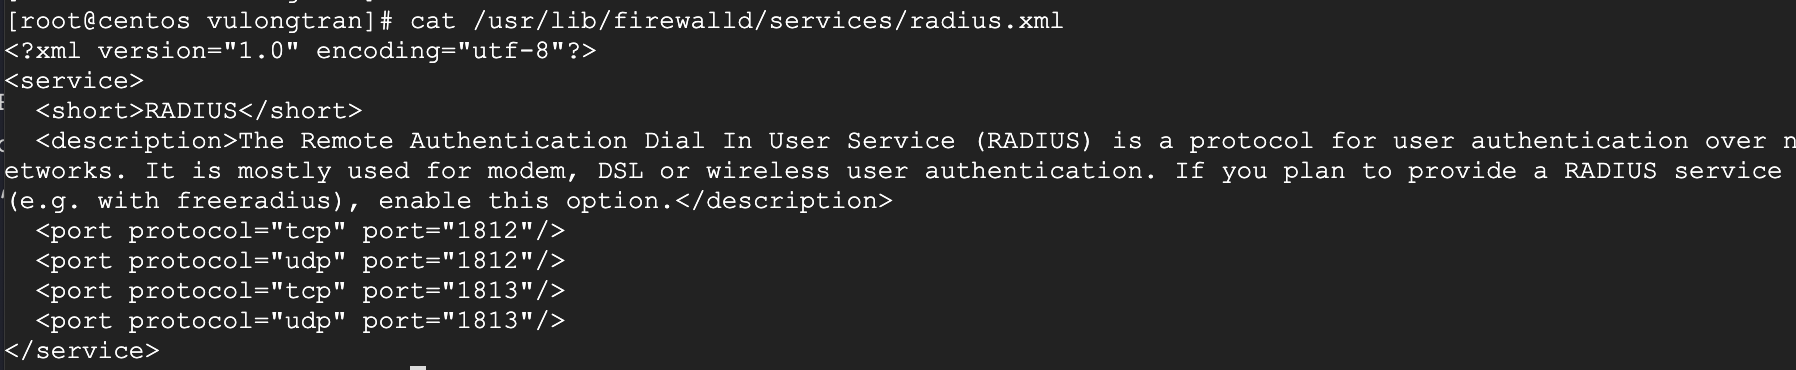
We need to allow FreeRADIUS RADIUS Server to push radius and httpd packets and uses UDP ports 1812 and 1813.
As we are using Centos 7, we will need to configure firewalld to allow radius and httpd packets.
We can check the configuration file added by FreeRADIUS by running:
cat /usr/lib/firewalld/services/radius.xml
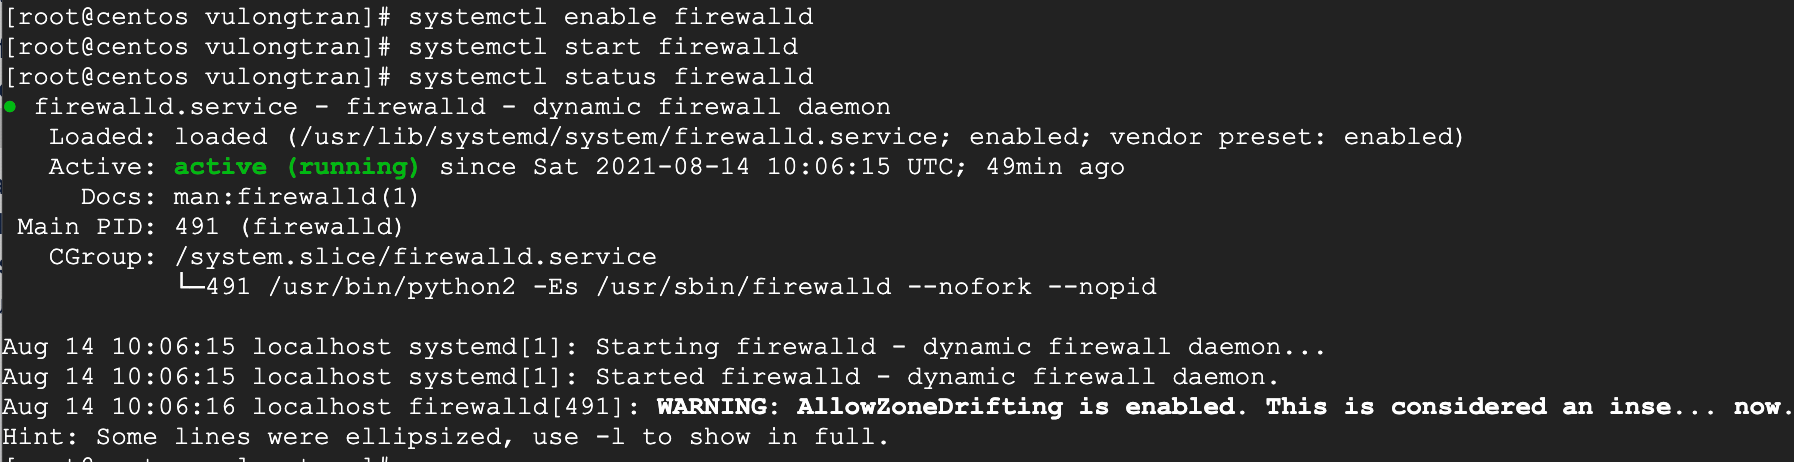
Start, enable firewalld and check it’s status:
systemctl enable firewalldsystemctl start firewalldsystemctl status firewalld
Create permanent rules to default zone to allow http, https and radius services.
firewall-cmd --add-service={http,https,radius} --permanent
Reload firewalld for the changes to take effect
firewall-cmd --reloadfirewall-cmd --state

Confirm that the services were successfully added to default zone
firewall-cmd --get-default-zonefirewall-cmd --list-services --zone=public

2.3 Test our FreeRADIUS Server has been installed correctly
When the server has been installed on a new machine, the first step is to close FreeRADIUS RADIUS Server service, and then start it in debugging mode, as user "root" and confirm that everything has been installed correctly.
Run the following commands to do this:
pkill radiusradiusd -X
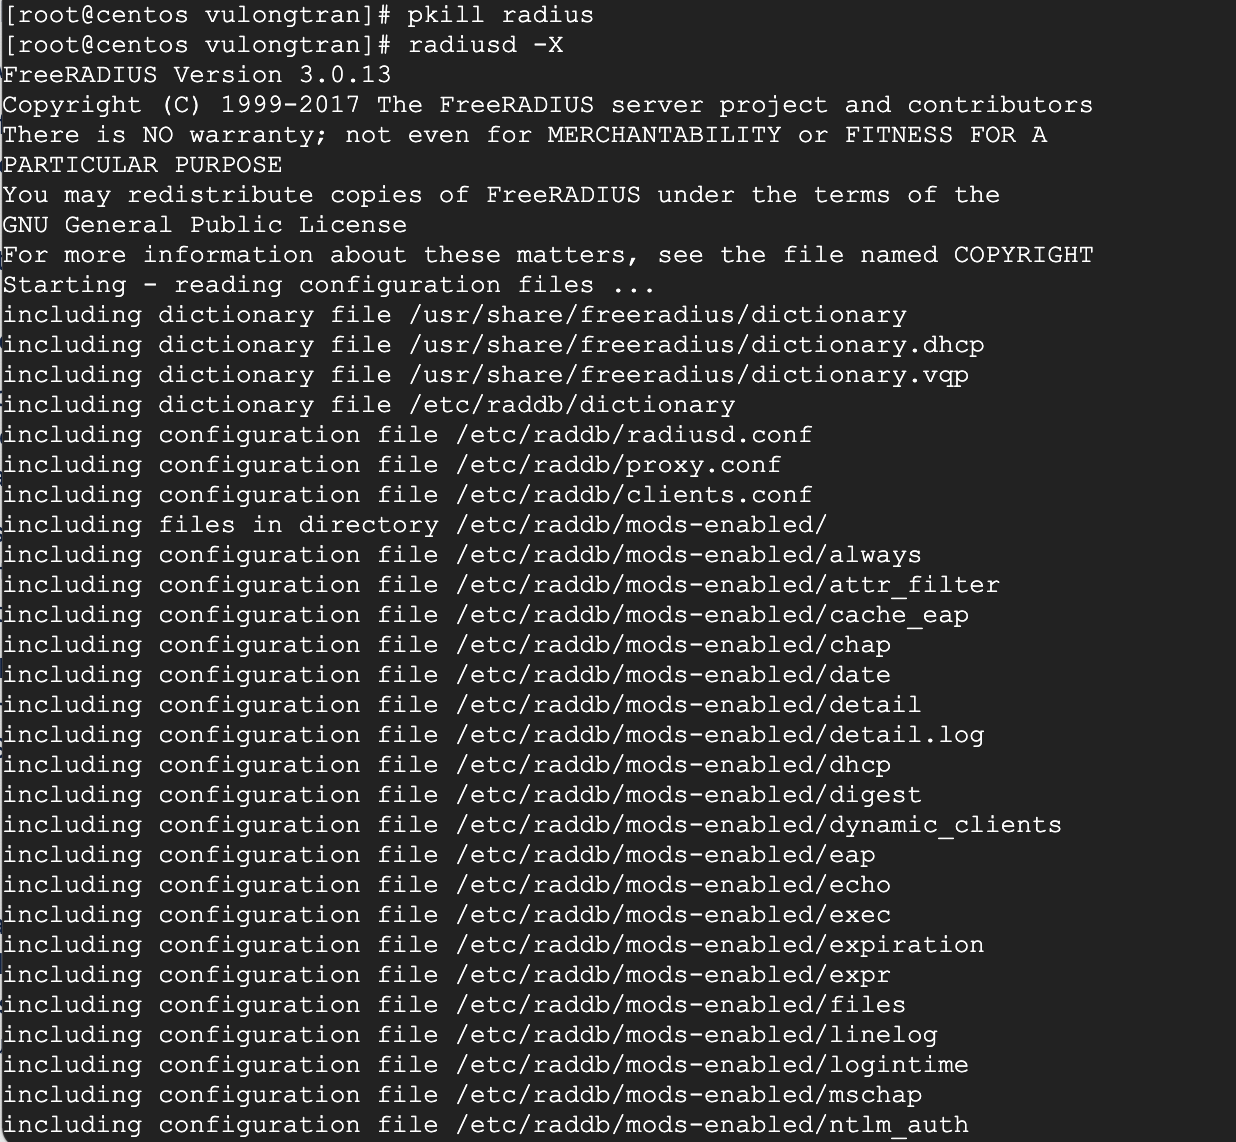
It will then process. We are waiting for it to say "Ready to process requests".
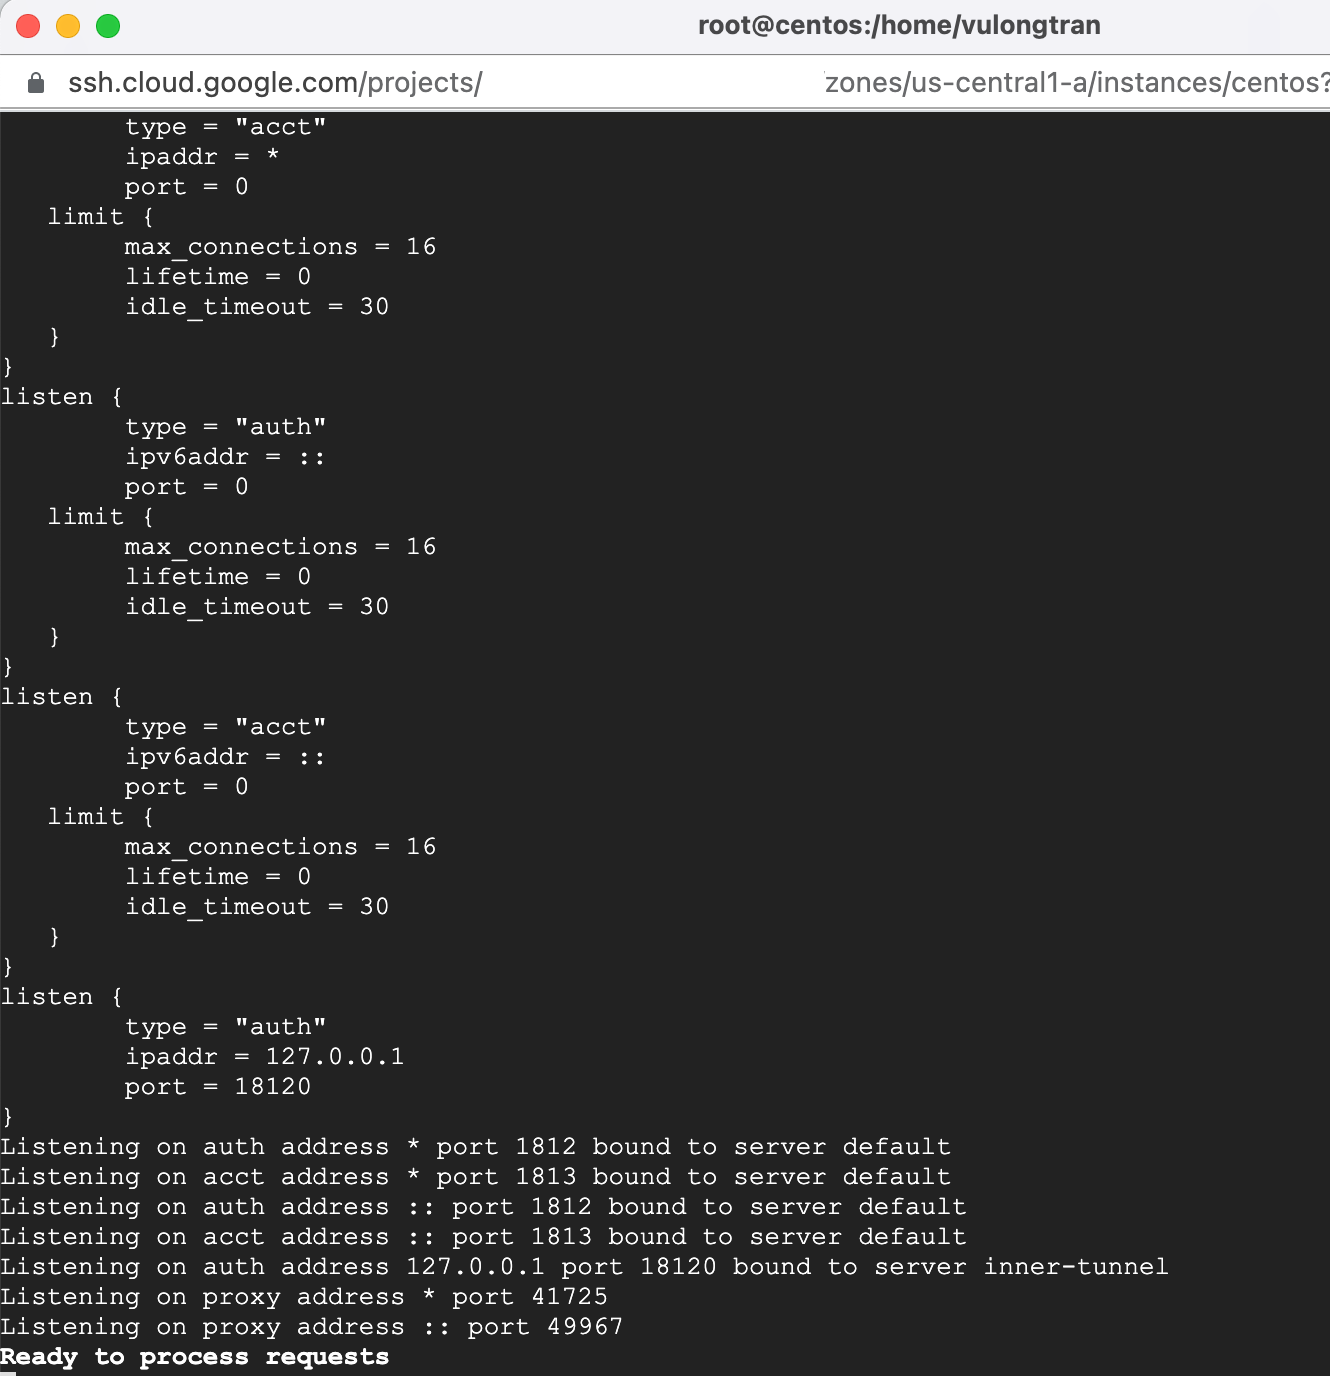
If the output says "Ready to process requests", then you are all set. Your FreeRADIUS server is installed and configured properly.
2.4 - Test our FreeRADIUS Client can authenticate
We want to test with a local test user that we can log in from our RADIUS Client (localhost) to our RADIUS Server (Centos 7 Linux virtual machine). So we will add a local test user and configure our RADIUS Server.
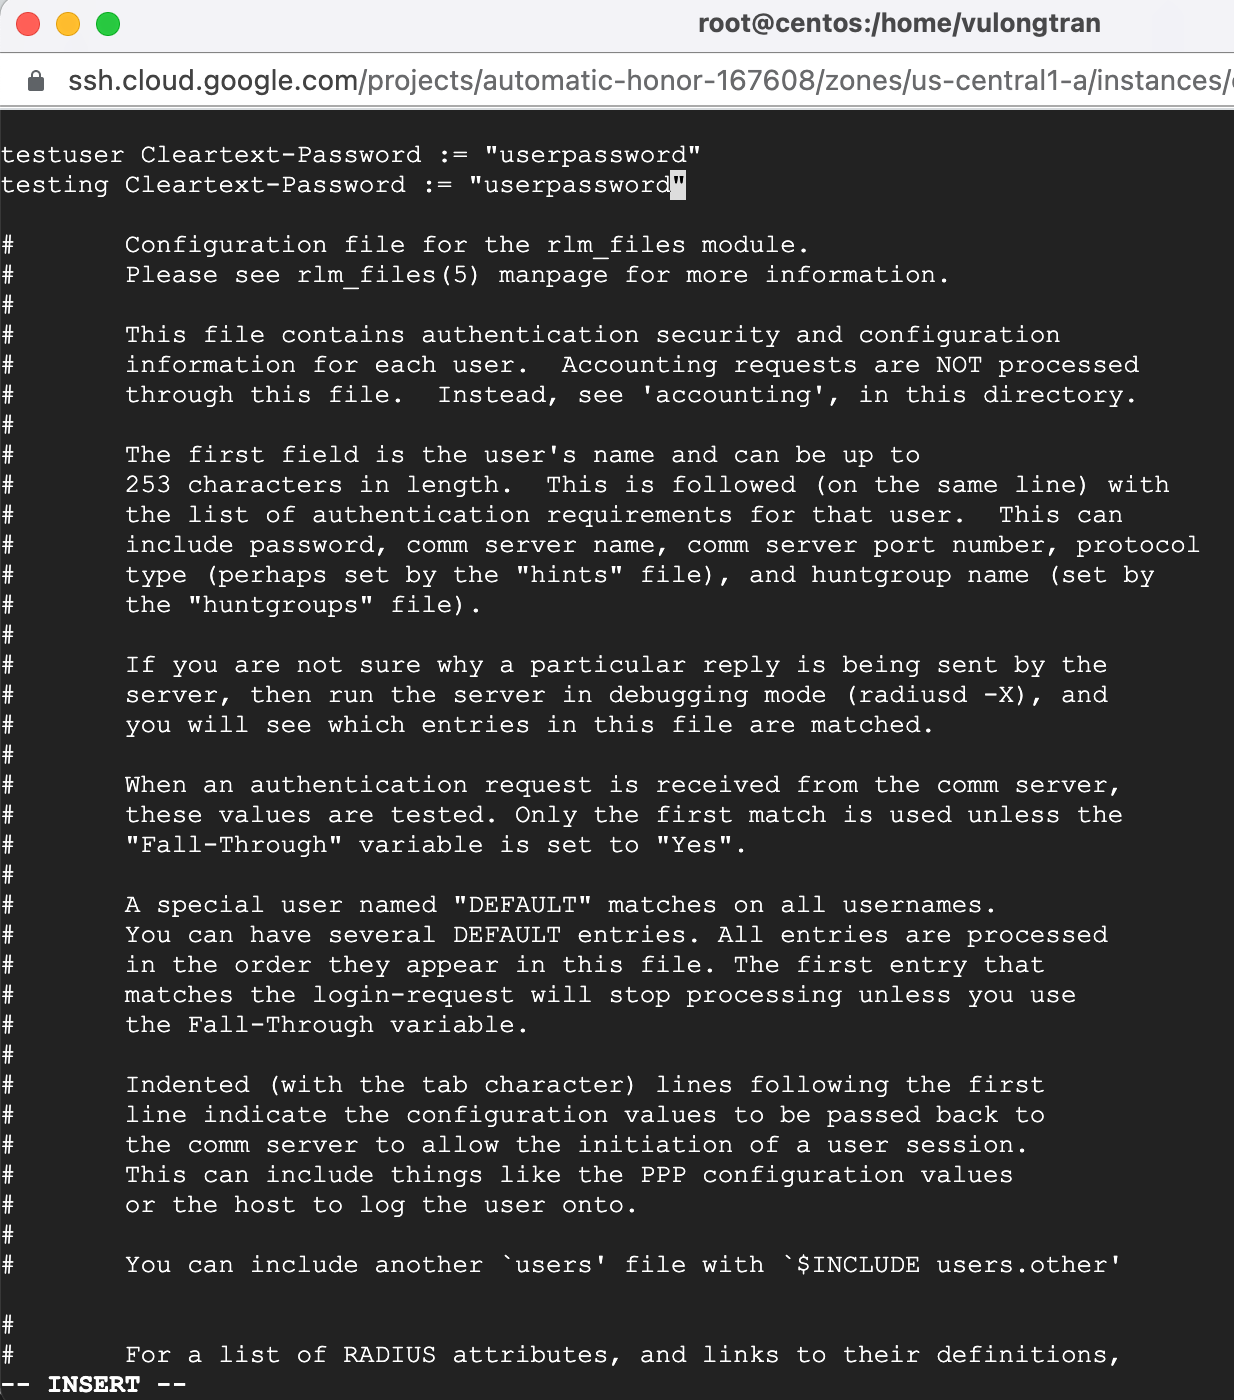
We will do this by on our RADIUS Server we will edit the users file, which reside in the files module configuration directory.
cat /etc/raddb/usersvi /etc/raddb/users

We will be using vim editor to edit the users file. You are welcome to use nano editor or similar if you prefer.
At the top of the users file, before anything else, type "i", and add the following detail. Then when you're done, press "esc" and type ":wq" and press the "return" button to write the changes.
testuser Cleartext-Password := "userpassword"testing Cleartext-Password := "userpassword"
After updating the config files, to allow your changes to take effect, you can restart your freeRADIUS using this command and then check that it is restarted fine:
systemctl restart radiusd
systemctl status radiusd
Close FreeRADIUS and start the server in debugging mode (radiusd -X). We will also run radtest. in another terminal window. We can do this by running the following commands.
pkill radius
radiusd -X

In another terminal window, we will run radtest to log in as our test users.
We will use this format for our user:
radtest username userpassword ipaddress udpportnumber my_radius_app_secret
For our test users that we created earlier, we can run these commands:
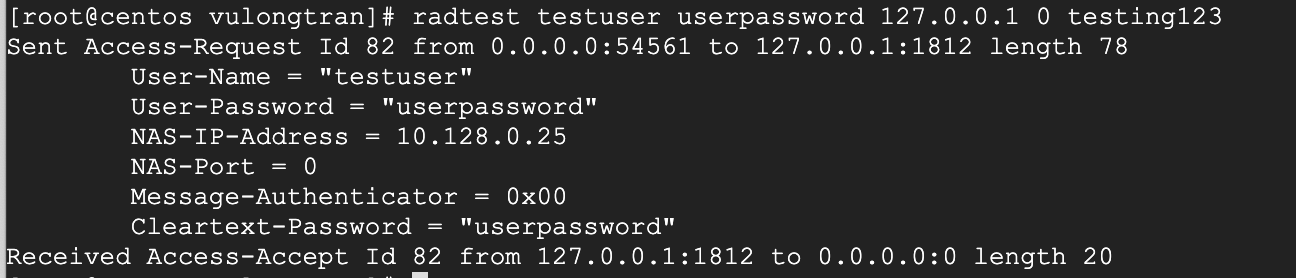
radtest testuser userpassword 127.0.0.1 0 testing123
radtest testing userpassword 127.0.0.1 0 testing123
Please do try open that second Terminal window, as you want to check for any possible errors as we run this. But if you cannot open a second Terminal window that is fine too. The extra Terminal window is just for debugging purposes.
- Terminal Window 1 - debugging (with the command "
radiusd -X") - Terminal Window 2 - radtest log in (with the command "
radtest testuser userpassword 127.0.0.1 0 testing123")

I am using Google Cloud Platform to host my virtual machine, so I SSH into my Centos Linux machine a second time to have that additional Terminal window.
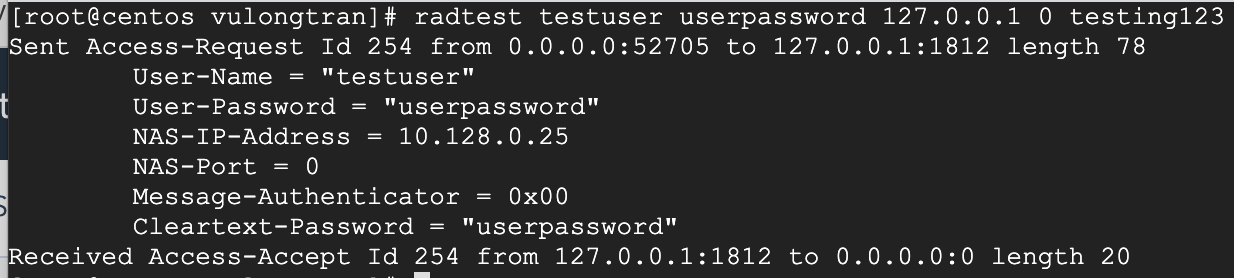
[root@centos vulongtran]# radtest testuser userpassword 127.0.0.1 0 testing123
Sent Access-Request Id 254 from 0.0.0.0:52705 to 127.0.0.1:1812 length 78
User-Name = "testuser"
User-Password = "userpassword"
NAS-IP-Address = 10.128.0.25
NAS-Port = 0
Message-Authenticator = 0x00
Cleartext-Password = "userpassword"
Received Access-Accept Id 254 from 127.0.0.1:1812 to 0.0.0.0:0 length 20
Where:
- User-name - testuser
- User-Password - testing123
- Server Hostname or IP Address - 127.0.0.1 (this is your localhost)
- NAS Port - 0
- Cleartext-Password - userpassword
If you get any RADIUS server secret errors, the default User-Password for your localhost is "testing123"). You can change this in this clients config file . Clients config file is located at /etc/raddb/clients.conf on a Centos server.
Step 3 - Adding a RADIUS Client to connect with our FreeRADIUS RADIUS Server (beyond localhost)
The earlier testing we did test runs radtest logins from our localhost.
We want to add RADIUS Clients interact with our RADIUS Server, so we can do this outside of localhost (which is our local server machine).
As we are currently doing the following:
- FreeRADIUS as our RADIUS Server, and
- localhost as our RADIUS Client.
So we change this so that the localhost is changed to our Linux machine machine and accessed via the Internet.
- FreeRADIUS as our RADIUS Server, and
- Linux virtual machine on Google Cloud as our RADIUS Client.
As we want to move closer to ensuring our set up will be able to simulate a production environment which would normally have network appliances (such as Wifi, VPNs) which engages via the internet and/or our private network.
We will need to update and configure our firewall on our RADIUS Server to allow RADIUS Client to talk and send RADIUS traffic to our RADIUS Server.
Essentially, our RADIUS Client will send requests (such as Access-Request packets) to our RADIUS Server via our UDP port (that we have defined, e.g. 1812). So we need to allow and open this UDP port to accept the inbound requests from our RADIUS Client (to our RADIUS Server). By default, all inbound requests are blocked (to our RADIUS Server).
So how do we open our defined UDP port to inbound RADIUS traffic on our RADIUS Server?
We will need to configure our firewall for inbound RADIUS traffic on our virtual machine.
As my FreeRADIUS RADIUS Server is a virtual machine hosted on the cloud provider, Google Cloud Platform, I will configure my firewall there.
Step 4 - Configure Firewall for inbound RADIUS traffic on our FreeRADIUS RADIUS Server hosted on Google Cloud Platform
I am using Google Cloud Platform so I will show you how to open an inbound port to allow for the RADIUS traffic to come into your RADIUS Server.
To start, log into our Google Cloud Platform Console.
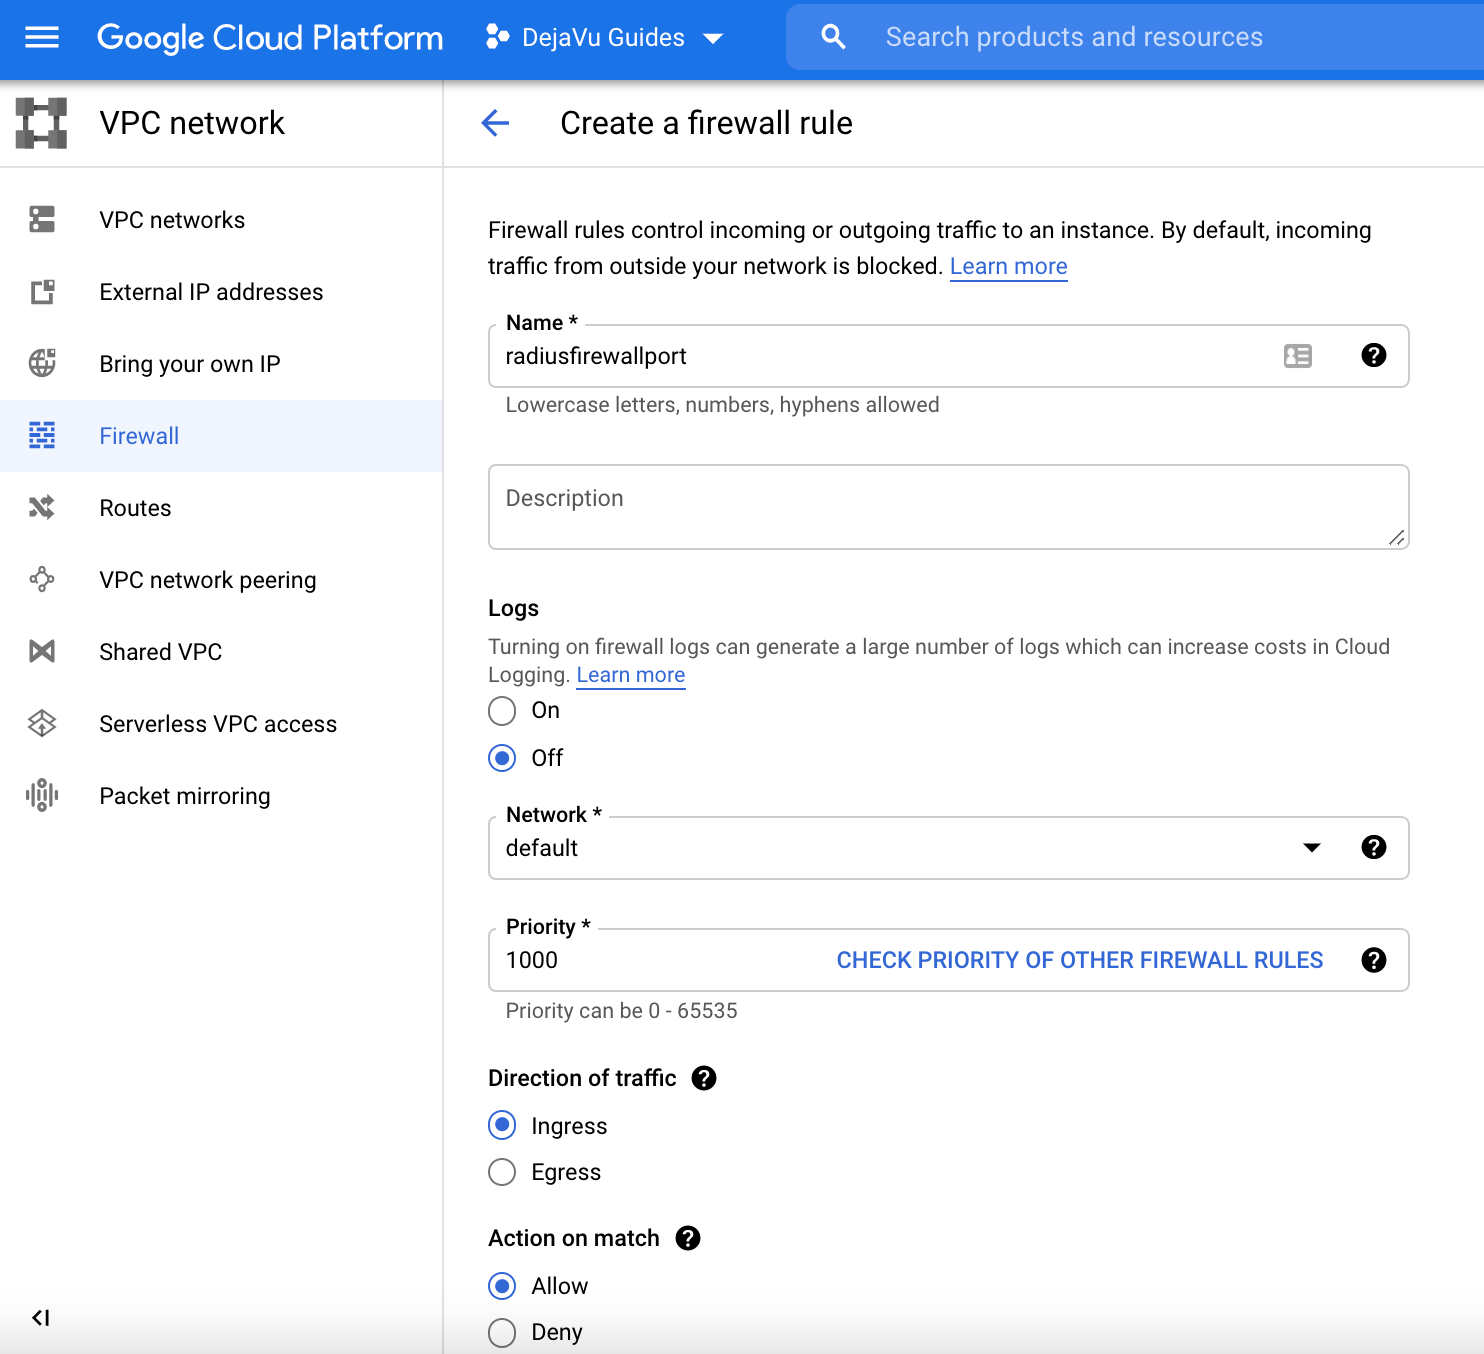
Go to Google Cloud Platform> VPC network> Firewall> Create Firewall Rule
Create a Firewall Rule with the following details and click Create when you are done.
- Name - radiusfirewallport (or any name you prefer)
- Direction of traffic - Ingress
- Action on match - Allow
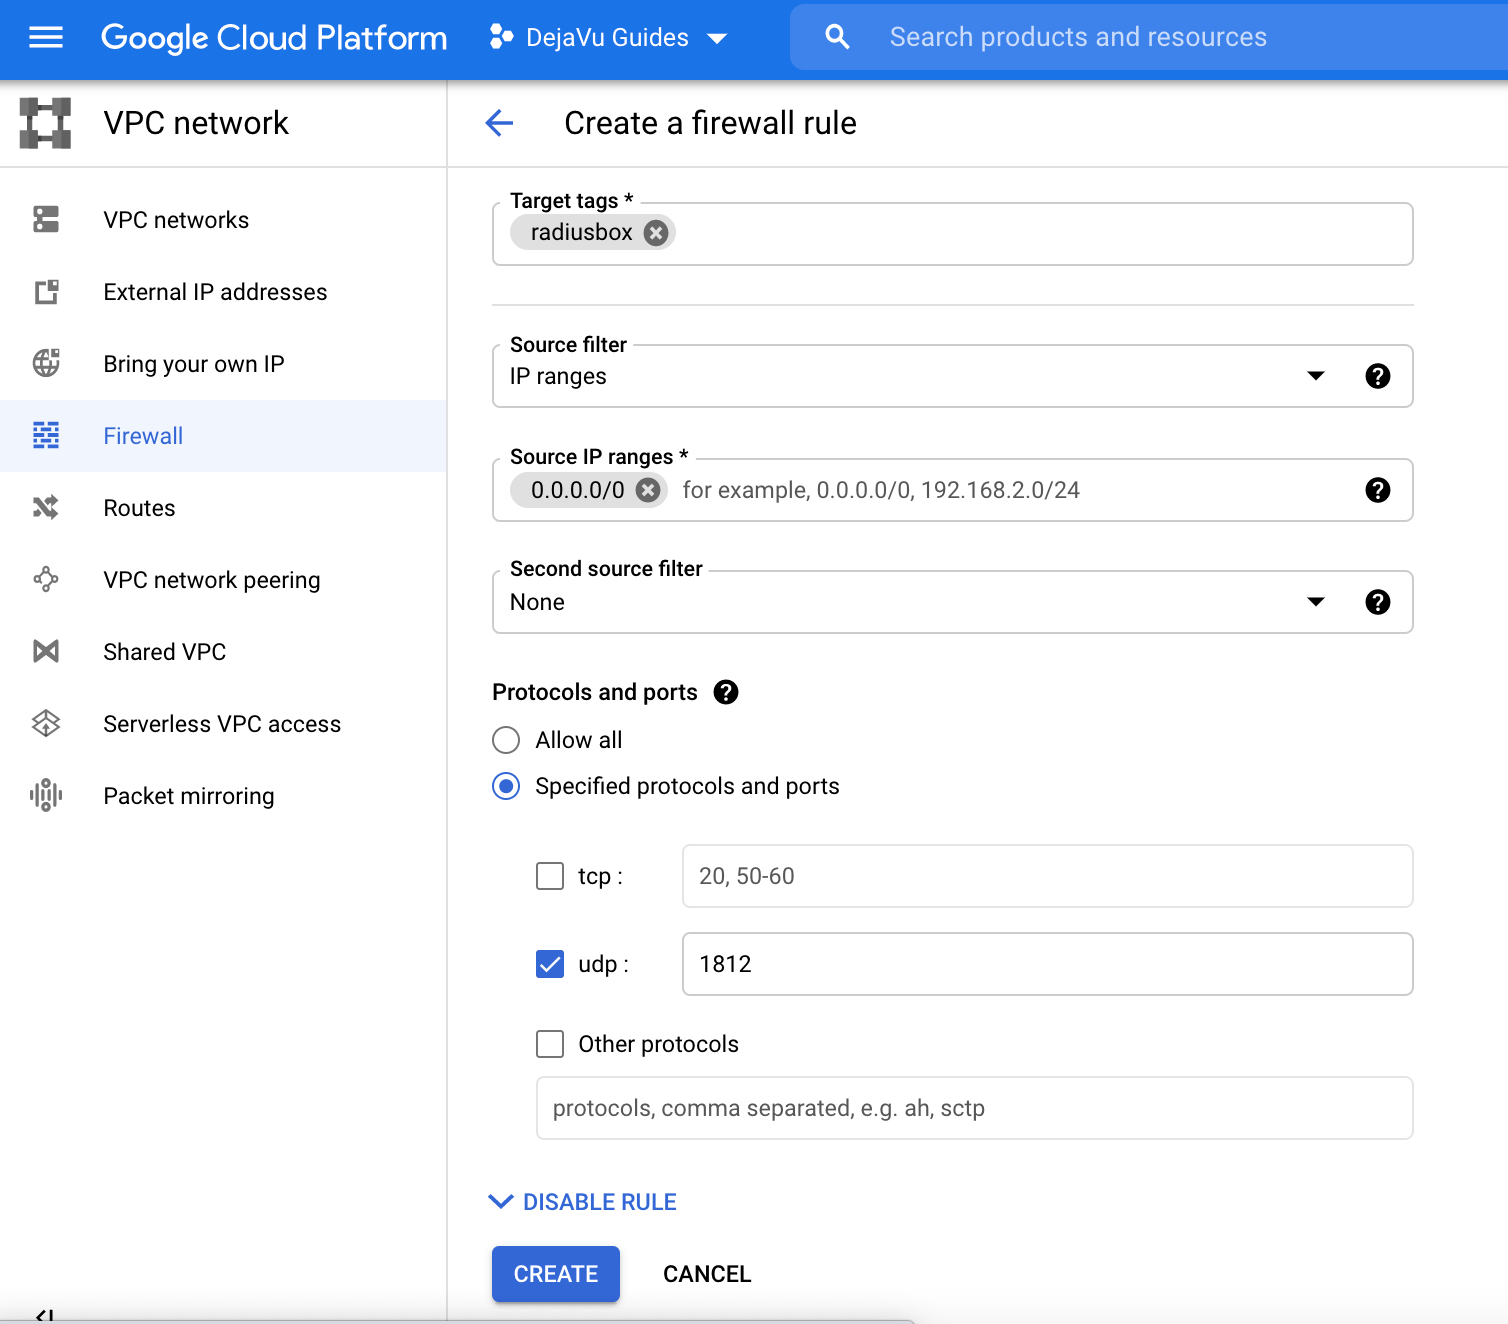
- Target tags (Optional) - I tagged my virtual machine I am using as "radiusbox", so I put "radiusbox" here.
- Source filter - IP ranges
- Source IP ranges - 0.0.0.0.0/0
- Protocols and ports - Select "Specified protocols and ports and tick "udp" and type in your RADIUS UDP port. I am using 1812 so I will put "1812".
It is useful to add a new client, which can be done by editing the clients.conf file.
cat /etc/raddb/clients.confvi /etc/raddb/clients.conf
We are using vim editor again to edit the users file.
Scroll down to the section with clients listed. Then we you are ready, type "i" when you want to make an edit, and add the following detail (with your own specific IP address details). You will need to change the IP address 192.1.1.1 (External IP address for your Google Cloud Platform or cloud provider ) as this will be the address of the RADIUS Client which will be sending Access-Request packets.
}client new {ipaddr = 192.1.1.1secret = testing123}
When you're done, press "esc" and type ":wq" and press the "return" button to write the changes.
Then once you have set that up, we need to close RADIUS on our server again and if possible open up two Terminal Windows. One for debugging, one for running the radtest login command like last time.
pkill radiusradiusd -X
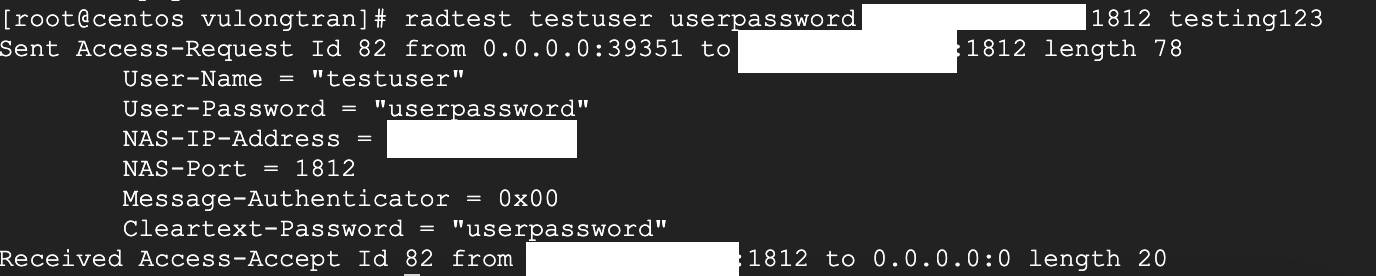
radtest testuser userpassword 192.1.1.1 1812 testing123
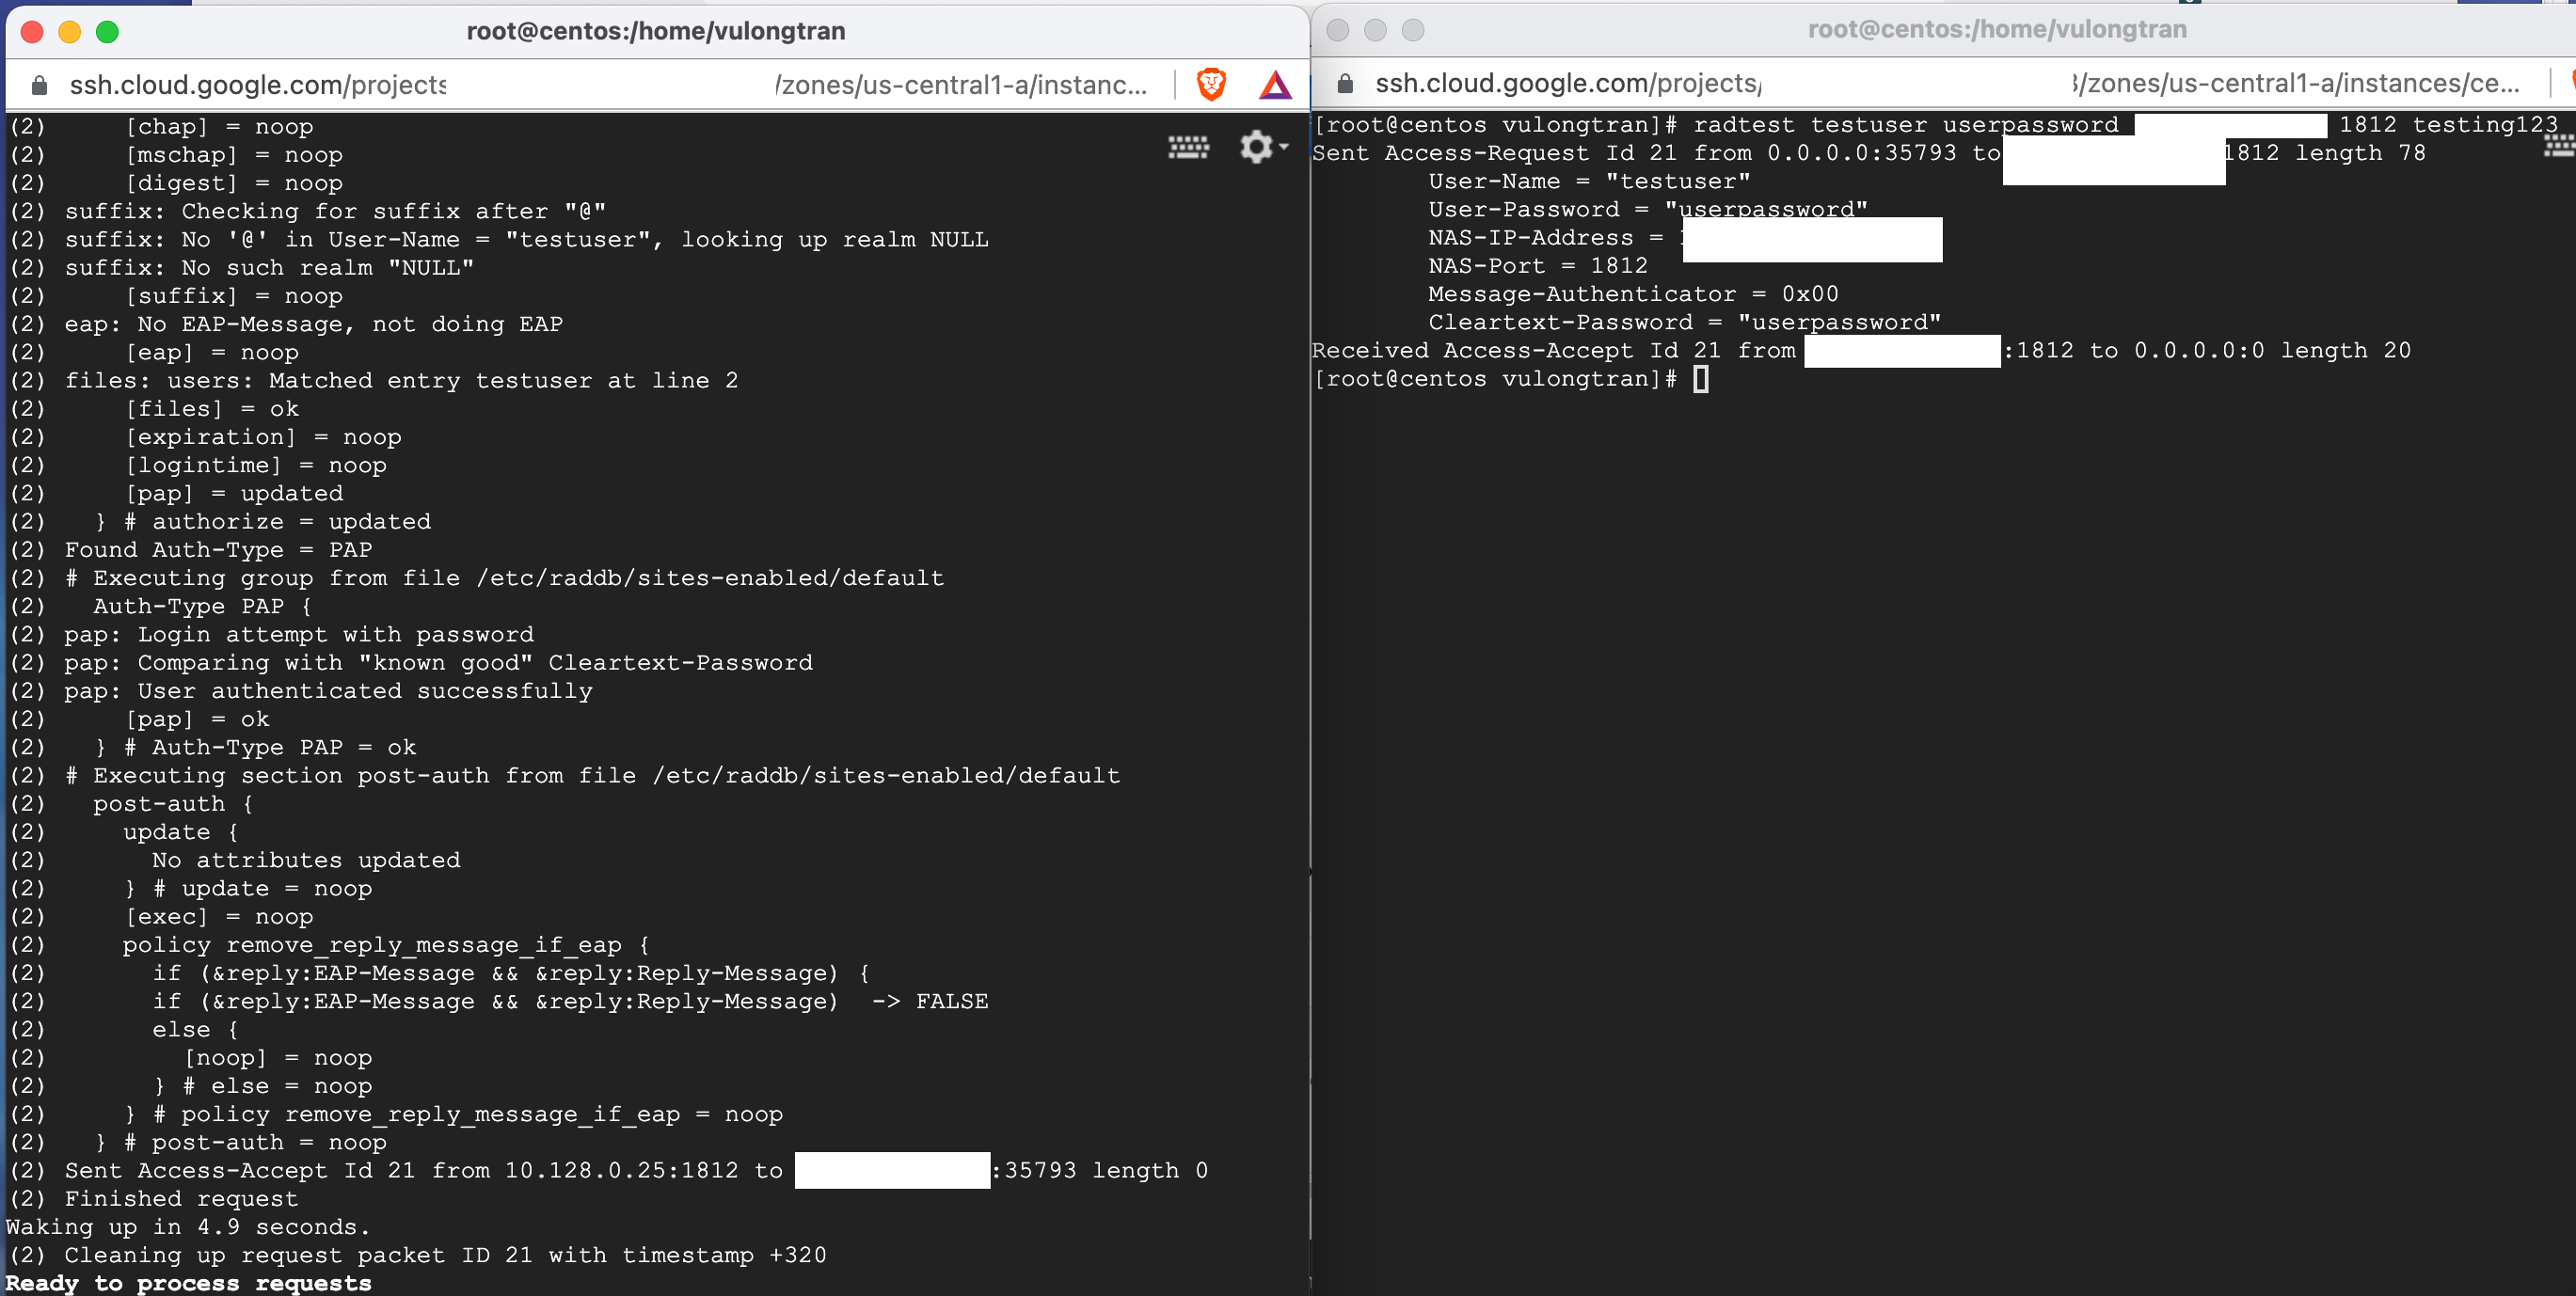
We should see "Access-Accept" in the server output if successful. Which we can see, hopefully you can see it too. If so, well done!
Example successfully test log in (with "Access-Accept Id" message) below.
You are all set now and have a solid foundation to work off.
Once you are satisfied with your RADIUS client/ server testing and ready to create a production configuration, you can look at doing some of the following (which is not exhaustive):
- Comment out or remove all the test users and clients
- Remove all the test certificates in /etc/raddb/certs and replace them with your own certificates
- Stop radiusd by running the "pkill radius" command.
- Manage the radiusd.service with systemctl, just as you would with any other service.
I would recommend FreeRADIUS's Howto Guides to work on further configurations and customisations to further leverage the potential from using RADIUS and FreeRADIUS.
FreeRADIUS Tips and Troubleshooting notes
When when up FreeRADIUS, I would recommend you can that you have:
- RADIUS Secret is aligned - RADIUS Client must use the same secret as configured in your clients.conf on your RADIUS Server (/etc/raddb/clients.conf).
- Firewall UDP port is open - Firewall UDP port is open for inbound (ingress) traffic on your RADIUS Server (in my case, UDP port 1812).
Troubleshooting error messages
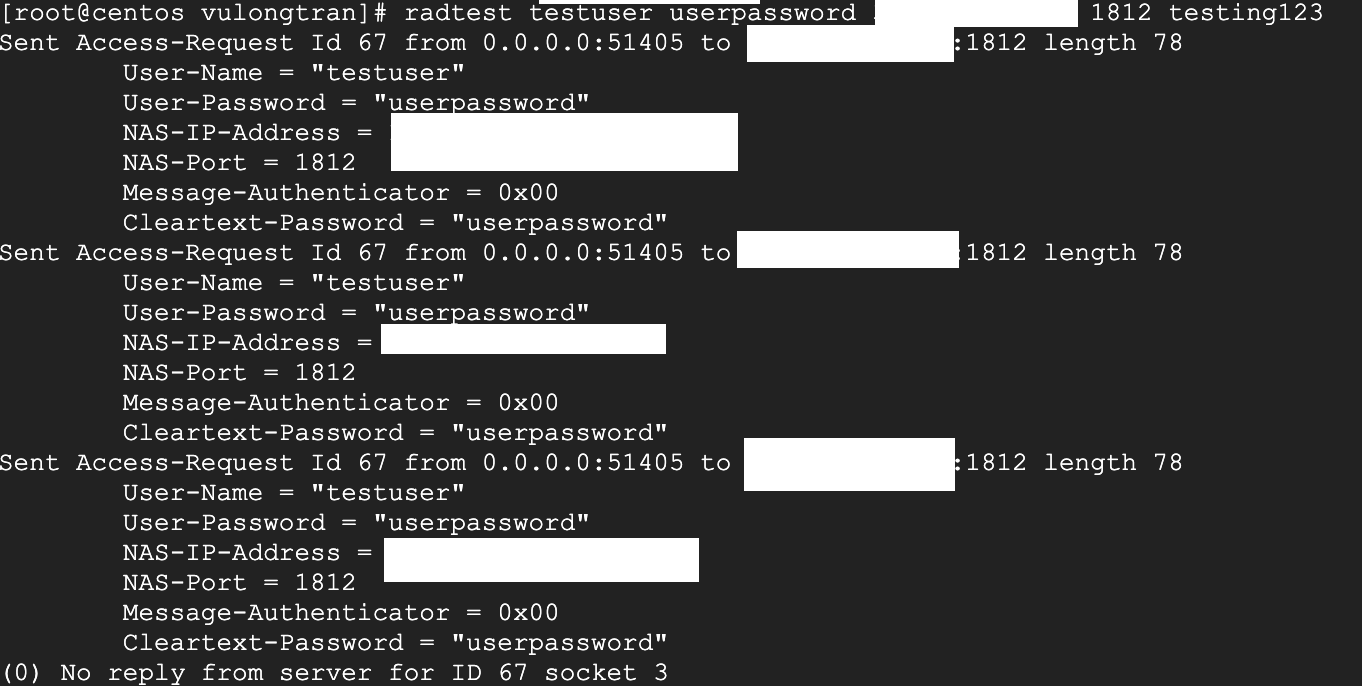
If you see the following error message, make sure you have have opened your defined RADIUS UDP port (in my case 1812) and that this firewall UDP port is open for inbound (ingress) traffic on your cloud provider
If you see the following error message, make sure you have closed the FreeRADIUS and then ran FreeRADIUS in debug mode.
Failed binding to auth address * port 1812 bound to server default: Address already in use /etc/raddb/sites-enabled/default[59]: Error binding to port for 0.0.0.0 port 1812
pkill radiusradiusd -X

FreeRADIUS Configuration reference (Centos):
- The default location of freeRADIUS configuration file in CentOS 7 is /etc/raddb.
- Clients config file on Centos:
cat /etc/raddb/clients.confvi /etc/raddb/clients.conf
Sample clients.conf config file with readme details inside - https://gist.github.com/vulongtran/f13bf6c2f8a746a136e9cd00aba30e76
Sample clients.conf config file with readme details inside -https://gist.github.com/vulongtran/da019d4d40122601a9cb054cdfb230fb - Users file
cat /etc/raddb/usersvi /etc/raddb/usersSample users file with comment details inside - https://gist.github.com/vulongtran/588a1a8030f004bc8818f77db40b0a31 - Note that in Debian-based systems, the server daemon is called freeradius instead of radiusd The configuration files are also located in /etc/freeradius/ instead of /etc/raddb/. We use radiusd and /etc/raddb/ in this guide. For Debian Ubuntu administrators you can translate this to yourr system.
- For example, the users file would be located in:
- On Centos:
/etc/raddb/users - On Debian Ubuntu:
/etc/freeradius/users
- On Centos:
- For example, the users file would be located in:


