In most cases, you would be looking to create subdomains to connect with HubSpot.
Why create Subdomains?
Subdomains are a subdivision of a domain and are essentially extensions of your current domain. We create subdomains as it allows us to create website domains that will be independent from your main website (which typically is www.yourcompany.com).
Common subdomains that you often see are blog.yourcompany.com. For example, Google uses this for their website.
https://news.google.com
https://support.google.com
At HubSpot, we use:
https://blog.hubspot.com
https://academy.hubspot.com
You can see more on how subdomains are connected in a diagram here.
How to create a Subdomain?
So how you create a subdomain is first thinking about how you'd like to define what you'd like as your subdomain name. There is no right or wrong answer to this, as it completely depends on what you'd like to use as a business to name it.
The main consideration is that you should often consider names that is most relevant to the subdomain's purpose. So for Google, "news" is their main purpose, so they defined their subdomain so that it is "news.google.com".
Here are common subdomains that are often used for the key areas of the tool are:
For Blogs:
blog. = https://blog.yourcompany.com
news. = https://news.yourcompany.com
articles. = https://articles.yourcompany.com
For Landing pages:
go. = https://go.yourcompany.com
info. = https://info.yourcompany.com
offers. = https://offers.yourcompany.com
pages. = https://pages.yourcompany.com
landing. = https://landing.yourcompany.com
For Emails (web hosted versions of your emails, commonly used for email newsletters that you want available online for full rendering of HTML and inline CSS):
go. = https://go.yourcompany.com
info. = https://info.yourcompany.com
email. = https://email.yourcompany.com
pages. = https://pages.yourcompany.com
Note - you will need to host your website on HubSpot to use your websites as your domain. This is a paid add on.
Once you know what subdomain name alias you'd like to use. Then you'd want to set this up and define them on HubSpot. Later, you'll also need to define it in your DNS (Domain name system) manager on your domain name registrar.
How do I connect my domains in HubSpot?
You'll need to go into the "Domain Manager", and this is where you will set this up.
Step 1 - Go to your "Domain Manager" in HubSpot
To go to your "Domain Manager". Click on Content > Content Settings > Domain Manager.
That is, Content Settings from the Content" menu (the last option on the screenshot below).
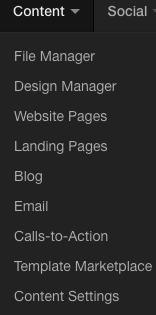 |
| Click on "Content Settings" |
Then click on "Domain Manager" from the second group of menus under the grey header "Content Optimisation Systems Tools".
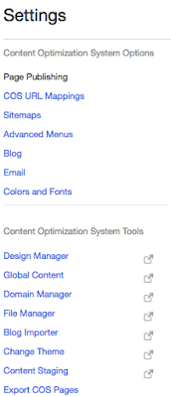 |
| Click on "Domain Manager" |
Step 2 - You will be on a page titled, "Manage Your Domains"
 |
| You should see this, as this is the "Domain Manager" |
Step 3 - Add in your subdomains into HubSpot
Click on "Connect another HubSpot COS domain"
Step 4 - Type in the subdomain you want to configure on HubSpot
Type in the subdomain you want to configure on HubSpot, then click "Connect domain" when you're ready.
In my example, I have created "info.dejavuguides.com". You will notice that I have marked the part of HubSpot that I want associated with "Landing Pages".
info. = https://info.dejavuguides.com
You can also choose to associate your "Blog", "Email", and "Website Pages"* with the same subdomain.
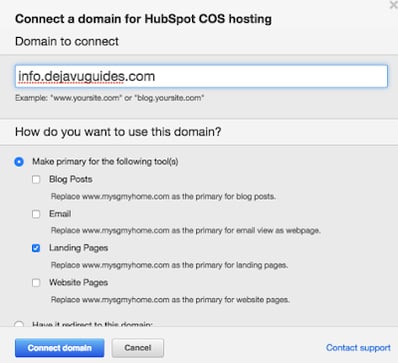 |
| info.dejavuguides.com for the subdomain |
Step 5 - Select "Make domain primary"
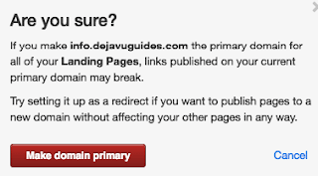 |
| Make domain primary |
Step 6 - You will then receive a CNAME address
Copy this CNAME address. You'll need this to configure some settings on your domain name registrar.
In my portal, this is:
1621557.group7.sites.hubspot.net
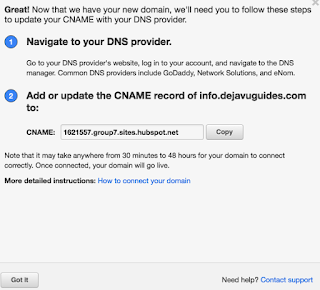 |
| Copy the CNAME record |
How to set up your subdomains on your domain name registrar
We need to add in a CNAME record into your domain name registrar. You may need to ask your webmaster or IT administrator if you don't have access to this.
My domain name registrar is
Hover.com. So I will show you what it looks like to configure this on Hover.com.
If you are using other domain name registrar providers such as GoDaddy, etc. you would want to look at the guides on this page of the HubSpot Academy. This is on the "
Going live instructions by registrar" guide on the HubSpot's Academy Knowledge base.
Step 7 - Go to your DNS Manager
This should be referred to as "DNS", "DNS Manager", "DNS Settings" or similar.
DNS stands for domain name system.
It's role is really as a directory service for the internet. Whereby, the DNS server maps domain names to IP Addresses. That way you have user friendly names such as HubSpot.com and Google.com as the names you only need to type in to visit their websites.
As this will redirect you to their IP Address (server address) so you can see the website. Saves us from having to reminder IP addresses such as 192.40.12.23, we just need to remember the name!
 |
| DNS user interface on Hover.com |
Step 8 - Add in CNAME record in your DNS
Add in the CNAME record to your DNS.
Under hostname you would want to put the subdomain you defined.
Record Type you would want to put CNAME.
Target Host you would put the CNAME record.
 |
| Add in the CNAME record |
 |
| This the row that is added to your DNS manager |
Step 9 - Confirm that this is up and running on HubSpot via the Domain Manager
You should see a green light next to the subdomain you have created in your Domain Manager.
 |
| Subdomain configured |
This is what you'll see info.dejavuguides.com before the DNS manager is configured
 |
| Subdomain NOT configured. No green light. |
|
Step 10 - It will be up and running now
It will be up and running now, such that when you create a new website page or blog post, it will be associated with your configured subdomains.
For my example, that means for:
- Landing Pages you will see: https://info.dejavuguides.com/landing-page-name
If I set one up for the Blog, Email or Websites it'll associate the subdomain and any blog, email or website page created will have a website URL that could look like the following:
- Blog you will see: https://blog.dejavuguides.com/blog-page-name
- Email (web versions) you will see: https://info.dejavuguides.com/email-web-version-page-name
- Website pages you will see: https://info.dejavuguides.com/website-page-name
Happy HubSpotting!


